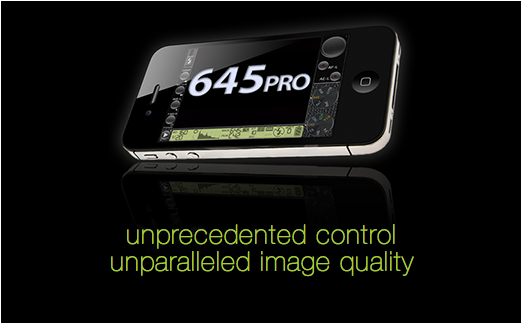
645 PRO – Tutorial – How To Use This Very Popular iPhone Photography App

645 PRO is a very popular iPhone photography app, despite only hitting the App Store in the past few weeks. Feedback from our iPhone photography community confirmed that despite its popularity, some users were slightly ‘confused’ by the technological layout.
We have written this tutorial as an introduction to using 645 PRO, to ensure you fully understand what the app is doing and you get the most out of it. Read this exclusive tutorial below.
If you haven’t yet picked up 645 PRO you can do so here. It retails for $2.99/£1.99/download.
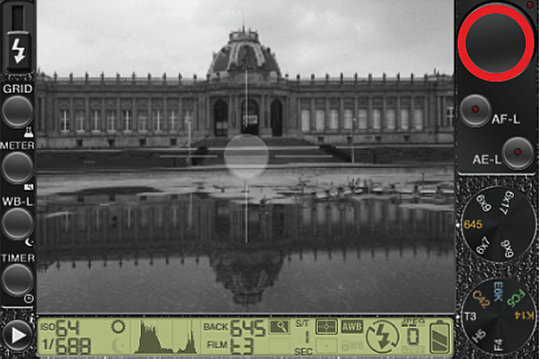
Because of the myriad buttons, dials and displays on the 645 Pro, I think the best way to explain the operations, functions and, ultimately, the ʻraison d’êtreʼ of this app is to go through each button and dial one-by-one, starting with the top left-hand corner. As subject matter, Iʼve chosen to photograph a rather nice museum building found in the suburbs of Brussels – more for demonstration purposes than artistic merit.
1. Flash
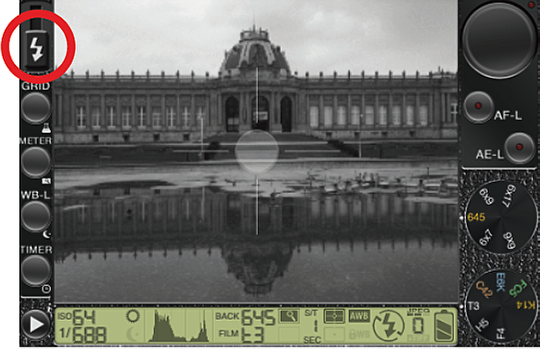
Easily spotted because of the icon and does what it says on the tin. If you’re still using a iPhone 3GS – like yours truly – this feature is redundant. It goes without saying, then, that the 645 PRO has been optimized for the iPhone 4S.
2. Grid / Focusing Screen

Like nearly all the buttons on the 645 PRO, this one has a dual purpose. Iʼll start with the simpler function of the two, which is to add a helpful compositional grid to frame your subject matter. Tap once and cycle through the three settings – crosshairs, rule-of- thirds and architectural (shown below).
The second function of this button allows selection of the final image quality of your photos. This is, arguably, the most important feature and 645 PRO’s claim to fame is the superior quality of image output in comparison to a default iPhone camera or any other photo app for that matter. Tap and hold down the grid button and you will notice that the JPEG icon on the bottom right of the LCD screen starts to change (see yellow circle).
You will also notice that there are 4 different settings – (Hi – Max JPEG each with or without a TIFF). The JPEG images are immediately accessible directly from your Camera Roll. If you select the option to save TIFFs to Camera Roll (from Settings.app) then they are completely accessible in iPhone. The saving time is slower, but you do get instant access. More on this later.
3. Metering
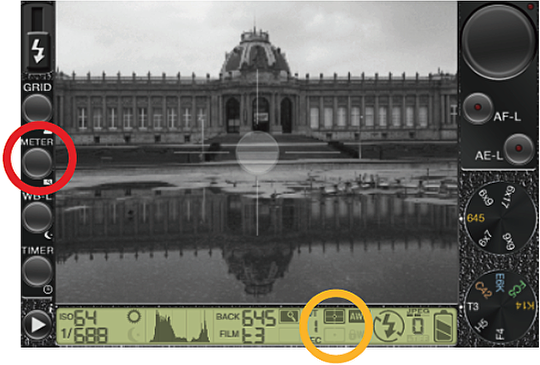
Again, this button has a dual function. Tap to toggle between spot or multi-zone metering (see yellow circle). For those of you who are unfamiliar with metering options, I would leave the setting as multi-zone. This averages out the light values
in the viewfinder and is ideal for most lighting situations. Spot metering is a good choice for back-lit subjects such as landscapes, still life, portraits, and certain night scenes as well. Nevertheless, it’s still a useful option even if the multi-zone option is sufficient for the majority of evenly lit subjects.
4. White Balance
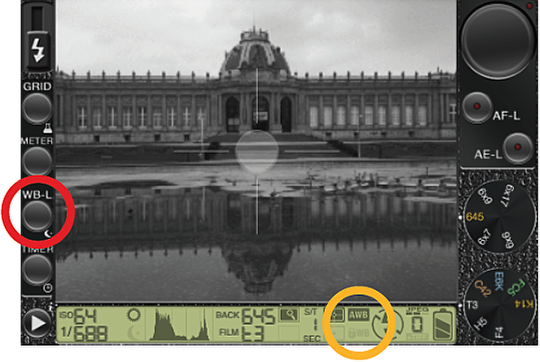
This feature is handy if you want your images to be largely unaffected as possible by color casts – in other words a pristine color balanced image. I would leave this in automatic as well and let the app do the correction work. But if you encounter lighting conditions that have conflicting color temperatures (e.g. natural and artificial light) then tap once to change mode to lock on to the light source you wish to favor. Make sure you point the camera at the light source before doing this.
5. Night Mode
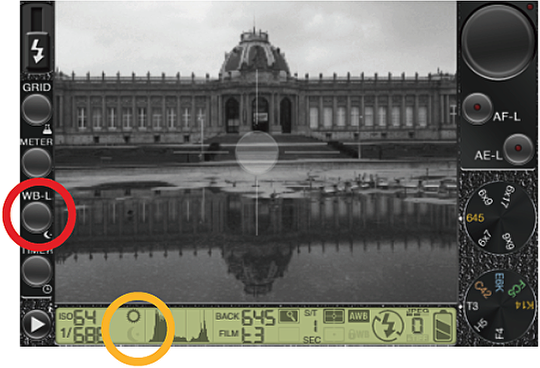
The other function of this button is to help you shoot in low light conditions (as the name suggest). To switch between the functions, press and hold, and you will see the icon switch in the LCD display from the sun to a crescent moon (see yellow circle).
I havenʼt tried this yet but the makers claim that you can drop the shutter to speed to as low as 1-second and raise the ISO (sensor sensitivity) to allow as much as 15 times more light to hit the image sensor as in a normal iPhone. Which means, you can shoot candle-lit dinners with friends, for instance. But this would be tricky without a tripod of some description or some means of steadying your phone, otherwise your pictures will be blurred.
If you have an iPhone 4S, you might want to use the flash option.
6. Self Timer
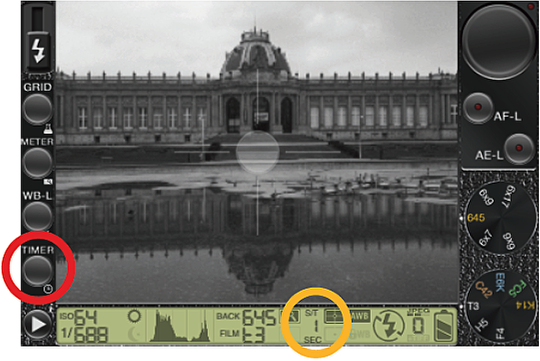
Youʼll be glad to know that this button does only one thing. One tap is all that’s needed to activate it (10 sec. delay is the default) but if you tap and hold to set the duration it will cycle through 1 to 99 seconds. Simply double tap to reset. A red light will appear over the shutter release button when the timer is activated.
6 View Playback
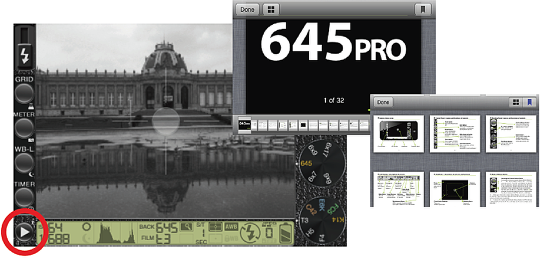
Back to a dual function button again. This time with a View/Share button. Tap once to view/share images from your Camera Roll. If you tap and hold this button you’ll be able to access a well-written and clear User Manual – it’s a handy option.
7. LCD Display – ISO/Shutter Speed
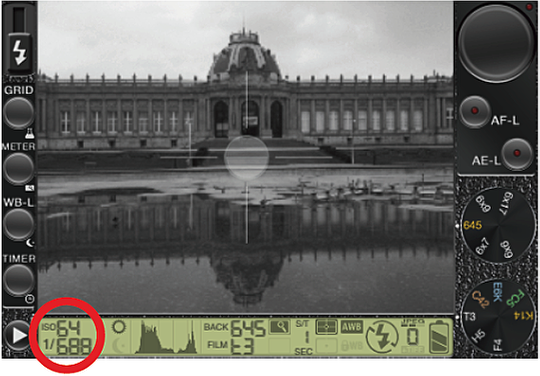
This app provides a real-time readout of the sensor sensitivity (displayed as ISO) and shutter speed selected. Both are fully automatic and you have no control over this (apart from the settings in Night Mode). However, if you know what’s happening with the exposure then you can compensate for potential problems by modifying your lighting or by altering the composition.
Like all digital cameras, the iPhone has a native ISO (ISO 64 for iPhone 4S, ISO 80 for iPhone 4) and provides extra “sensitivity” through amplification. Unfortunately, this adds “sensor noise” (which is, more correctly, distortion from the amplification stage). If you want noise-free images then you must keep an eye on the ISO, even if it at times it means altering the shot over the original. Meanwhile, knowing the shutter speed, by keeping it above 1/100 sec, can help to prevent blur from camera shake.
8. Histogram
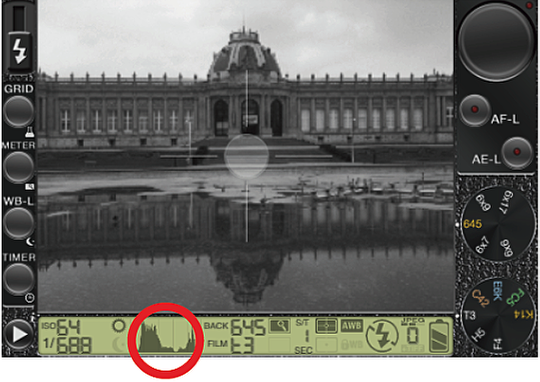
The histogram shows the range of tonal values in the scene and is very useful visual aid to judge the exposure when shooting with less than ideal lighting conditions. Too dark in the shadows and all the bars on gang up on the left side of the chart – too bright with the highlight detail blown out and youʼll find everything on the right hand-side.
The ideal (to get a balanced picture with less noise in the shadows and mid-tones) is to get all of the data distributed between the two end points. Two peaks like this, one of the left one on the right, is fine. Itʼs more complicated than that but you get the idea.
9. Image Settings

This is the LCD readout of the settings you have selected for “Film” and “Back”. In this particular instance, a black and white “film” and the 645 format “back”. Iʼll go into these in more detail when I talk about these buttons (selected in yellow) in the next section.
10. Film Mode Selector
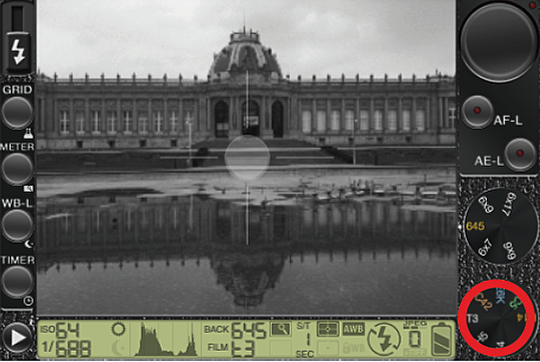
The developer claims seven different settings here – from delicate monochrome to rich color. Apart from the obvious
switch from B&W to color I find the differences quite subtile. If you are looking for a rich, saturated in-filters app – this isnʼt
it. However, sometimes subtlety is a good thing, especially in photography.
You need to be in ʻLive Previewʼ mode (the default setting anyway) to see the differences in the viewfinder. If you want you can bypass all the filters simply by double-tapping the button/dial highlighted above.That way you can shoot and save a hi-res image for color processing at a later date on an app of your choice.
11. Back Selector
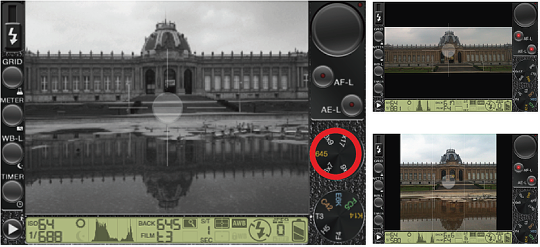
This might seem like one of the 645 PROʼs more superfluous functions – switching cropping ratios in real-time. Why not do it at the processing stage, in another app, when we have time to consider and reflect? But I like this function. Cropping can make or break a great picture. For example, choosing a 6×6 ratio makes you think about what kind of picture you want in advance. No bad thing. The art of consideration in photography is still that – an art. Choose between a square format all the way through to panoramic.
12. Auto Focus and Auto Exposure
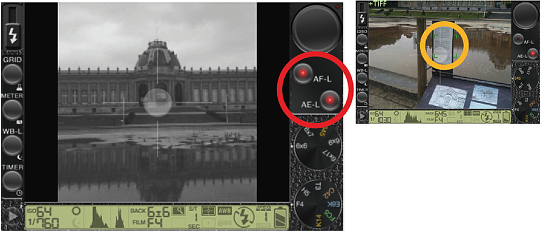
These two features are ubiquitous on all digital cameras these days. A less fancy version even exists on the default iPhone camera app – tap and hold to lock focus and exposure. But this is not well known and I suspect rarely used.
For challenging light and depth conditions these functions can be really handy – macro photography (with or without the Olloclip lens) jumps to mind. Point the camera at the area of interest – meter (spot or multi) and then lock the exposure and/or focus by tapping on the buttons. A red light will appear to confirm the relevant locking mode.
Another useful function is the user-selectable AF point or “Point-of-Interest” focus option. You can tap your finger anywhere on the screen and that becomes the area of focus. A green box appears (see yellow circle), which is independent of the default focus point in the center of the viewfinder. This is useful when your subject is not located in the centre of the frame, and it can be used in-conjunction with the AF-L (lock) option.
12. Shutter Release Button
Last but a long way from being the least important button is the shutter-release (highlighted above, top-left) It has some fancy interplay between with the AF/AE lock but would sound really geeky here. When youʼre happy with what you see in the viewfinder – simply click!
13. Accessing your ʻdeveloped RAWʼ images
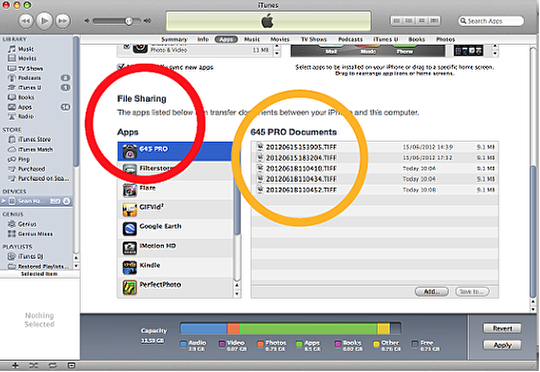
This is what the 645 PRO app is all about – developed RAW (actually large TIFF files. Unprocessed and up to 22.9MB (from a iPhone 4s). Thatʼs big and impressive for a mobile camera. You can access them from your Camera Roll (though they take up a lot of space if not deleted eventually) or via the iTunes utility. Simply Sync your iPhone then scroll down to File Sharing in the apps section – click on the 645 PRO icon (red circle) and the TIFFʼs appear on the right (yellow circle). From there you can move them to a folder on your Mac (or PC).

Please Support Us…
TheAppWhisperer has always had a dual mission: to promote the most talented mobile artists of the day and to support ambitious, inquisitive viewers the world over.
As the years passTheAppWhisperer has gained readers and viewers and found new venues for that exchange. All this work thrives with the support of our community.
Please consider making a donation to TheAppWhisperer as this New Year commences because your support helps protect our independence and it means we can keep delivering the promotion of mobile artists that’s open for everyone around the world.
Every contribution, however big or small, is so valuable for our future.
Sean Hayes
Sean is a Freelance Advertising Art Director by profession, and you can find out more about that here at www.wix.com/shonski/sean-hayes. Sean started shooting images with an iPhone in 2009 and began to submit work on a regular basis to sites such as www.iphoneart.com, www.eyeem.com and pixelsatanexhibition.com in 2010. Sean’s iPhone photography work has been exhibited in Los Angeles, Miami and Naples, Italy.
15 Comments
Egmont van Dyck
All I can say is ‘thank you very, very much’ for this introduction to 645 PRO program capabilities in which I totally believe will alter iPhones future.
Egmont
Robert Lancaster
Thanks for this article/tutorial.
I have had 645 for a while now but ave found the task of using it rather daunting … until now.
kathy
wow, thanks Joann, this helps alot… but of course like you i have a 3g… for now:))
David
Great tutorial, Sean! This is a fantastic app that you’ve made easier to use!!
Mike
This is my one and only app now and has been since its debut. The difference in quality of the jpegs from this app and the standard camera app help a lot when app stacking and saving a photo multiple times. Great overview.
Anders
thanks for this great tutorial, since the last update there are also a couple of filters, just slide the finger over the screen 🙂
Photogenix
Thanks for this. Great read. One thing I found useful is using the meter lock on a different light source so that I could get a higher shutter speed than the subject I was shooting would allow. The image came out dark of course but I was able to capture a water droplet with it in quite decent detail and the lighting was sorted in post processing.
Sean Hayes
Really glad to know that you all found the tutorial helpful. I find myself using the 645 PRO as a default photo app ever since I wrote this piece. I learnt a lot about it’s very capable features myself in the process. Very powerful app. I didn’t know about the “filters” Anders – thanks for that added info.
Peter Wilson
Great App and your guide is particularly useful. Thank you.
She Escobar
Thanks for the tutorial!
Marc Simons
Thanks for the tutorial! It seems like a complicated app. I had no idea how to use it before reading this.
Pingback:
Pingback:
Hetta
Thanks Sean, your tutorial is great, saved lots of time trying to figure it all out by myself.
Ed Okie
Is a user-manual update available that covers the iPhone 13 ProMax? The illustrated user-guide is for an older iphone, far different than the layout as viewed on the ProMax13