Mobile Photography – Tip Of The Day – Number 29
Welcome to another brand new section from your favourite mobile photography website and one of the most popular in the world. Today, we’re publishing our 29th Mobile Photography/Art Tip Of The Day to our brand new section of the site.
Every day we will publish a short quick tip to help you with your mobile photography, this may be related to editing your image, capturing your image, printing your image, all manner of things, across the complete photographic and art mobile genre – we’ll be featuring great mobile street photography tips, great blending tips, great cloning tips, we will cover it all from some of the greatest mobile photographers and artists in the world.
We’ll also have a widget in our right hand column, displaying the Tip of The Day every day, just click on that and you will be taken to our tip of the Day archive.
We are delighted to publish our twenty ninth Tip Of The Day today with an excellent one by AlyZen Moonshadow. We have featured AlyZen Moonshadow many times on theappwhisperer, she’s a very creative mobile photographer and artist and we’re delighted to publish this outstanding tip of hers today, don’t miss this… over to you AlyZen (foreword by Joanne Carter).
‘What I’d like to talk about today is my personal exploration into the field of printing A3 size images onto tissue paper. I have tried various methods of digital transfer printing with abysmal results. I have Bonny Lhotka’s book “Digital Alchemy” which is a beautiful book packed with with glorious examples of inspiring images; I borrowed from my library Bonny’s second book “The Last Layer“, which explains even more printing and transfer methods. However, I must confess I found it difficult to follow Bonny as she talks about using a Super Sauce and DASS products which are impossible to get over here in Australia (without spending hundreds of dollars, that is). Acting on Bonny’s advice, I got some Purell hand sanitizer (one of the cheaper options suggested by her) and tried digital transfer printing using that, but all I got was a muddy, jellified mess (and very clean hands!). Bonny talks about inkjet vs laser printers, and inks vs dyes, and after a few pages of that my eyes glazed over. I’m sure if you follow her advice and instructions carefully, and if you are lucky enough to have the type of printers she has, and access to all the “ingredients” required, following Bonny’s methods will give you the same great results she consistently gets, and may catapult your art into the same high realm as her. For more info about Bonny Lhotka’s prioneering work on printing and digital transfer techniques, click on this link: http://www.lhotka.com/bonny/Home.html
For me, however, it proved to be too complicated, so I moved on to developing my own low-tech printing methods.
I wanted to print bigger than the standard A4 household printer size. After some online research, I settled for the Epson Artisan 1430 printer, which prints up to A3. Please note, this is just a printer, with no fax, scan or copying functions. The inks used are Light Cyan, Cyan, Light Magenta, Magenta, Yellow and Black. My first foray into printing was onto canvas paper, which I wasn’t particularly enamoured of, as it tended to suck the inks in and the images looked too flat and matte. Ditto printing onto canvas fabric. I had some fabric samples lying around (hoarder that I am), so I decided to gesso over some and print directly onto that. The problem with that was, the prints tended to smudge, and getting the fabric to feed through the printer smoothly was a nightmare.
My local K-Mart was selling A3 canvasses at 2 for $5, which was a great bargain, so I snagged myself 10 of those. My problem then was how to get my images onto the canvasses. after trying different methods I was just about to give up when I decided to give printing onto tissue paper one last try. I had a bundle of paper left over from our last move, the sort used for wrapping glasses and fragile items. So I cut one to A3 and taped it to a carrier sheet, which was simply an A3 piece of canvas paper. The print came out beautifully, but then I hit another snag…because the tissue had been taped to the carrier sheet, I had to then cut out the parts where the tape had been, hence the end result was smaller than A3, and left a border to be filled in somehow.
Repositionable glue sticks to the rescue. I found that if I drew some horizontal and vertical lines of glue onto the carrier sheet, then placed the tissue paper over that, I could not only print easily onto the tissue, I was also able to remove it from the carrier sheet afterwards. Needless to say, I was pleased with the results, as the tissue paper not only took the inks beautifully, I could then Mod Podge it to my A3 canvas really easily afterwards. And, the little creases and folds that resulted from sticking the tissue paper to the A3 canvas only added to the illusion that it was a piece of painted art and not a photographic image.
And then I ran out of tissue paper. And printer ink. The Epson Artisan 1430 inks were easily obtainable, however proved to be expensive – to replace all 6 cartridges cost me AUD$140 :-(. The tissue paper however, proved to be yet another nightmare. I never knew there were so many different grades or types of tissue paper available – archival, craft, museum, etc! I got some samples from a removals company, but they tore upon peeling off the carrier sheet. I got a packet of craft tissue paper from K-Mart, but not only did it also tear, it jammed up the printer. A packet that I got from eBay was equally bad, no, worse, as the paper itself was grey and had holes in it and was therefore useless. Yes, there were tears (in the paper), tears (down my face) and temper tantrums.
And then I found the Holy Grail of tissue papers. Quite simply, I had run out of baking parchment while baking a cake, so I nipped out to the supermarket and bought a roll of baking paper. Which turned out to be the exact width for A3, and all I had to do was gluestick the carrier sheet, roll out the baking paper onto it, and cut off the end. Et voila! Beautifully printed images, which peeled off with no tearing whatsoever, and a joy to use.
Oh, and a postscript: after 2 expensive ink refills of the Epson Artisan 1430, I decided to try out the CISS (Continuous Ink Supply System). I got mine from good old eBay, for AUD$140 plus $10 postage. It was simple enough to install (hubby did it hehe), and there’s about 10 times as much ink in the bottles as in a normal cartridge, plus it’s refillable, which makes it an attractive option indeed. So I should be okay for ink now, til next year at least! Anyone looking for a cheaper alternative to ink cartridges should look into CISS. These are the guys I got mine from http://www.rihac.com.au
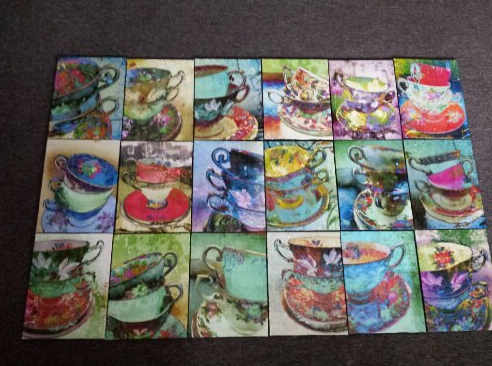
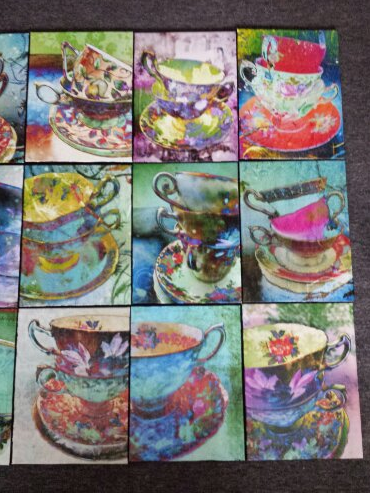
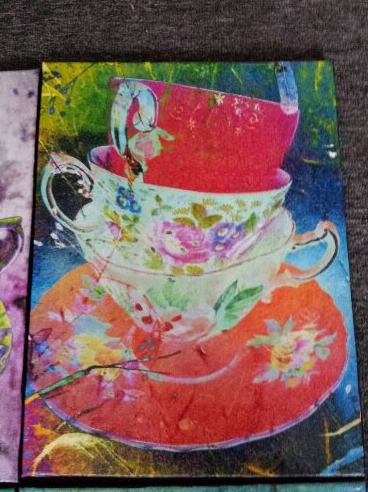
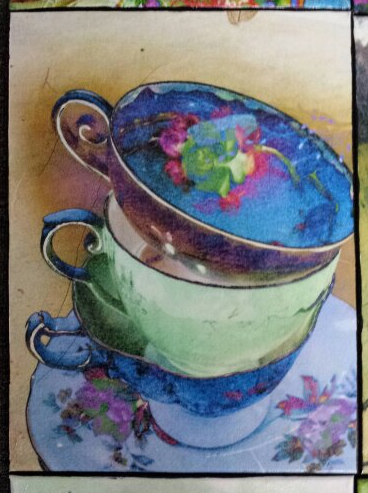
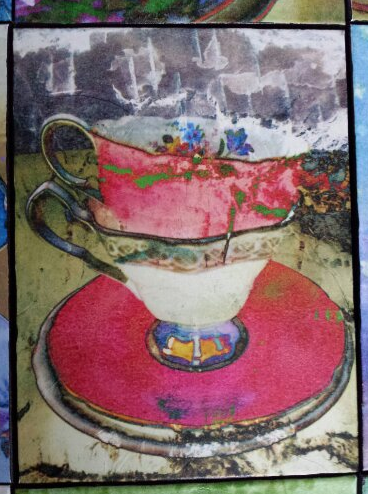
I was working on my Madhatter’s Teaparty Series then, and to date have completed over 20 A3 canvas pieces, with a view towards getting 50 in total. Here are some of the canvasses, so you can see what the end results look like (after sealing, varnishing).
AlyZen Moonshadow
I'm an iPhoneographer/iPhone Artist/mobile photography artist based in Perth, Western Australia. I love taking images of the mundane, trivial and pedestrian, and turning them into something extraordinary and special. My website is http://alyzenmoonshadow.wix.com/alyzenmoonshadow. I am also on Flickr at http://www.flickr.com/photos/alyzenmoonshadow. I have my work up on several online sites such as: Redbubble at http://www.redbubble.com Zazzle at http://www.zazzle.com FineArtAmerica at http://www.fineartamerica.com deviantArt at http://alyzenmoonshadow.deviantart.com Society6 at http://www.society6.com/alyzenmoonshadow and ArtOfWhere at http://www.artofwhere.com/alyzenmoonshadow. When not engaged in making mobile photography art and design, I also like to set my images to accompany original music, by creating YouTube videos using iMovie on the iPhone 4/iPad/Macbook Pro. To date, I have created several YouTube videos for the electronic musician ElectroCelt (who also happens to be my husband), you can find them under my publishing name or channel "electroceltess10" on YouTube. My first outside collaboration with another musician, Brian Vassallo, set my images to his electronic music track entitled "I Am Always In Your Heart". I am also a Classically trained musician currently working on composing music on my Yamaha Tenori-On. You can follow my work and my words on my blog http://www.alyzenmoonshadow.com

11 Comments
MaryJane Sarvis
Wonderful results here Alyzen! I’d love to see these in person. You used the perfect images for your found technique. I have read about baking paper-parchment as a great tool for a few processes. I hope you get to show these in some galleries soon, very beautiful!
AlyZen Moonshadow
Hi MaryJane Sarvis, many thanks for the compliment. I have had more good results with the baking paper parchment technique than any other technique, so it’ll be my preferred method. Other methods I tried (transfer film, iron transfers, gel, etc were epic failures lol.
Judy Tillson
Alyzen, thanks for sharing your technique. These are beautiful, creative images.
AlyZen Moonshadow
Thank you Judy, glad you like them :-). I still have over a hundred of my teacup images waiting to be processed, but other projects seem to have taken over, hehe. Maybe when things quieten down I may have more time to work on a few more images and print them onto my A3 paper.
Jennifer Sharpe
Thanks for sharing this! It is good to see another aspect of the process being discussed – i.e. making your photos tangible by your own hand.
AlyZen Moonshadow
Yes, Jennifer, but if money were no object I’d get a wide-format professional printer so I can print really big images, like 4×5 feet to hang behind a living room sofa as a conversation point! Still haven’t struck the lottery though…!
Barry Kidd
Alyzen:
First off this is just cool! Though I have been a photographer for many years I was never convinced till recently that mobile photography was even worth my time. Though it’s by no means my primary way of capturing images I have come to use it for projects from time to time when the need or simply the desire strike me.
Now this printing in tissue, That’s a whole e thing and frankly something I have never heard of or even seen before. I really like the results and I am certain that I’m going to give it a try tomorrow. I mean why not! Look at the results you have gotten!
Sadly I have a tendency to blotch creative projects myself but with your guidance perhaps the pitfalls I will surly suffer will be short lived.
I’ll come back tomorrow or the next day with a report back. If it sucked I’ll let you know. If I get amazing results like you have I will surely tell you.
Hoping for good things to happen on my end and thank you for sharing with us,
Barry
AlyZen Moonshadow
Hi Barry, I’m glad I’ve inspired you to try your hand at printing with this method. My Epson Artisan 1430 can be a pig to get the paper to come out straight, sometimes it works first time, other times I get a couple of scrunched up pieces before it behaves itself arrghh! Just make sure you draw a few lines of repositionable glue on your carrier sheet then smooth your baking paper over, make sure it’s the matte side you print on, cos if it’s the glossy side your ink may slip. Once it’s out and dry, which only takes a minute or so, use a workable fixative spray to seal the surface of your print before you attempt to do anything else to it. Otherwise the inks may not be stayfast. After I finish my pieces I always spray them with gloss varnish, first spraying on one layer, then letting it dry, then another layer, letting it dry, another layer and so on…building up a few coats. If you’re into collage or altered art, use the in-between varnish coats to embed your added elements, then seal again. Good luck! Do show us how your efforts turn out, Barry!
Barry Kidd
It seems that I need to go on a shopping spree later tonight. I’d planned to do it earlier today but sadly I got a little lazy. The wife is out of town on business this week. Because of that I’m doing all the silly things husbands do when they are bored an in man cave mode. Surfing the web, cooking chicken parmesan at 3:00 AM and other fun things along those lines.
Since I didn’t work today I ended up sleeping in and now I’m behind the power curve in my must do list. Either way I’m going to head out and get some of the stuff that I need once all that is done and see just what kind of mess I can make of my own printer / office.
Still waiting to inform you of my success or disaster. 🙂
Barry
Carlos
Thanks for sharing Alyzen!
It is quite a process that you worked out. What apps did you use the process of teacups? How permanent is the ink’s on the paper?
The work is very lovely. I would love to see some pictures of your set up with your printer and you at work. Ask your hubby if he would take some pictures of that. Thanks a lot for sharing again. Look forward to seeing more of your work. Cheers from Texas.
Sara McCracken
thanks.. great tutorial and so nice of you to point out all the ways something seemingly simple can go wrong!