Photo Education – Accessible Photography through Switch Access in iOS 7
We are delighted to publish the second tutorial to our brand new section within theappwhisperer – Photo Education & Accessibility. There are many photographers and artists with special needs, whether this relates to visual issues even bordering on blindness (yes it’s true), to deafness (not many people know this, but I personally endure severe hearing loss) to many other challenges people have. These include mental health issues, physical issues and more. We want to ensure that whatever your difficulty you can still enjoy photography and art, it’s so therapeutic.
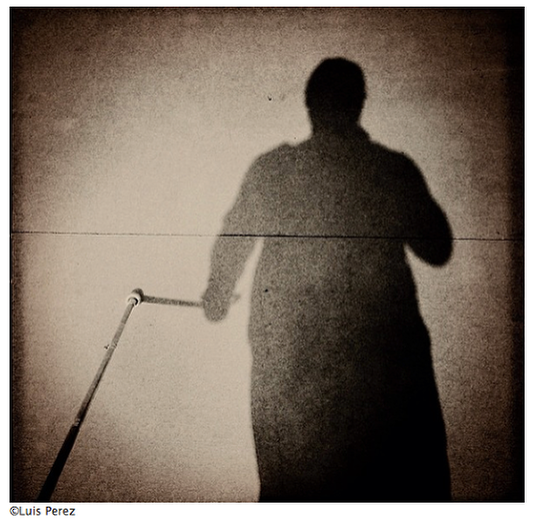
We welcomed Luis Perez to theappwhisperer family as our Photo Education Editor last month. We recently interview Luis in our Day in the Life series, if you missed that, please go here. Luis is an Apple Distinguished Educator whose work focuses on accessibility and inclusive design. He received his doctorate in special education from the University of South Florida in 2013 and is the author of Mobile Learning for All from Corwin Press. His work has appeared in THE Journal, The Loop Magazine, and the New York Times Bits Blog.
Luis is also partially sighted and ironically he turned to photography as a result of his vision loss, we hope you find this section as invaluable as we do. Over to you Luis (foreword by Joanne Carter).
"In my previous tutorial for The App Whisperer, I focused on how the iPhone, with its built-in VoiceOver screen reader, provides photographers who are blind or who have low vision with the same opportunity for creative expression as everyone else. In this tutorial, I am going to focus on Switch Control, a new accessibility feature introduced in iOS 7 that provides the same level of access as VoiceOver, but in this case for photographers who have motor or cognitive difficulties rather than visual ones.
In order to understand how Switch Control works, it is first essential to have a basic understanding of switch access. Switch access provides alternatives for those who are not able to interact with a computer using the mouse or keyboard. In its most basic form, a switch access setup consists of a button the user can press when the desired item is selected by a moving cursor on the screen. All that is required for this to work is for the person using the switch access device to be capable of some kind of voluntary movement, be it a press with one finger or a tap with the head or arm. Switches can be mounted in a number of configurations, including on the headrest of a powered wheelchair where the user can tap the switch with his or her head. For those with very limited or no motor capability, sip and puff or eye gaze solutions also exist. With sip and puff switches, blowing into a special mouth tube activates the switch, and with eye gaze, a blink of the eye performs the same function. However, these two types of switches are not currently supported on iOS devices, so I will not discuss them at length in this tutorial.
On iOS devices, switch interfaces provide an alternative means of access for those who are unable to perform the many gestures used to interact with a touch screen device, including tapping on buttons, swiping to scroll a web page or switch screens and more. The switch device is not plugged in directly to the iOS device, but instead relies on a switch interface that translates the switch presses into commands the iOS software can understand.
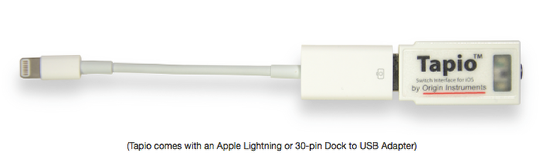
Two types of switch interfaces for use with Switch Control are currently available: those that plug directly into the device using the Lightning port at the bottom of the device, and those that use a Bluetooth wireless connection. An example of the former is the Tapio switch interface from Origin Instruments (http://www.orin.com/access/tapio/).
For the latter, a number of options are available:
Blue 2 switch interface from AbleNet
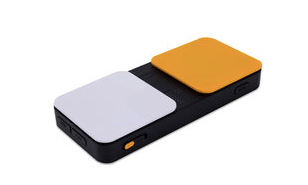
the Blue 2 from AbleNet (http://www.ablenetinc.com/Assistive-Technology/Switches/Blue2-Bluetooth-Switch) is a visually appealing and lightweight switch interface that already has two switches built-in, with the ability to connect two more.
J-Pad switch interface with joystick for iPad
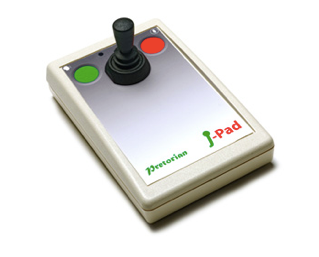
The APPlicator and Swtich2Scan interfaces from Pretorian Technologies (http://www.pretorianuk.com/ipad-access-devices) provide a number of options for connecting up to four switches to an iOS device. The company also makes a J-Pad interface that includes a joystick for controlling the Switch Control cursor, along with two touch-sensitive buttons and inputs for two additional switches.
Tecla Shield DOS switch interface from Komodo OpenLab
The Tecla Shield DOS from Komodo OpenLab (http://komodoopenlab.com/tecla/) also provides compatibility with the driving controls on many powered wheelchairs, along with inputs for two switches.
(Full disclosure: I have received review units from the companies mentioned for my own testing).
Even if you don’t have one of these external switch interfaces, you can still explore Switch Control on your iOS device. Switch Control also allows you to use the screen or the camera as a switch. With the screen as a switch, you tap on it when the cursor is over the desired item to perform an action such as selecting that item, while with the camera you turn your head to the left or the right to perform the desired action. For an overview of Switch Control on iOS 7, I recommend viewing this brief video above. For accessibility, the video is closed captioned for those who need the captions.
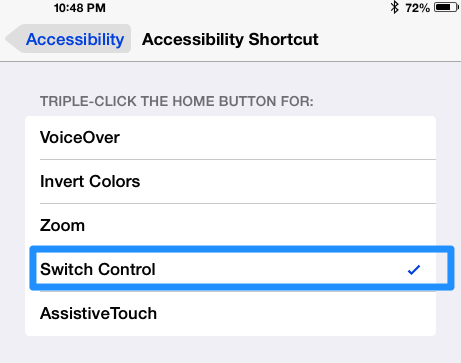
Now that you have a general understanding of how Switch Control works in iOS 7 after watching the video, let’s take a look at how you can use the screen as a switch to make a quick photo. Before we get started, let’s make sure you have the Accessibility Shortcut set up with Switch Control as the only option that is enabled. This will allow you to triple-click the Home button to quickly stop Switch Control and return the iPad to its typical mode of operation if you get stuck while using this new feature.
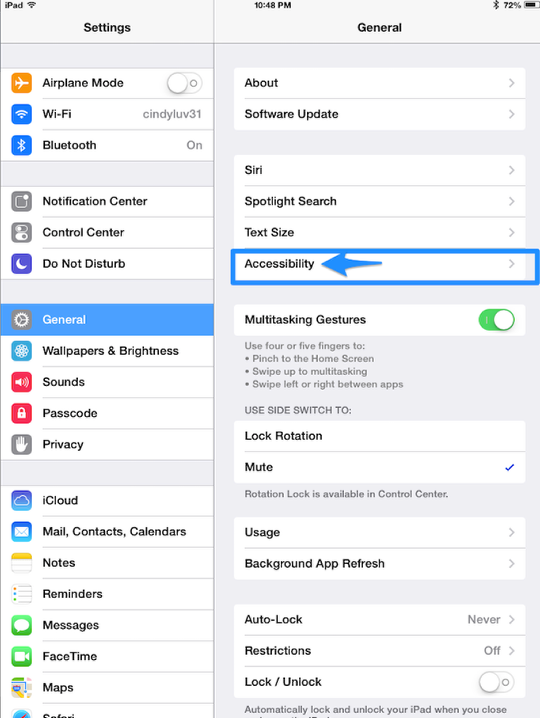
To set up the Accessibility Shortcut to enable and disable Switch Control, first go to Settings > General > Accessibility.
Next, select Accessibility Shortcut, and make sure Switch Control is the only option with a check mark next to its name.
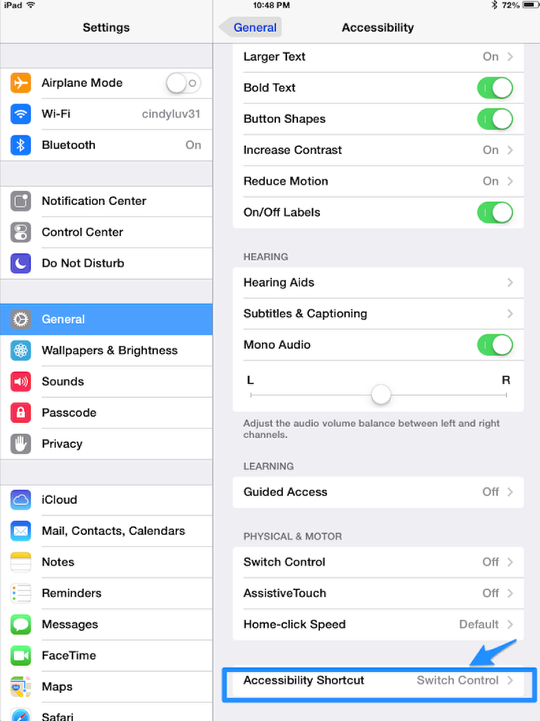
You may also need to disable Guided Access (a feature for enabling single app mode on iOS devices). To do this, go to Settings > General > Accessibility > Guided Access (under Learning) and make sure Guided Access is turned off. If you do not disable Guided Access, you may be presented with a popover menu when you triple-click the Home button. However, if you are already having difficulty with Switch Control, you may not be able to use it to select an option from this menu.
With the Accessibility Shortcut set up, exit the Settings and launch the Camera app, then triple-click the Home button to enable Switch Control. You will then see the Switch Control cursor move around the screen.
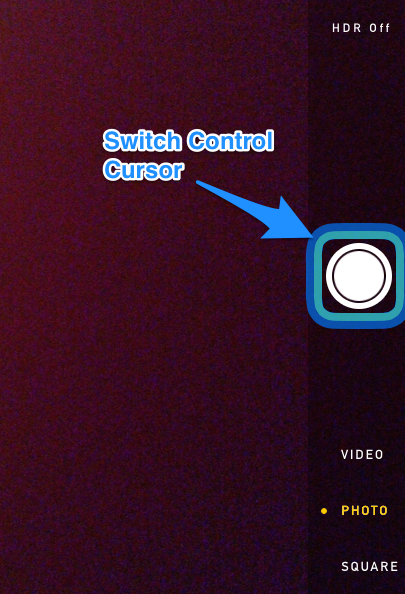
When the cursor is over the Take Picture button, go ahead and tap anywhere on the screen. Congratulations, you just used Switch Control to make a photo. To view your photo, disable Switch Control by triple-clicking the Home button, then go to into the Photo and Video viewer and confirm that your photo has been saved to the Camera Roll.
To get a better sense of the capabilities of Switch Control, you should view this video created by Christopher Hills, a switch user based in Australia who is also an accomplished gamer and video editor.. Starting at around 4:15, Christopher discusses a special mode included with Switch Control known as Point Mode. With Point Mode, Christopher is able to select any point on the screen to perform actions such as tapping to focus the camera or tapping and holding to lock focus.
With Switch Control, people who have conditions such as cerebral palsy or who have suffered injuries that limit their motor functioning can now have access to photography as a tool for creative self-expression. The ability to use photography to tell our own stories, from our own point of view, is an important aspect of feeling empowered as people with disabilities. Christopher is a great example of what is possible when people with disabilities are provided with the supports they need to express themselves creatively.
Luis Perez
Luis is our Photo Education Editor he is also an Apple Distinguished Educator whose work focuses on accessibility and inclusive design. He received his doctorate in special education from the University of South Florida in 2013 and is the author of Mobile Learning for All from Corwin Press. His work has appeared in THE Journal, The Loop Magazine, and the New York Times Bits Blog. You can learn more about Luis’s work in educational technology by visiting his website at www.luisperezonline.com. To see more of Luis’s photography, visit his Instagram page at www.instagram.com/lfp1211.


2 Comments
Carlos
Hola Luis…mil gracias!
Carlos…desde Austin Texas
Luis Perez
Gracias a ti Carlos. Aprendi mucho contigo durante el ADE Photo Walk en Austin.