iPhone Photography Tutorial – By Carlein Van Der Beek aka ©arlein
Our new mobile photography tutorial section is in full swing and we’ve received much acclaim from the mobile photography community, thanks to all. If you’ve missed our previous tutorials you can read them here.
This is my first tutorial for theappwhisperer and is quite brief but will show you how I created my very popular image ‘ambiguity’.
Take a look below and if it inspires you to want to create something similar, we have included links to the various apps used at the end of this feature.
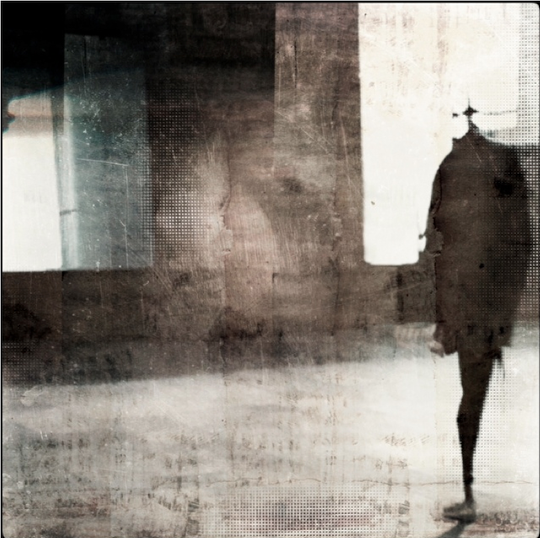
Final Image "ambiguity"
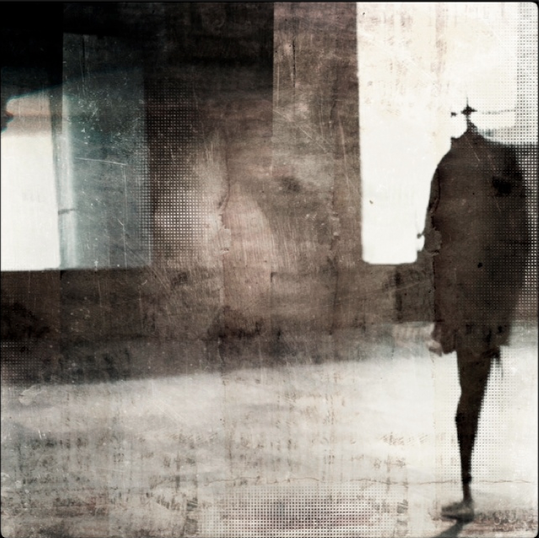
This is my final image, the one I am going to show you how to create.
Original Image
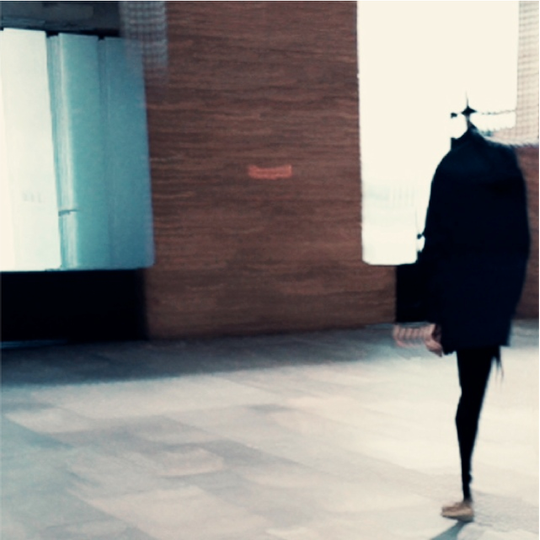
This is my original shot, I took this with the Slow Shutter Cam app. I saved the image and opened it in Squaready and then cropped the image. I then saved it and opened it in Pixlromatic in order to ‘spice’ up the colors. I saved the image.
Step 2

Next, I opened the image in Superimpose and added a self-made texture to the photo.
Step 3
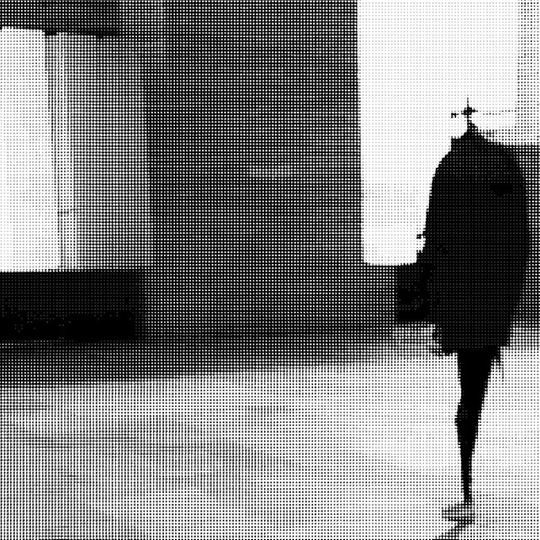
Having saved the image in Superimpose, next I opened the image in Halftone and created a second version of it.
Step 4
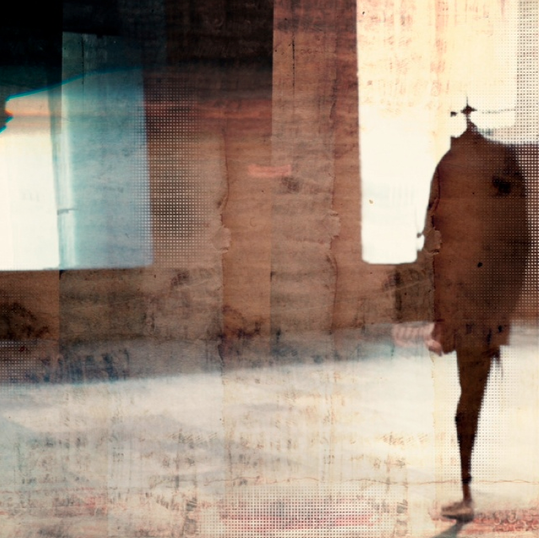
I then opened Filterstorm and blended in part of the Halftone version within it.
Step 5
I reopened the image in Pixlromatic and desaturated the colors and added fine black frame. Then my image, "ambiguity" was ready.
Apps With Links Used In The Article…
Carlein
Carlein started with iPhone photography 2 years ago. Her iPhone work really got noticed in 2011 and has been featured on some sites and blogs, and she has been featured in interviews as well. Carlein first exhibited some work in galleries in Santa Ana, Berkeley, and LA. The big break came when she was invited to participate in Eyephoneography #2 in Madrid May 2011. Ten of her pieces where shown in Madrid with 3 other iPhone photographers (Jordi V. Pou, Matt Burrows and Stefano Giogli). The event got a lot of press coverage in El Mundo, El Pais, Playboy, and on television. That was was followed by the Atlanta Celebrates Photography Festival, an exhibit with Eric De Fino, Richard Koci Hernandez, Dan Cristea, Sion Fullana, Anton Kawasaki, Keith Weaver and Giacomo Por. For the festival, our work was printed on aluminum. Concurrent to that festival, Mobile eyephoneography was launched. This involves the work of Eyephoneography #1 and #2 traveling around Spain with stops in eight major cities (Barcelona, Madrid, Bilbao, Sevilla to name a few).
21 Comments
Susan Carroll-Seger
Lovely work & I like the overall effect. I would really love to have an app that is only textures and lots of them. Also it would be nice to have controls for opacity,contrast and blending. Am I only dreaming?
carlein
thank you Susan!! I have gathered over 400 textures in the course of time and have them in a folder on my iphone. All kind of textures: faded paint, text, rust, tiles etc. and i use those in Superimpose. in Superimpose there are different controls for filters and opacity. In Filterstorm i do the blending.
David
Great image!! This is one “recipe” I’m going to have to try out myself!! Thanks for sharing this with us!!
carlein
thank you David!! happy you find it useful!!
Danny
Great image and process! What was your setting for slowshutter to capture the image?
carlein
Danny, i always have it on lighttrail and for the rest i change the settings according to the light…
Danny
Great image and process! What setting did you use for slowshutter?
Christian
Awesome tutorial, definitely one of my favorites. Now one question about the original image that was shot on slowshutter cam app. How did you turn that person into a solid black “deformed” figure?
Thanks!
carlein
thank you Christian, glad you enjoy it!! first of all, this person was wearing dark clothes, so that helps as well. with slow shutter cam best works dark, contrasty or bright colours.
if the subject doesn’t move, you can always move your iPhone to get that distortion, it only needs a little “twist” to get a lot of result.
and furthermore, play with the settings so you know after a while what setting works best. enjoy!!
Andy (Molzography)
Great and helpful tutorial, I really have to use slowshutter more often!
carlein
thank you so much for your comment, Andy! and i am sure you will enjoy SlowShutterCam!
Robert Lancaster
Great tutorial!
I really like the blended halftone image.
You have given me some great ideas. 🙂
carlein
Hey Robert, really happy to hear this little tutorial inspired you!!
Lee Thatcher
A really great tutorial Carlein. Thank you for sharing your process.
carlein
thank you Lee! Glad you like it!!
carolnicola
Hi Carlein,
Thx so much for this awesome tutorial… I know I am late to the party but I’m trying to figure out which slow shutter app you use. The Slow Shutter Camera app on the app store seems to not be working very well according to 2012 comments, crashing etc.
Which slow shutter cam app do you use?
Gracias muchas! Carol
carlein
Hi Carol, thank you so much! Glad you like the tutorial.
I use Slow Shutter Cam (Cogitap Software) and haven’t had any problems with it. I am using an iPhone 4S, running on iOS7.
carolnicola
Thank you so much! I will give it a try… Carol
carolnicola
Carlein…
One more question please, what is the largest size print that you get from your images? I would like to get a print about 24 in. x 30 in., but I don’t think that is possible with the pixel dimensions with my iPad… and especially the apps?
It seems like all the apps have various pixel dimensions and I guess that ultimately controls the size of prints? Do you work with apps that have the largest pixel dimensions, or do you just work with apps you like and settle for 12 x 19″ prints?
Thank you very much in advance. I am a sculptor and a painter… and my paintings are quite large… I know I won’t get prints that big, but I’d like to get medium sized I guess.
I read where some people choose a density of 200-240 dpi when printing and that that is okay.
Any thoughts would be very much appreciated.
Carol
carlein
Hi Carol,
(My background is painting (abstract, mixed media) and photography 🙂 )
I have had prints made at 30 x 30 inch on watercolour paper for a show in LA, from work made on my iPhone 4S. These were resized by the printer, though.
I have no technical knowledge whatsoever 🙂 as my work doesn’t need crystal clear printing like needed with street- or portrait photography.
Best is to ask a printer what is needed and what would work best at what format. I bet you can find lots of info on that by googling as well.
carolnicola
Hi Carlein,
Thanks so much for this info. I had asked another person on a forum and they said to ask my printer.
I live in Mexico so not so sure my local printer will know, but it is possible.
And yes, I had googled it pretty extensively but got some ambiguous contradictory answers re dpi and resolutions for larger prints… so that’s why I thought I would ask a professional!
Actually your answer helps a lot, cus maybe I won’t worry too much!
I do want some larger canvas or paper prints…. so guess I will talk to the local printer here in San Miguel de Allende.
Gracias…. and really love your work. Thanks for the tutorial and mostly for your inspiring work!
carol