
iPhone Photography Tutorial – How To ReCreate Veevs ‘Feed Us’ Pastel Styled Image
Hopefully you will recall our ‘A Day In The Life Of Veevs’ article that we recently published, if not, you can read it here. We were so impressed with Veevs images and we know so many of our readers were too, that it has inspired us to launch another new section on theappwhisperer.com. This new section will contain iPhone photography tutorials, to help our readers learn how to create stunning images too, from all the incredible styles of iPhone photography.
With help from Veevs we have retraced the steps she took to create the wonderful image below, entitled ‘Feed Us’. The original image was taken with an iPhone 4S and the editing was completed on an iPad. Read this easy to follow tutorial and see if you can too create a similarly stunning shot too.
The Final Image
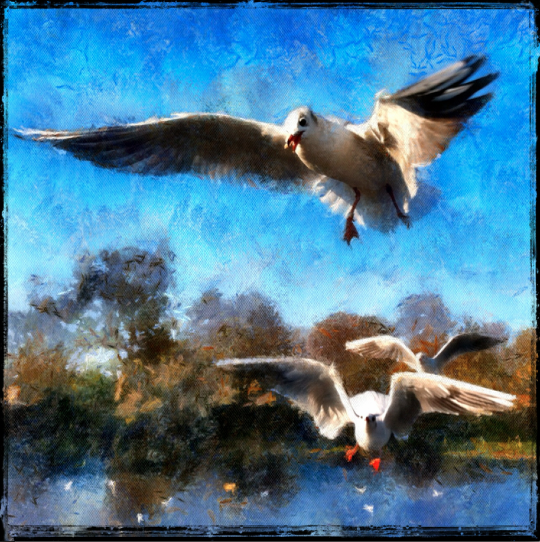
The image above is the final image, the one that we are going to show you how to recreate.
The Original
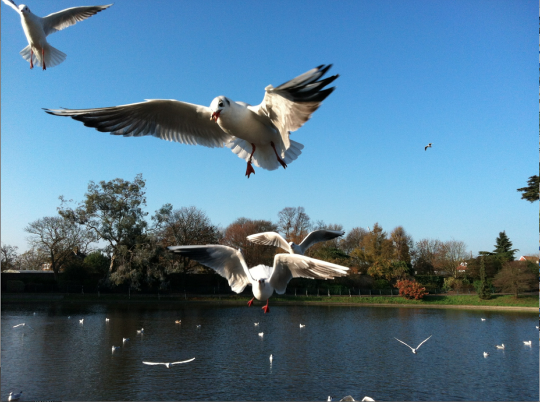
This is the original unedited initial image. Veevs wanted to draw attention to the bigger seagulls and therefore needed to crop the image. To do this she opened the image in the CropSuey HD app and cropped the shot, she then saved the image and reopened it in the TouchRetouch app in order to clone the corner seagull out.
Croping The Shot
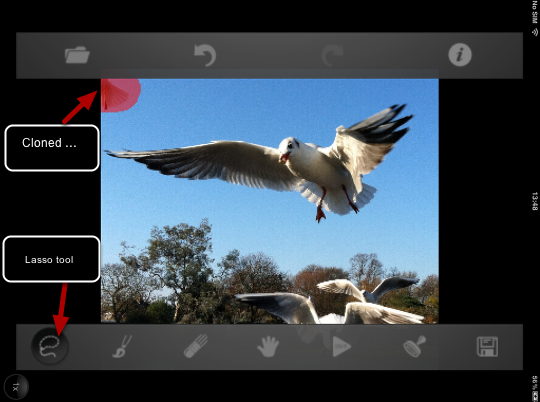
In order to clone the seagull out as mentioned above, with the TouchRetouch app opened, Veevs selected the lasso tool and drew around the seagull, you can see the cloned out area in red above.
Cloning
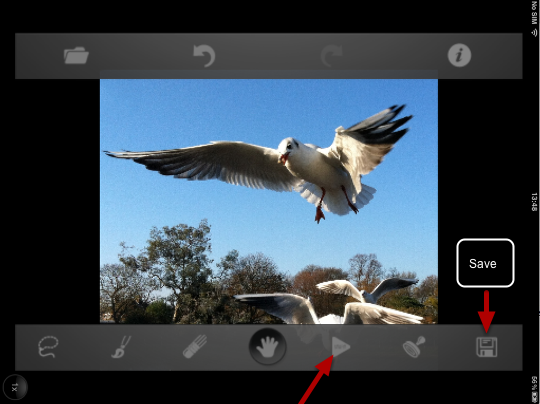
The next step was to click on the sign above in order for the cloning operation to commence. The image was saved and named as Image A and selecting the disc icon above.
AutoPainter
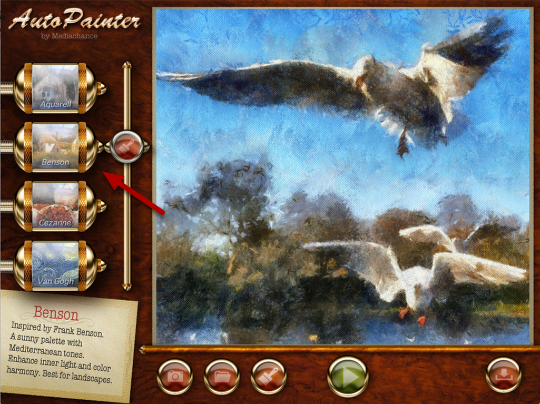
Veevs then opened the image in the AutoPainter app, and selected the Benson filter. She then saved the image as Image B.
Iris Photo Suite
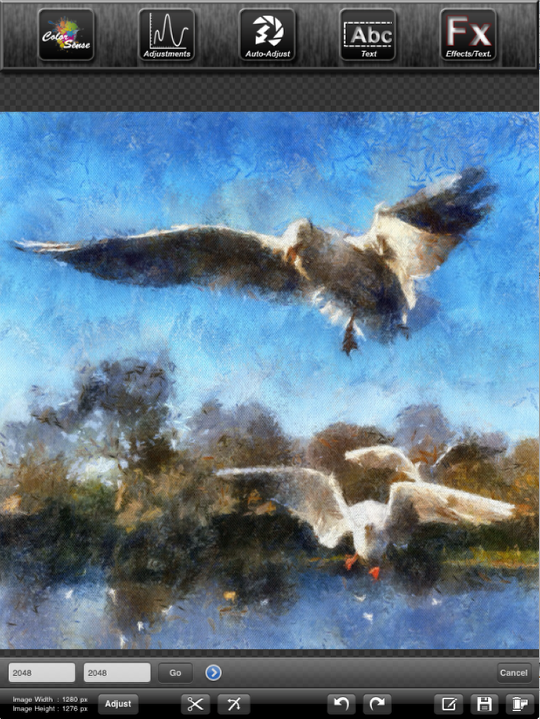
Veevs wanted the image to be square in diameter and also wanted to increase the size. In order to do this she opened Image B in Iris Photo Suite. She adjusted the width and height to 2048 and selected ‘No’ when prompted with ‘should the target height and width be set so as to maintain the original Aspect Ratio’, she then clicked Go to accept.
Brighten Up
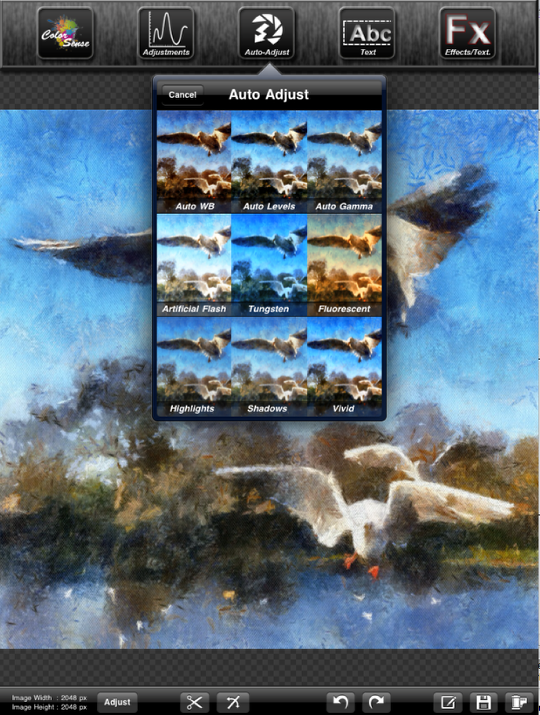
Veevs then wanted to brighten up the image, so whilst still in Iris Photo Suite, she selected Auto Adjust and the Vivid filter.
Layers
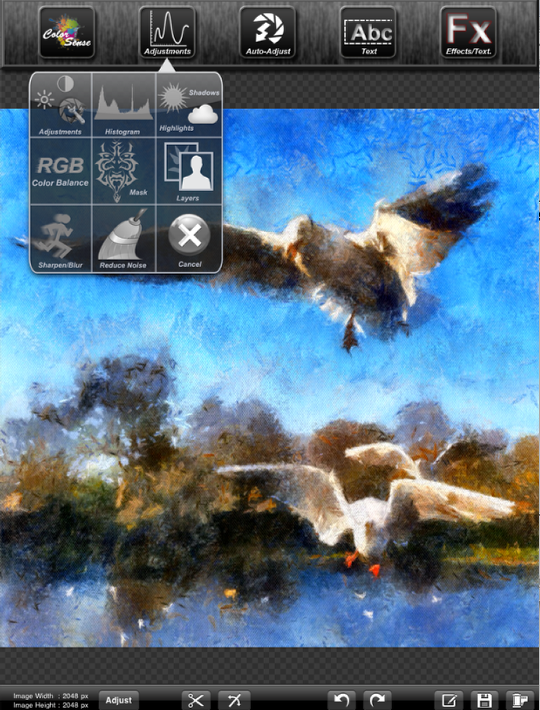
Next, she selected Adjustments, then Layers and Set Layer as Base and then clicked on Ok.
Open A New Image
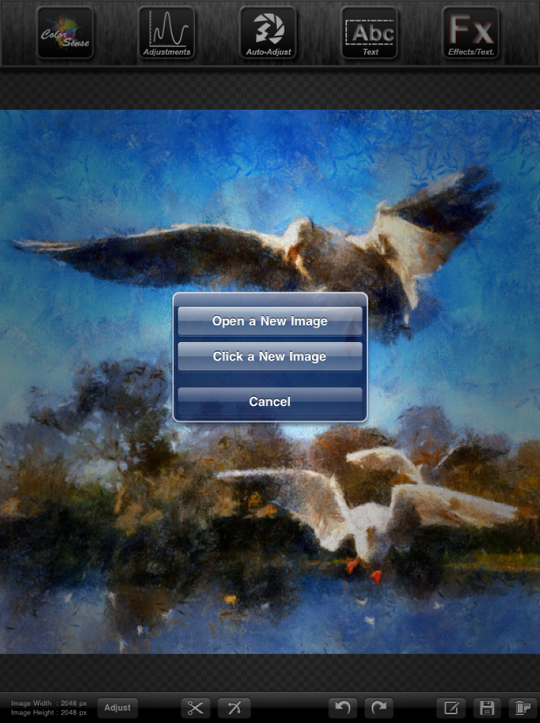
Next she selected ‘Open A New Image’ and opened Image A, then repeated the same steps as Image B to adjust the image and run Vivid Filter.
Layers
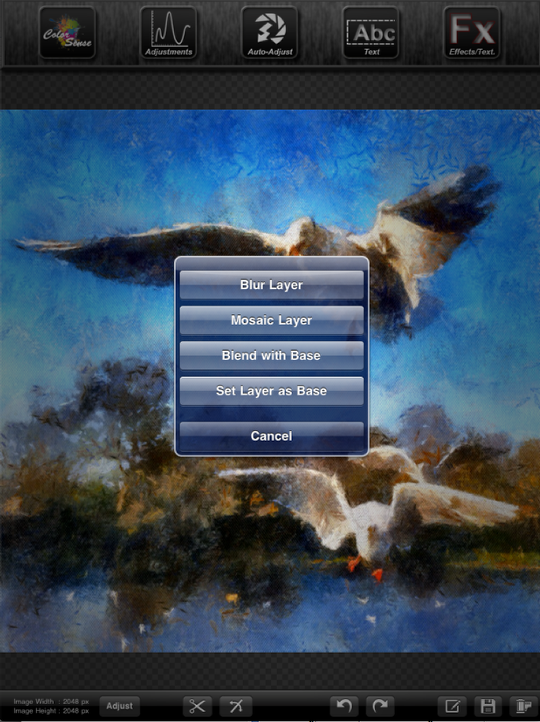
Still within Iris Photo Suite, Veevs clicked on Adjustments and Layers and then selected Blend with Base.
Blends
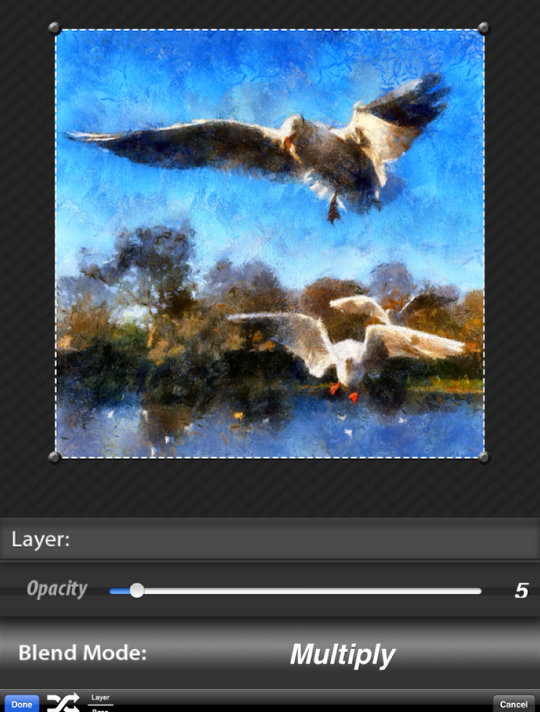
Next still within the Blend mode, select Multiply and adjust the Opacity to 5. Click on Done to save.
Mask
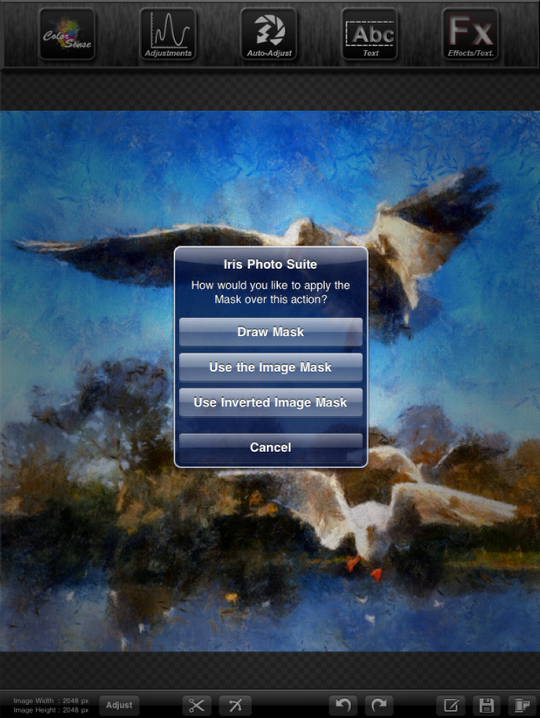
Veevs does not like to apply the filter onto the whole image so her next step was to mask parts of the filter from the image, especially on the seagulls.
Click on Draw Mask.
Brush Off

Next, lower the Brush Size and the Opacity and click on the paintbrush to brush off the filter. Then use a single finger (or stylus) to paint the mask and two fingers to PAN-ZOOM into the image.
If you brush too much off, use the eraser to brush it back on again.
Once you are happy with the results click on the check mark to accept, then save your image
Grungy
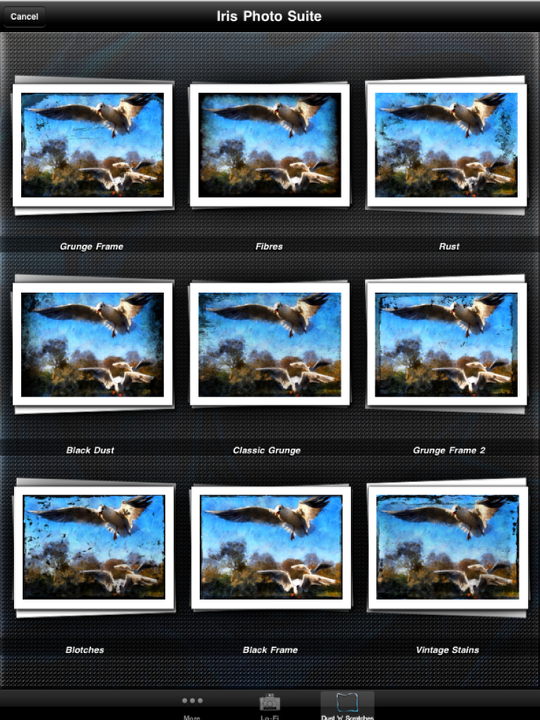
Then select Grungy Frame then select FX and go to the Dust n’ Scratches section, from here select Black Frame.
Strength
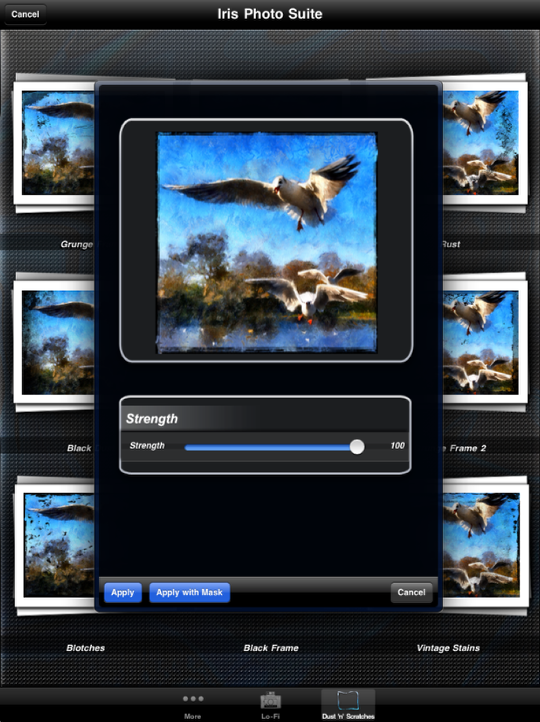
Leave the Strength as maximum, click on Apply and then save your final image.
The Final Image

And here is that awesome image again. We hope you successfully managed to follow that tutorial, please send us your similar examples, we’d love to take a look.
Veevs has also posted a link of this tutorial to www.mobitog.com, a community of likeminded individuals.
Joanne Carter
Joanne Carter is a British photography journalist, editor, curator, and the founder of *TheAppWhisperer.com*, one of the world’s leading platforms dedicated to mobile photography and art. Since its launch in 2009, TheAppWhisperer has become an international hub for artists of all levels to discover, learn, exhibit, and engage with contemporary photographic practice.Built on principles of inclusivity, accessibility, and artistic excellence, Joanne has spent almost two decades championing mobile photography as a serious artistic medium. Through interviews, critical essays, exhibitions, competitions, and education, she has helped shape and document the evolution of mobile art on a global scale.Her work has taken her internationally, lecturing on photography and mobile art at institutions and events including the Museum of Art in Seoul, South Korea, alongside appearances in the UK and Europe. She has served as a juror for international photography and mobile art awards across Portugal, Canada, the United States, South Korea, Italy, and the UK.Joanne is also the founder of *TheAppWhispererPrintSales.com*, one of the first online galleries dedicated exclusively to collectible mobile art, connecting artists with collectors across Europe, the United States, and Asia.Before founding TheAppWhisperer, Joanne worked extensively in print journalism and photographic publishing, including roles at a paparazzi photo agency and as deputy editor of a leading photography magazine. Her freelance journalism, criticism, and commentary have been published widely in both the UK and the US, with bylines in *The Times*, *The Sunday Times*, *The Guardian*, *Popular Photography*, *NikonPro*, *DPReview*, *Which?*, *Vogue Italia*, *LensCulture*, the *BBC*, and more recently, the *Financial Times*, where her published letters on photography continue to contribute to wider conversations around the medium.Alongside her editorial and curatorial work, Joanne’s own photographic practice has been exhibited internationally across the UK, Europe, South Korea, and the United States. Her work increasingly explores themes of grief, loss, death, memory, and the body.Her current research interests centre on grief, death, and poverty, with forthcoming postgraduate study leading towards doctoral research in these areas.Joanne is currently developing new long-form writing and photographic projects and is available for commissions, editorial projects, speaking engagements, and collaborations.Contact: joannetheappwhisperer@gmail.com)


9 Comments
Speesh
I think a lot of people, critics especially, forget quite how much work, skill and planning (when you consider all the different filters and programmes used) actually can go in to producing work like this one.
Seems a waste just to post it on Instagram or Flickr and forget it, I hope Veevs is doing a bit more with her pictures than that.
Veevs
Hiya Speesh, thank you so much for your great comments! I try to post most of my photos to all social media, ie Facebook, Flickr, Instagram. I have a blog but need to update it! Working full-time difficult to know what else to do with my photos! On my list is to start printing them for myself lol!
Ben Crenshaw
I tried to follow this tutorial all the way until I came to the step where you use “auto adjust” in Iris Photo Studio. Is this option available on the iphone 4S version of the app?
Veevs
Hi Ben, I just checked in my iPhone and Auto Adjust is not there, so I guess it is only available on the iPad. You could get something similar by clicking on Adjustments, then Adjustments again and play around with the settings? Maybe increase the saturation a little bit if you want to have a Vivid look. Hope this helps?
Linda Schenck
wonderful tutorial, veevs!!!
Mandolina Moon
On the iPhone Iris App, there are auto adjustments under Histogram; Auto Level, Auto WB, Auto Gamma — or Magic Touch which does all three.
Dan Kerr
Cool, i have never used the layering option in Iris. Must get to it.
The only think i would add to the tutorial is to not always stop at one effect. I find it more effective to blend a few painting effects to ensure i dont know what app and effect i used. Once you get into this style of editing you start to recognise them really quickly. “Oh, thats a AutoPainter” or “Oh thats a Snapseed”. I think instead you want people to say “how the hell did they do that?”
Nice job.
Meri
I just heard about Veevs’ tutorial over at MobiTog. As always, you’re publishing such great stuff here on The App Whisperer!
I haven’t really enjoyed using Iris that much but now that I see how Veevs’ using Iris, I think I’l try again.
More! More!
carlos
muy bien mujer.