APPart – Creating Outstanding Art With Image Blender
It’s Saturday again, phew that went quick and that means that it’s time for Mel Harrison’s column – APPart. Mel’s Column APPart focuses on digital art and collage images. Mel will be incorporating different ‘mainstream’ editing apps to inspire you to try some APPart of your own. (Foreword by Joanne Carter).
‘This week I am talking about how I use Image Blender. I won’t be doing an indepth review of Image Blender but I do hope you can take away something from my process.
Image Blender is a really important tool to my art, some of my images can have up to 30 steps along the way and most of those are taken into Blender to blend edit versions. I do this to build layers in a subtle way. I often use apps such as Percolator, which are great stand alone apps which work fabulously with some images. However by bringing a Percolator edit into Image Blender and layering it back over the original it allows you to mask out sections and adjust opacity to give just a subtle hint of percolator. I refer again to my ‘Neptune’ image where percolator was blended down until only ‘bubbles’ accented certain parts of the underwater scene.
Step 1
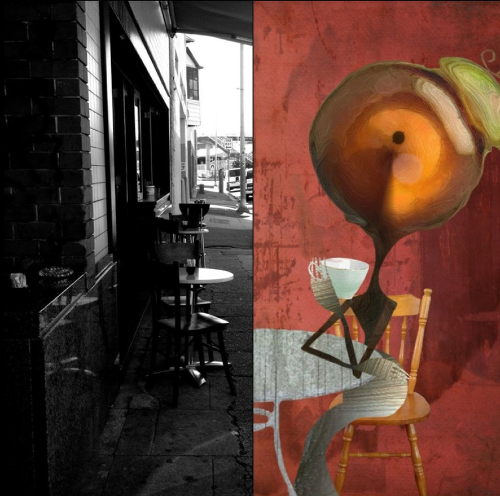
In the following examples I recreated the process I used for ‘High Tea’ I layered a Juxtaposer creation over a street cafe image and used masking and blend modes create the scene. Please note I am working on my iPad, while the functions are the same the button placements are different.
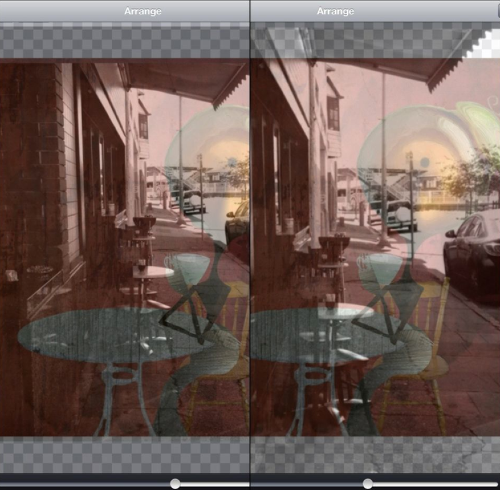
I loaded the art image as the background image and the street scene photo as the foreground image. I went into ‘adjust’ and moved the street photo so it was composed how I wanted it, you can adjust the size of the top image and/or rotate it.
Step 2
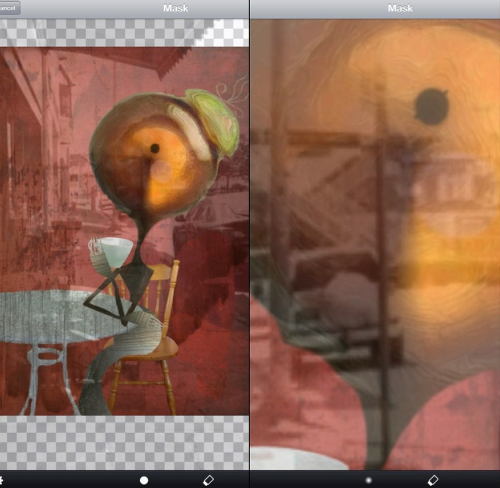
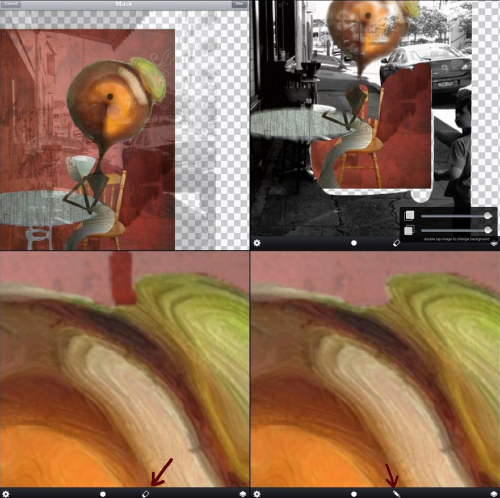
Then I went into the ‘mask’ function to mask out the street scene from over my character. When masking there are two brushes available; a soft and a hard brush. I zoom in and use the soft brush for delicate areas then use the hard brush for the outer areas. Some people do the opposite so work with it a few times either way and see what works best for you.
If you make a mistake in erasing you can undo the last step by holding your finger or stylus on the screen, an undo button will appear, or for fine control in areas you can select the pencil to un-erase sections.
You can adjust the opacity view of each layer when blending by taping the layers icon in the bottom corner and adjusting the sliders, this is really handy when erasing to make sure you have not missed a section.
Step 3
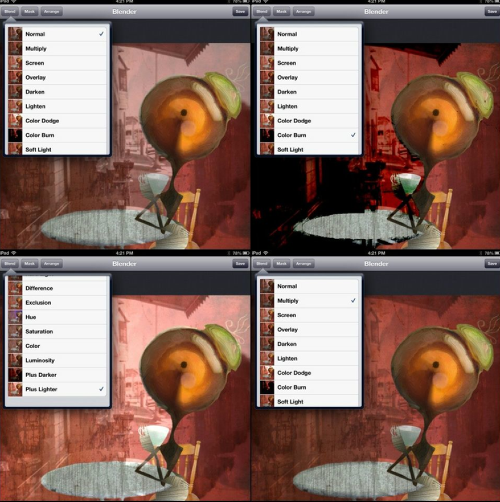
Once I had masked the image I went into the blend modes selector. I won’t pretend to completely understand the blend modes, I had never worked with any sort of program or app that used them before Blender. I tried a few out until I was happy, I settled on multiply. The table required more masking so I went back into the mask function and zoomed in for fine control over the legs of the table.
Step 4
The opacity slider is fantastic! Unlike juxtaposer that only layers solid images, Blender lets you adjust the opacity of the top image, allowing you can be as subtle or as bold as you wish. In my image ‘coming or going’, I saved the image from juxtaposer with just the central Melancholy figure, then went on and added the other Melancholy’s and saved that version to camera roll too. I then loaded both versions into Blender and used the opacity slider to ghost out the extra melancholy figures.
Step 5
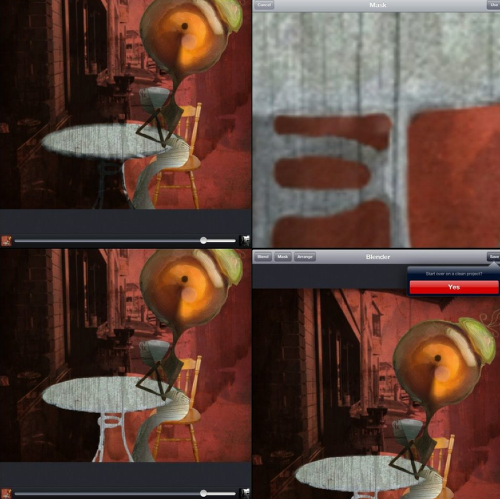
I adjusted the opacity of the blend on’ High Tea’ fading the street scene out and saved to camera roll ready for the next step.
Step 6
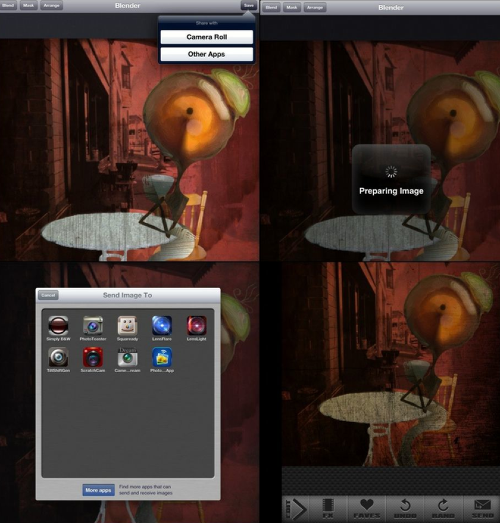
You can also save to (compatible) other apps in Blender. In previous versions I would flatten my image by holding the screen for a few seconds until the ‘copy, switch, flatten’ menu pops up. By doing this it compresses both images into the edit you had completed. The image only appeared in the left hand (background) box, leaving the right hand (foreground) box empty. I did this so I could transfer the edit back to Blender for further adjustment. However after a recent update if you flatten the image the app won’t allow you to save unless you open a second image. This is a little frustrating so I have to save to camera roll and then save to another app. If I need to go back into Blender a new session needs to be open. I am hoping this is just a bug in the upgrade and it will be fixed next round.
Step 7
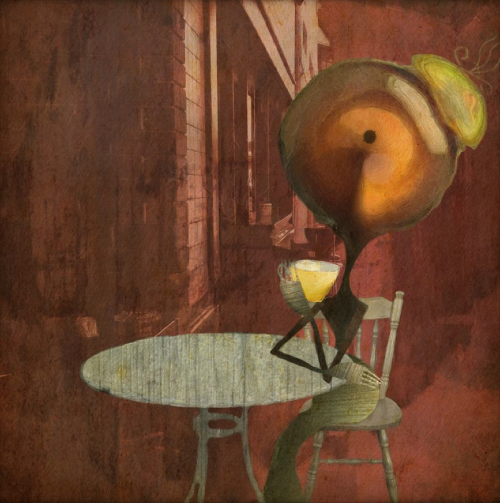
© Mel Harrison – ‘High Tea’
I am moving my column to fortnightly over the (Australian) summer vacation, and as the next column falls just after the festive season I thought I would do something a little different. I am opening the floor to questions. Is there something in particular you want to know about my work? Have I done something you are not sure how to recreate? or want to know what app I used on a particular image? Something about me? Email your questions to mahoganyturtle@mobitog.com and I will select a set to answer for the next column.
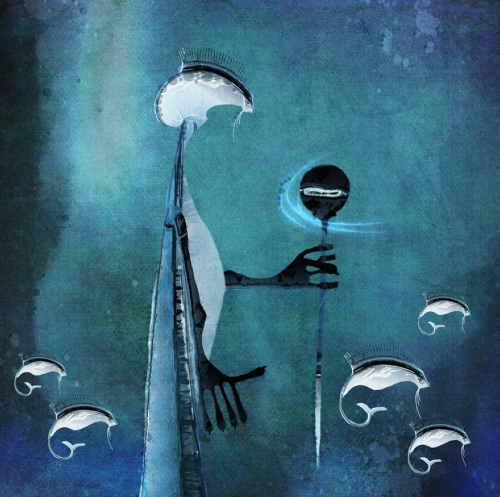
© Mel Harrison – ‘Neptune’
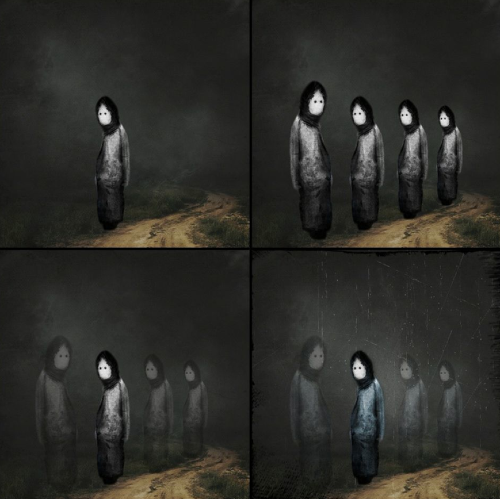
© Mel Harrison – ‘Coming or Going’

Joanne Carter
Joanne Carter is a British photographer, photography journalist, editor and curator and the founder and editorial director of TheAppWhisperer.com, an independent international photography publication established in 2009.Her journalism, criticism and commentary have appeared in The Times, The Sunday Times, The Guardian, Financial Times, BBC, Vogue Italia, LensCulture, Popular Photography, Android Magazine, NikonPro, DPReview, Which Digital Camera and Which Camera. She has lectured internationally on photography and mobile art, served as a juror for international photography awards, and exhibited her own photographic work across the UK, Europe, South Korea and the United States.Alongside her editorial work, Joanne's photographic and postgraduate research explores death, grief, memory, representation and social inequality through contemporary photography, participatory practice and visual research methods, with the longer-term aim of developing this work through doctoral research.Through TheAppWhisperer, she continues to publish independent photography journalism spanning contemporary photographic practice, mobile imaging, photographic apps, computational photography and emerging imaging technologies.Joanne is available for editorial commissions, photography projects, judging, curatorial work, speaking engagements, consultancy and selected collaborations.
12 Comments
Sue Fagg
Thank you for sharing, I’m new to playing with Blender, but the possibilities are hugely exciting…even more so after your explanation!
Coming or Going simply fascinates me!
Sue
Mel Harrison
Thanks Sue! Have fun with Image Blender it really is a fabulous App!
Phil Bishop
The BLEND MODE is just like working with layers in Photoshop. Once you use it several times it becomes easier to understand. Great images you have done with Blender which is one of my favorite Apps…
Mel Harrison
Thanks Phil, I am not familiar with photoshop. I probably should read up on blend modes to get a better understanding of them.
Phil Bishop
It becomes simple after playing with layers bending with blender or in Photoshop. Really love your work….
Delta
Fabulous Mel ! Love Blender !
Mel Harrison
Thank you Delta xx
Laurence Zankowski
Ahh, Mel, your sense of play and whimsy. Even the brooding ( from my P.O.V. ) Coming or Going, has it. A 2d version of Russian stacking dolls. Truth be told, I am partial to the beginning diptych at the start of the tutorial. Would love to see a 4’x 4′ print/ painting of it. Ala , David Salle.
Be well
Laurence
Mel Harrison
Russian stacking dolls! Had not thought of that but yes I see it 😀
Robert Lancaster
Awesome tutorial once again Mel!
Thank you so much for sharing your process and workflows with us.
Mel Harrison
Most welcome Robert xx
Janine Graf
You are so freakin’ creative Mel! I like Image Blender a lot, but find their masking tools / functionality quite tricky to be honest. So with that being said, I really appreciate the results you constantly achieve with that app! Appreciate the results and admire you as an artist! 😀