Technical Tutorial – ProCam: Night Mode
Recent updates to ProCam added its “ISO Boost” feature which when activated, will up the iPhone5’s maximum ISO from 800 to 3200. This is really helpful when shooting in low light environments. A real bonus with this app is its “Night Mode”! This allows you to reduce the shutter speed…and so more light is captured by your iPhone 5’s camera sensor. Using this with the “ISO Boost” gives you a lot more possibilities!!
We have recently published some excellent technical tutorials to help you get the most from ProCam, to read those, go here. ProCam retails for $0.99/£0.69 and you can download it here.
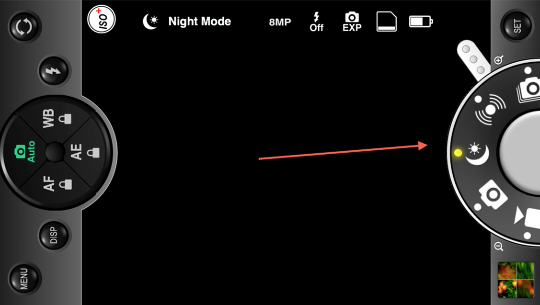
Let’s take a look at this. To activate “Night Mode”, move the mode dial to the crescent moon icon. This sets the shooting mode. You will also see this displayed on the status bar located at the top of the screen.
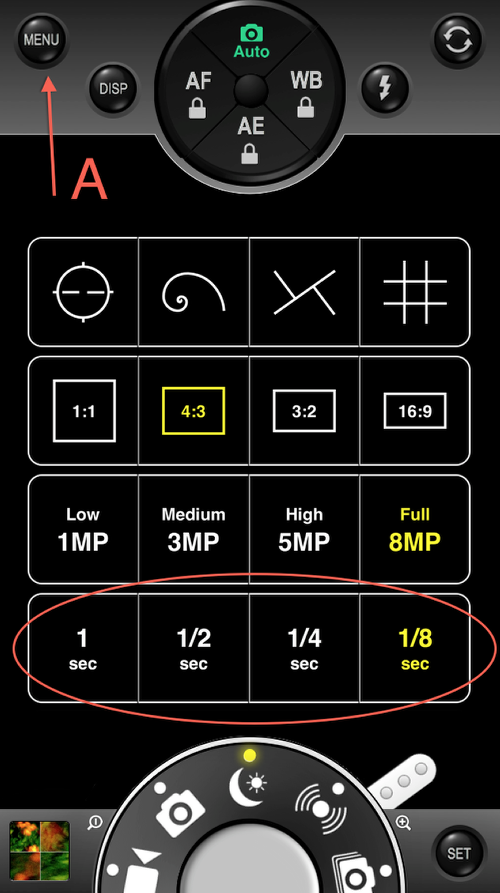
With this mode selected then click on the “Menu” tab (A)…and this pop-up screen will open. In the bottom row you’ll find the four shutter speeds offered by ProCam: 1/8 sec, 1/4 sec, 1/2 sec, and 1 sec. To chose a particular speed, just click on one of these. Close the “Menu” and you’re ready to do some night shooting!!
A couple of things that I have learned working with Night Mode. Yeah…you do have to hold your iPhone still as you can or you’ll get blurry pictures. Sometimes this is good…most times it’s not. You’ll also find that ProCam starts “lagging” if you try to take pictures too fast…you need to give it time to process these low light images. Not a big deal…just know it’s there.
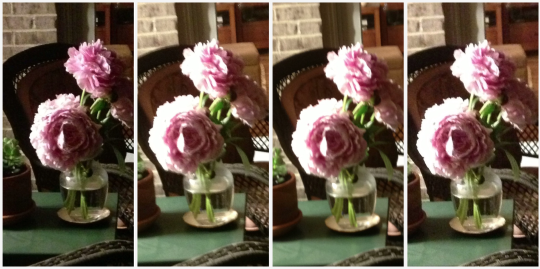
Thought I’d share some of my test shots with you so you can get a sense of what this mode will do. This foursome shows images I shot on my screen porch the other night with just the light coming through the house windows. (I did crop these images later to bring the center focus to the peonies…but nothing else.) Moving from left to right, my exposures started at 1/8 second and moved to 1 second at the end. While you don’t notice much of a change one exposure to the next, you can really see the different between the first and last shot! These are blurry, as I didn’t follow my own advice.
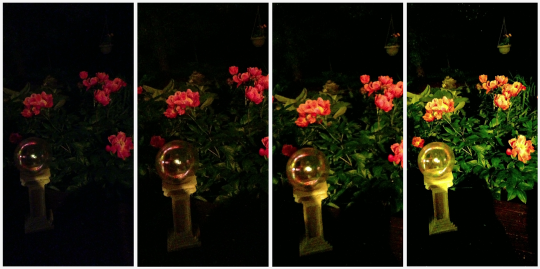
Here’s another sequence shot that same night. This time I sat down in front of the flowerbed right behind our back deck. The only light on was a porch light on the house that has one of those yellow bug lamps in it…so my shooting light was yellow!
As with the first sequence, I started with 1/8 second and moved through the shutter speeds to 1 second. You can see the difference in these shots! I particularly like how the hanging basket in the back of the image seemingly appears out of no-where! Again, blurry but just think of how they’d look if I had used a tripod!

Last sequence. This one takes advantage of the blur! I am always fascinated with “painting with light” and ProCam’s Night Mode gives me that chance! I left the shutter speed set at 1 second and during the exposure, I just waved the camera in the general direction of the flowerbeds. These four are the best of the bunch…but they do show the possibilities!!
So go out tonight…and have some fun with Night Mode!!
David Hayes
David is Head of Technical Tutorials here at theappwhisperer.com and this role adds to the many things David has done in his life…some of which he considers more significant than others. Yet, he feels all have made him the artist he is today. He’s been a cook at a truck stop, a janitor at a military base, worked in advertising, been a banker managing other people’s money, and an elementary school teacher. Trained as a photographer as an undergrad, he’s recently returned to these roots and now considers himself foremost a photographer and secondly a mixed media artist.You can find David’s work on many other popular websites including his own: http://www.clearerreflections.com.
You May Also Like
Carol Wiebe Joins TheAppWhisperer as New Columnist for ‘Draw the Line – Mobile Art as an Expression’ A Brand New Column
How I Did It!™- Creating with Your iPhone; Masking, Composites, & Textures with Rad Drew