Tutorial – AnyShape – Photo Editor – Learning How To Use This Great App
Any Shape…now here is an app that I would call a real “sleeper”. I didn’t expect this to be as good and as versatile when I first looked into it for The AppWhisperer…but the more I used it…the more impressed I became!!
Any Shape utilizes a bezier selection tool function that allows you to fine tune your cropping masks to a level normal found with desktop editors. This in itself is a great thing…but then it goes a bit further with a great selection of filters that you can apply in-app as well.
What I want to do in this tutorial is to give a quick overview on using the selection tool…and then show you some playing around I did with an elephant. Nothing “dangerous”…but I did have fun!
If you feel inspired by this tutorial would like to download AnyShape – Photo Editor for yourself, just click here. It retails for $1.99/£1.49.
Step 1
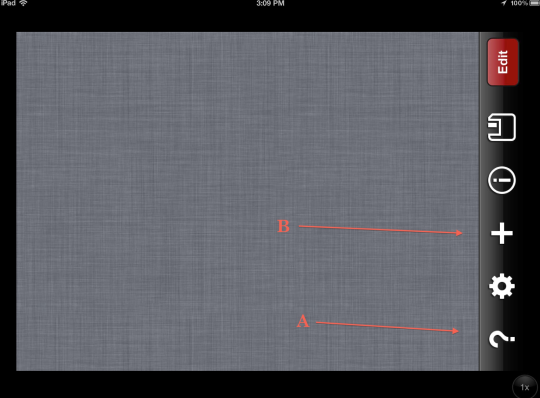
When you first open Any Shape, this screen comes up first. Without any image to work with, there’s not much to talk about. But I did want to point out that before you use Any Shape, you should watch their quick video tutorial…, which you access by clicking on the question mark (B).
Step 2

The video shows using the selection points to mask different points of a car. You are going to want to watch it several times to get the hang of it…but then it’s pretty intuitive after that.
Step 3
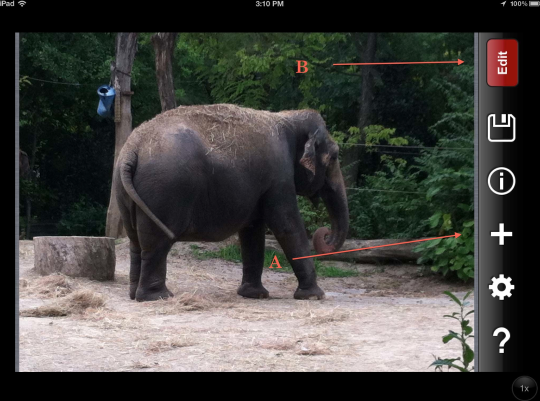
Time to bring in the elephant! I clicked on the “+” symbol (A), went to my camera roll and brought in this snap I had taken several weeks ago during a visit to the Cincinnati Zoo. Not a great image…but perfect for this tutorial. Lots of curves to show you what Any Shape’s bezel tool can do!!
Clicking next on “Edit” (B), brings up the edit screen…
Step 4
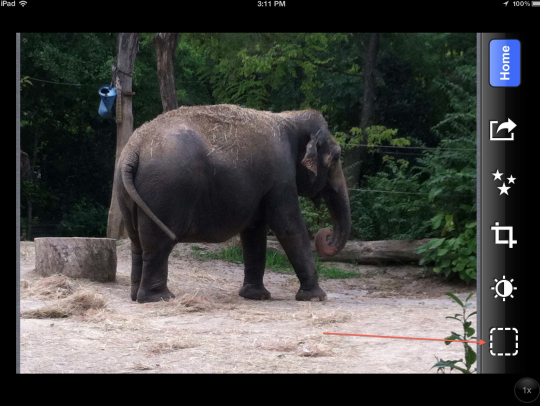
Now begins the fun!! Click on the Outlined Box (see arrow) to activate the Bezier selection tool…
Step 5
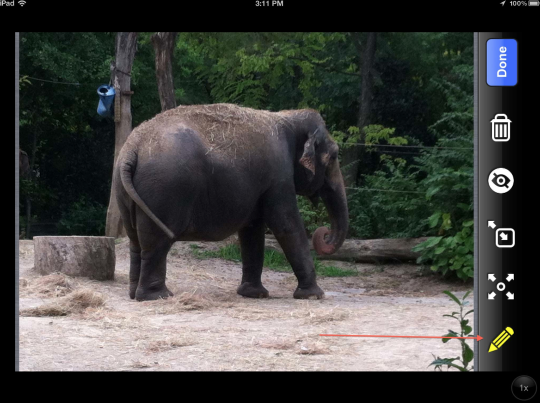
…which changes to a pencil icon. Now you can start touching the screen to establish your points. (Just an aside: after you’ve established some points, these can be erased by clicking on the pencil icon. This will erase the points, starting with the last one first.)
Step 6
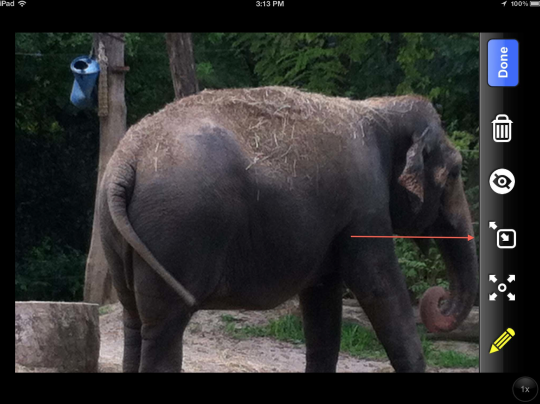
Oh…before getting started with that, I wanted to show you the pan/zoom tool. This comes in handy when you start fine tuning your mask!
Step 7
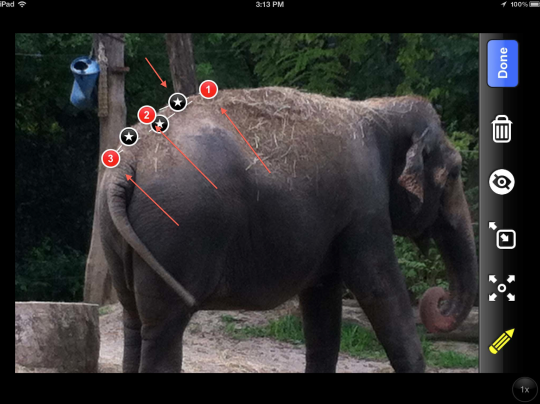
Each time you touch the screen, a new selection point is established…as indicated by the numbered circles. It doesn’t really matter where you start as long as you keep in mind that you have to come back to that start point to complete your selection. Sort of like dot-to-dots! Also…here’s something they don’t tell you in the video tutorial…you only have 40 selection points to work with! (I found this out the hard way…first time through with this elephant, I got only half way round before I ran out of points!)
The black star circles are fine-tuning points that you’ll use after putting down more of the numbered points.
Step 8
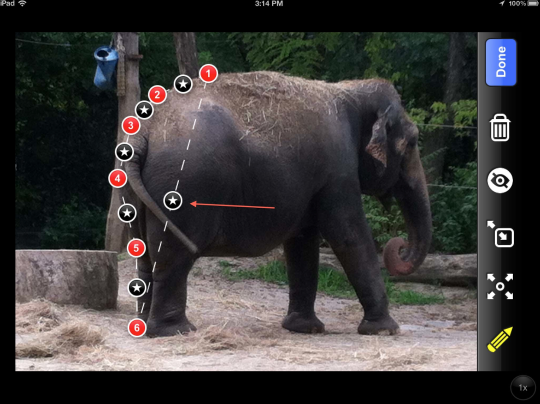
I’ve continued down the elephant in this screen shot, establishing a point at every major curve point as I want to mask off the entire elephant when I’m done. I wanted to also show you that the last point is always connected to the first point.
Step 9
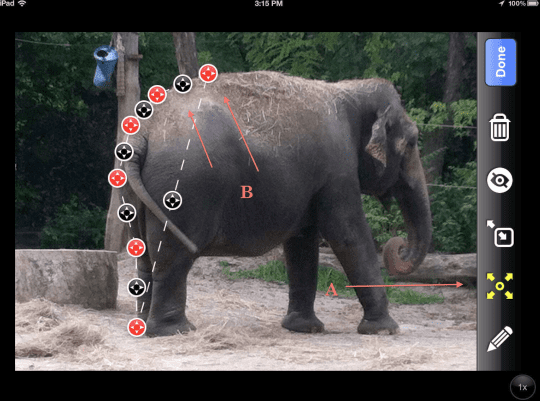
One thing I learned right away when using this selection tool is to stop at various stages to do my fine-tuning. It’s a lot easier this way than doing it all at once. To do this, click on crossed-arrows icon (A) which allows you to move around the selection points (B) and (C). These have changed in appearance as well indicating that they can be moved. To move them, just touch/hold and place them so the dotted line in-between each symbol closely fits the shape. The red icons are more for gross control while the black icons are for fine-tuning.
Step 10
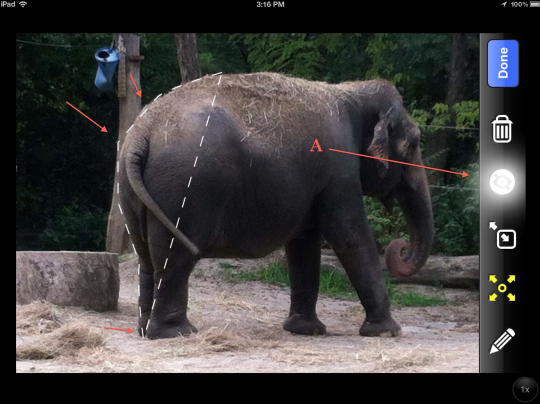
To check the fit of your mask, click on the eye icon (A) and the selection icons will disappear leaving only the mask lines. Checking this out, I noticed a couple of points, indicated by the arrows, where I needed to do some more fine tuning.
Step 11
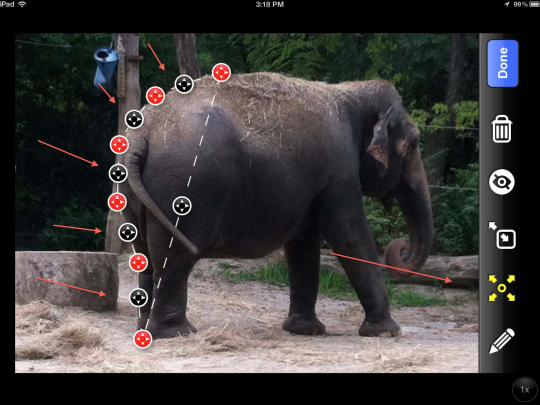
Clicking on the cross-arrows icon again, I then used the black icons to adjust the mask so that it “clings” to the elephant. (I was just happy that this particular elephant wasn’t ticklish!)
Step 12
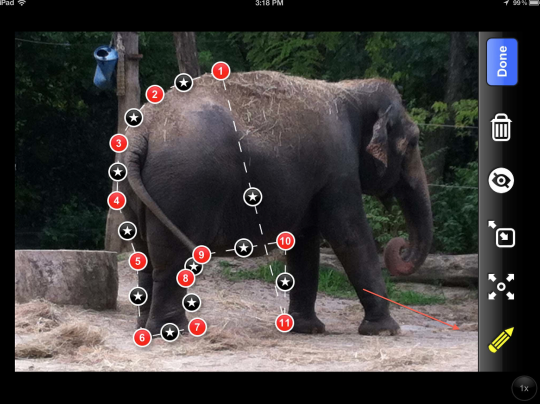
Finished with that, I clicked on pencil icon, and continued around the elephant!
Step 13
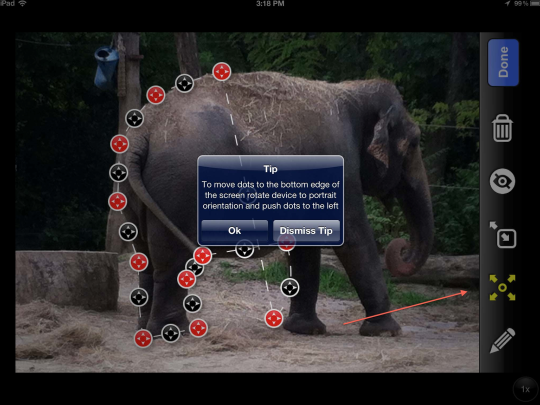
In this screen shot, I had stopped to do some fine tuning…and got a little close to the edge! Any Shape has built-in “Tips” that will pop up, reminding you what you need to do to keep going. (You can turn these off it you want, but I like them, as I need reminding from time to time!)
Step 14
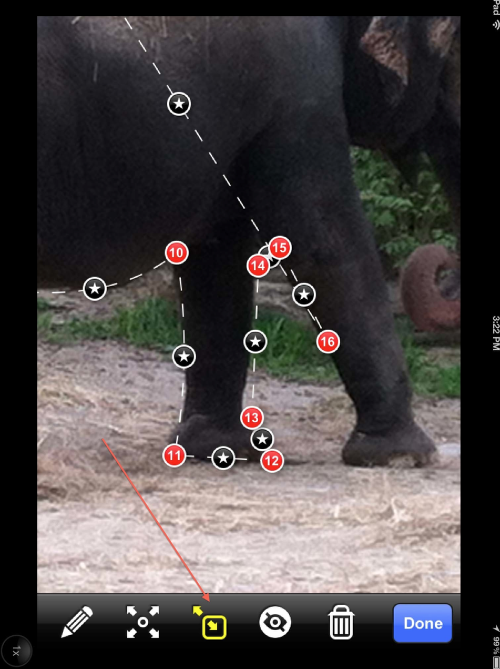
So I did what I was told and rotated my screen. I also used the pan/zoom tool to move in closer to help my placement of the points.
Step 15
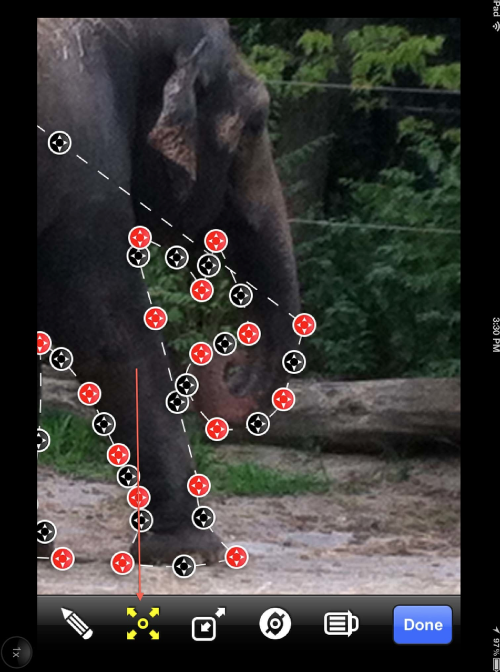
Continuing my trip around the elephant…and stopping as before to fine tune. Almost done…and keeping an eye on my selection points count so that I don’t run out!!
Step 16
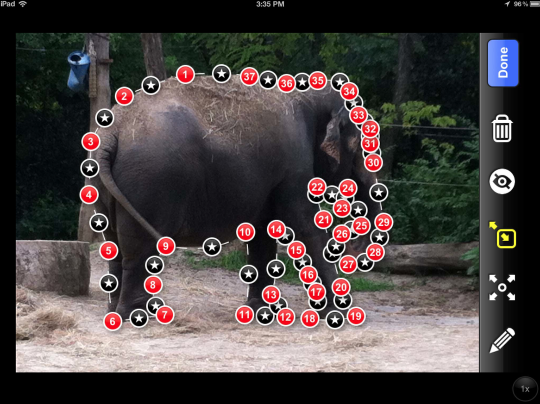
And…finished!! Using only 37 points…3 to spare!!
Step 17
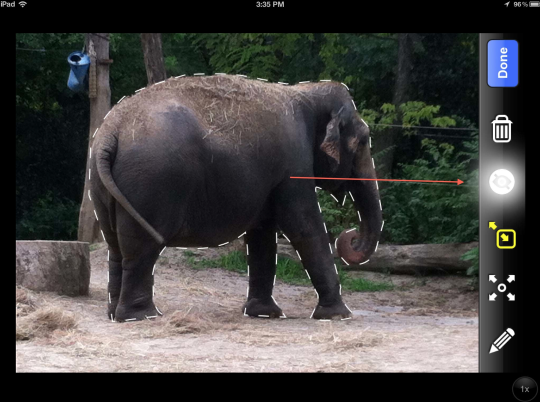
In this screen shot, you can see how closely I was able to fit the mask around my patient pachyderm. If only it knew what I had in mind for it next!!
Step 18
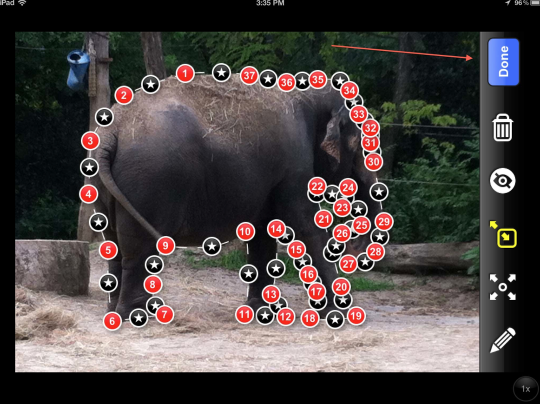
With the mask completed, time to do something with it! I clicked on “Done”…
Step 19
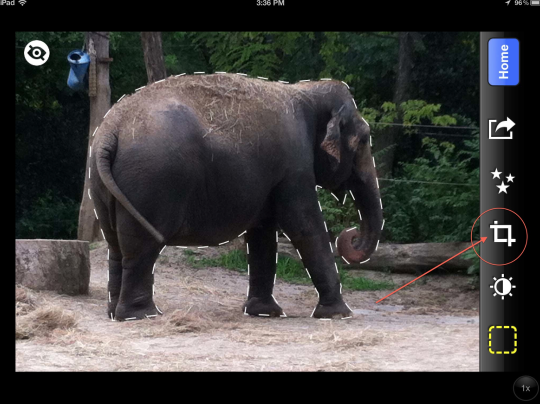
….which closes the selection screen and returns you to the “Edit” screen. The first thing I wanted to show you is the “Crop” function…which is activated by clicking on the crop icon! Of course!!
Step 20
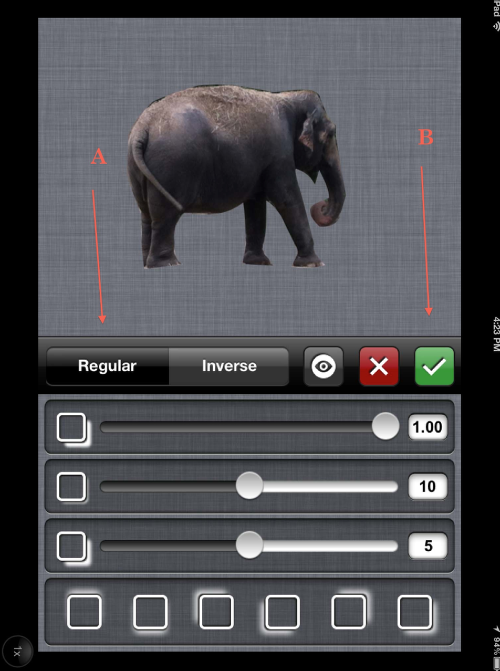
In this screen shot, the elephant stands alone. I’ve clicked on “Regular” (A) that drops anything that isn’t inside the mask. You can click on the “Check” icon which applies this effect and takes you to the save function. Once your “stamp” is saved then you can use it in any other app. Or you can click on “Inverse” button…
Step 21
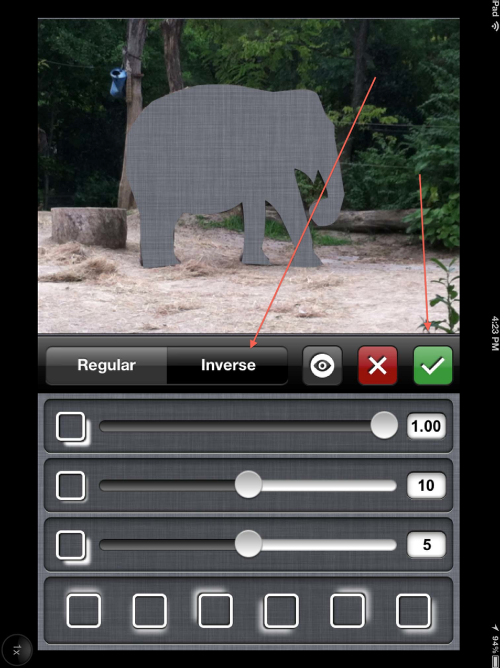
…and the elephant mask drops away, leaving only the area outside of your mask. Again, you can use this as is by clicking on the “Check” icon. (The controls below these icons allow you to establish shadow effects…but this is something I’m not going to discuss right now.)
Step 22
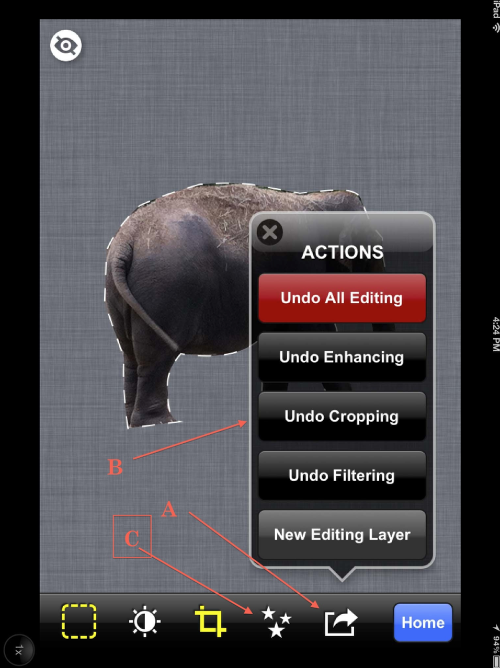
All right! Enough of cropping for now! I’ve clicked on the “Check” icon while in the “Regular” mode….then clicked on the boxed arrow icon to bring up this pop-up which gives all sorts of lovely choices. For now, I clicked on “Undo Cropping” to bring my image back to what it was….now for some real fun!!
Step 23
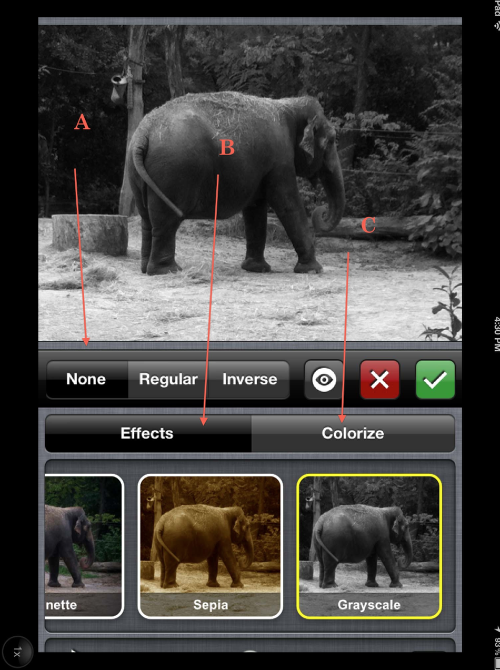
Oops! I just realized that I don’t have the screen shot I need to show you to begin the next phase of this tutorial! No matter… take a look at the last shot. Do you see the “Stars” icon at the bottom? Where I have a boxed C and an arrow pointing? After you’ve clicked “undo cropping” the entire image will come back, mask still intact. Then you need to click on the “Stars” to bring up this screen. I hope this made sense. Sorry about that…
Okay. In this screen, nothing is happening…yet. Let me explain how to use the different filters that come with Any Shape. At the top you’ll see a bar with “None”, (A) active right now, Regular, and Inverse. “None” is the setting when you want the filter to affect the entire image. “Regular” will affect what’s inside the mask, and “Inverse” what’s outside. Right now, I’ve selected the Grayscale filter and “None”.
Below this bar, you can select “Effects” (B) which is the mode I’m in here or “Colorize” (C). I’m going to the “Colorize” mode next.
Step 24
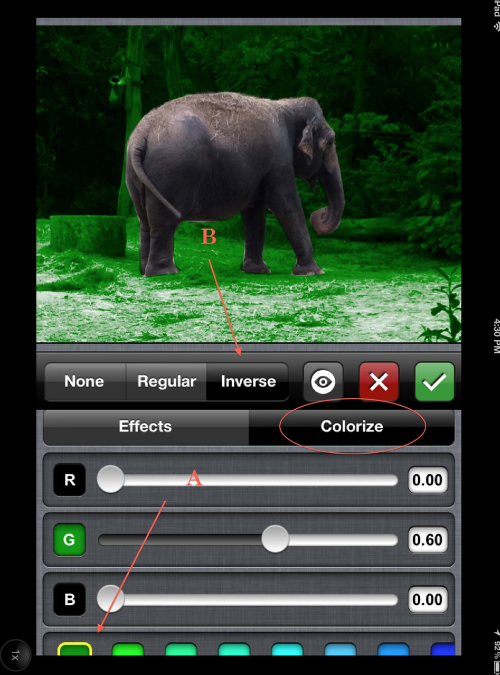
I’ve clicked on “Colorize” (A) , then “Inverse” (B) which means I’m going to deal with the area outside the mask, and then…all the way at the bottom…picked green. (C). I used the slider bar to adjust the intensity…giving the background a lovely green tint.
Step 25
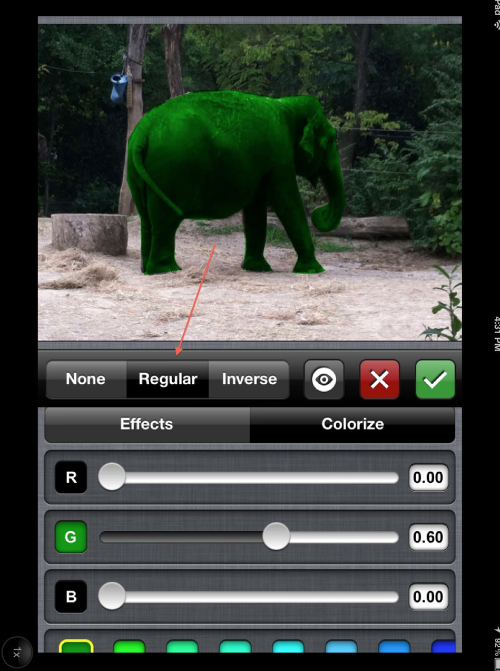
In this shot, I’ve selected “Regular” and kept everything else the same…making my elephant a sickly shade of green.
Step 26
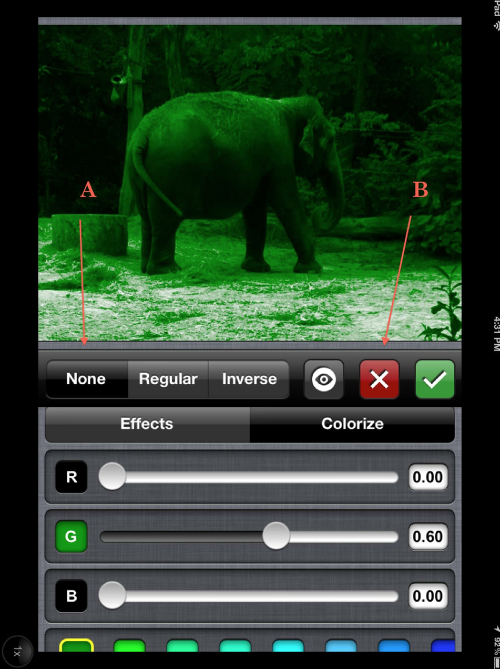
And in this shot…I selected “None” giving everything that green tint.
Enough of this…but hopefully you get the idea. Clicking on the “X” , I’m returned to the Home screen where I click on “Effects” to begin this next phase…using the filters to create my final image!
Step 27
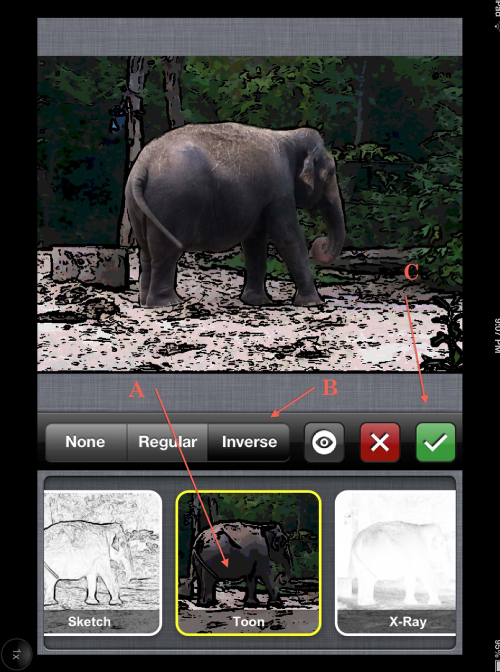
Wanting to work with the background first, I clicked on “Inverse” (A) and then the “Toon” filter (B) which applied this to the background. I then clicked on the “Check” icon to move on.
Step 28
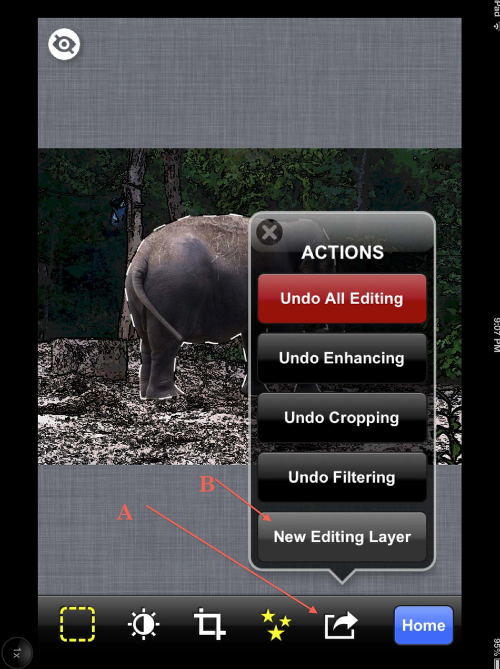
Time to mess with the elephant. First…I had to add another layer, so I clicked on the boxed arrow icon (A), and then “add editing layer” (B). (A tip will come up telling you how to use this…I’ll let you read that on your own. This tutorial has gone on too long as it is!)
Step 29
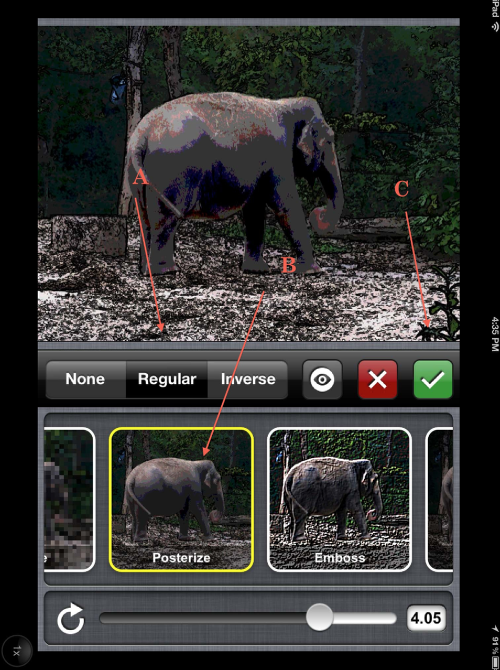
This time…I clicked on “Regular” (A) to apply my filter to the elephant, the “Posterize” (B) filter with adjustment via the slider bar, and then applied this by clicking the “Check” icon. (C).
Step 30
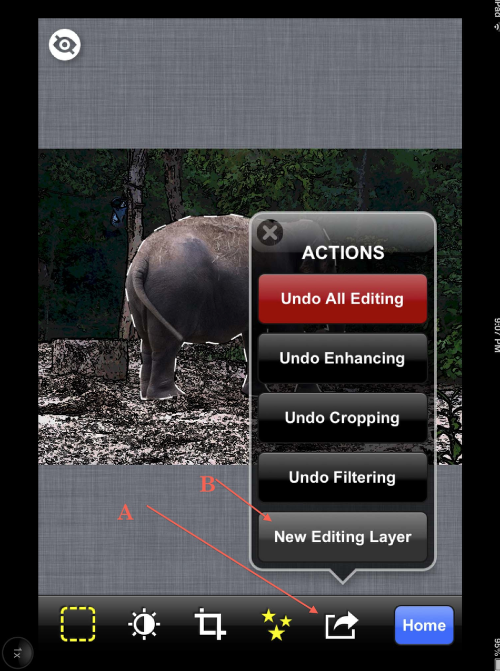
After doing this, I decided I wanted to add another filter to the background, so I had to add yet another editing layer as before…
Step 31
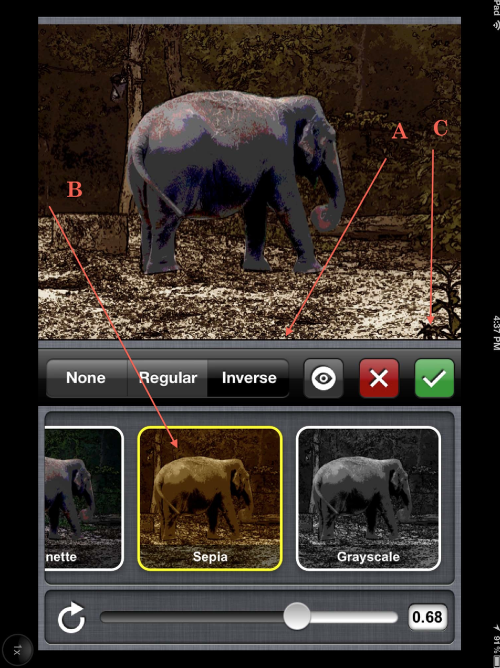
This time, I added a sepia tone (B) on top of my “Toon” effect already on the background (A) …and adjusted this tone with the slider bar before applying it (C)! Just like above…
Step 32
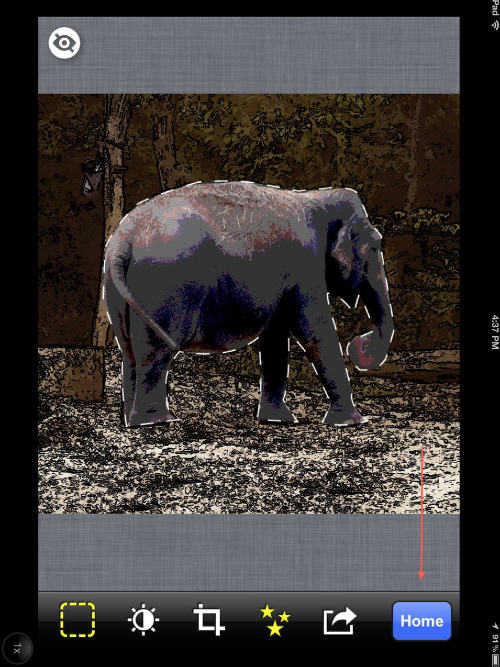
Time to save! Click on “Home”…
Step 33
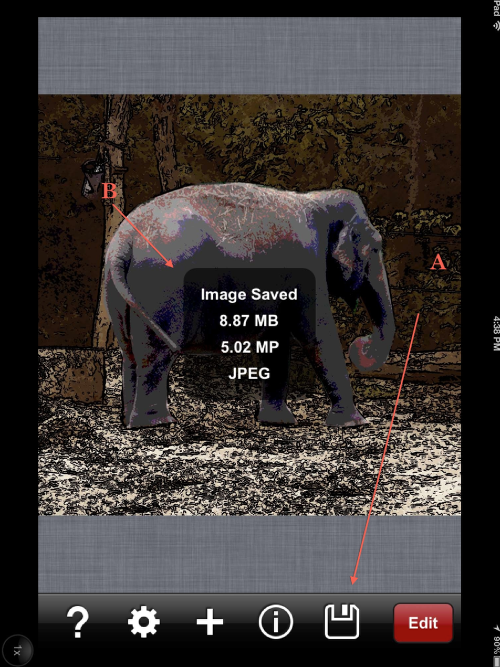
Then click on the “Save” icon. (A). When it’s done saving, this little screen (B) will come up giving stats on your image.
Final Image
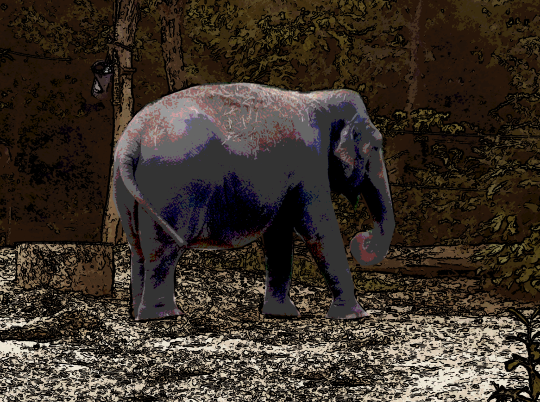
And here’s my final! “One Time…At the Zoo”! I do hope you like it!!!
This tutorial was a little longer than usual, but I wanted to give you a good taste of what this app can do. I know Any Shape has a place in my toolbox now…and not for the cropping/stamping it can…as it has some great filters!!
As always, I do appreciate your comments, questions, and feedback. Please don’t be shy!!


19 Comments
Delta
Thanks for the clarity ! I have this app – watched the video and..was close to deleting..your tutorial clear up a lot of things…it’s a keeper now !
maktub77
Thank you, Mr. Hayes. Excellent tutorial!!!
tanci
David, this is one tutorial that I must save. It sits in my app folders and have kept trying to use it but to no avail. This is certainly a huge help!
With my appreciation to you & to the appwhisperer for posting it…thanks!
David
Thank you everyone!! I’m so glad my tutorial helps clear up any “mysteries” with this app. I had to watch their video a couple of times…and then play with it before I realized what was going on. I’m sure there’s more to it that’s yet to be discovered! Who knows…maybe another tutorial is in order…
melia
i agree with all. this app was frustrating me. thank you david for diving in and sharing some of the mysteries!
David
Melia ~ I glad I was able to help! Thank you for taking the time to leave your comment/feedback! I do appreciate that very much!!
Kat
Thank you so much, David!! You make it all so easy to understand!!
Kat~
David
You’re welcome, Kat! And thank you for letting me know…I do appreciate the feedback!
Carol
Fascinating tutorial, Dave, and so easy to understand. I’ve been considering the app and this will help clinch it. Many thanks.
David
Carol ~ I’m glad it was helpful. I think you’ll find a lot of use for AnyShape…I know I have!
Rob
Excellent overview of the app. It took me a while to get the hang of it , but I do have a question I hope you can answer. I’m still trying to figure out why I should use the cropping tool. I mean once you cut out the image, what can you do with it? Is there a way in the app to paste it into another scene? I just can seem to see the usefulness of the cropping function.
Thanks,
Rob
David
Good question, Rob! It would appear that you can’t do anything with the extracted image while still in AnyShape. You’ll need to save this to your camera roll and then use it as a “stamp” in another app that allows for layering. The good part is that AnyShape’s selection tool is one of the easiest to use…so I’ve taken to using it when I want to create a “stamp” to be used in another image. I’ll be putting together another tutorial real soon discussing just your question…so stay tuned!! Hope this helps for now.
Lynnem
It was reassuring to know that others have struggled with this app. But, your tut was excellent and I may be able to master it now. Thanks so much.
David
Lynnem ~ I glad my tutorial was helpful! Thanks for for your feedback. I do appreciate it!!
Sebastian
Can I use a shape I cut as a template for cropping other photos?
Carl
Can i crop on piece of image and put on in other photo with this app?
Tank you! My emais is contatosbase@hotmail.com
Dave
Sebastian ~ Yes and no. While the shape you’ve cut will be saved as a .png, not all apps will treat it as such and will convert it to a .jpg. There are apps like Image Blender and others that will keep it as a .png and then you could use their masking functions. Give it a try…nothing ventured…nothing gained!!
Carl ~ You can’t do this in Photo Station. You’ll have to save to your camera roll and then using a blending/layering app to do this sort of thing. Something to suggest to the developers!!
Sebastian
Dave, I don’t think I explained well enough in my question, sorry. What I meant was is it possible to use a shape (ie an irregular hexagon) as a sort of template, for cutting congruent shapes put of another picture-sort of like how there are preset shapes for cropping like circle, square, etc
Dave
Sebastian ~ Me thinks the only way you’d be able to do that is to use the free-form tool and create your own shape. Now that Photo Station gives you 80 selection points to work with, creating a shape shouldn’t be a problem. You know, why don’t you give it a try. If you figure it out, let me know! I’ll play with this idea as well…who knows…perhaps we’ll come up with a new way of using this app! Cool!!