AnyShape – Photo Editor – iOS Tutorial – Using The Selection Tool & FX Filters
In this tutorial, the third in a series (if you’ve missed the others, go here), I am going to have some fun using Any Shape’s selection tool and its FX filters. I won’t be covering how to use the selection tool in any detail or the FX filters as I’ve already been there in the first two tutorials. So I’ll be moving through some steps pretty quickly. There are five separate “stages” to this project, each will have the same work flow sequence but on a different part of the image. I tell you this now so if you get the sequence down after the first or second “stage”, feel free to stop.
We hope you feel inspired to try AnyShape – Photo Editor for yourself after reading this tutorial. You can download it here, it retails for $1.99/£1.49.

Step 1
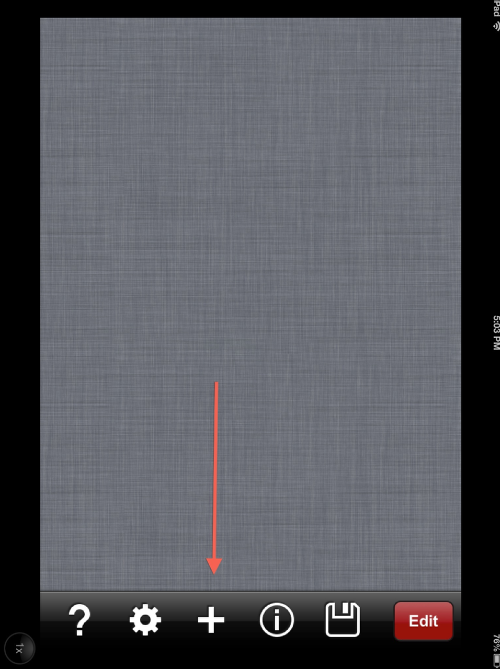
To get started, open Any Shape…and click on the “+” icon to bring in your image.
Step 2
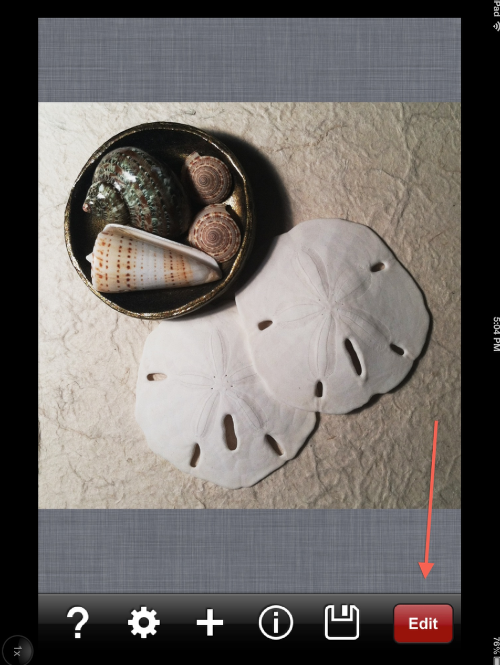
Here’s a little “shell-life” I staged for this project. Won’t say it’s an award winner but it does have three elements and a background, which is what I need for this project! To begin…I clicked on “Edit” to bring up the selection tools.
Step 3
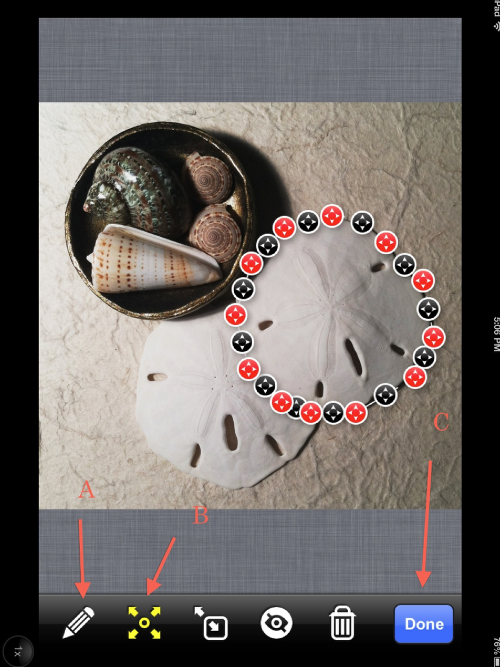
Clicking on the “Pencil” icon (A), I activated the selection tool…and made my points as shown in this screen shot. Done with that, I clicked on (B) to fine-tune my selection. Finished with this step, I clicked on “Done” (C) to take me to the FX screens.
Step 4
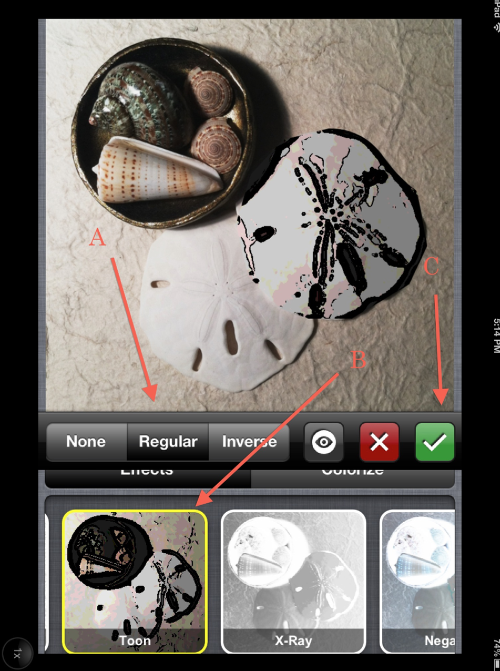
Making sure that “Regular” (A) was selected, I chose “Toon” (B) for my first effect. Clicking the “Check Mark” icon (C) closes this step.
Step 5
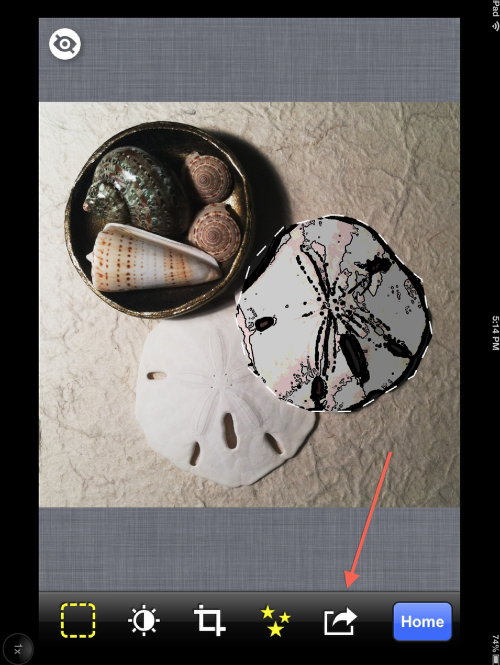
Finishing up Stage 1 and setting up for Stage 2, click on the “Boxed Arrow” icon.
Step 6
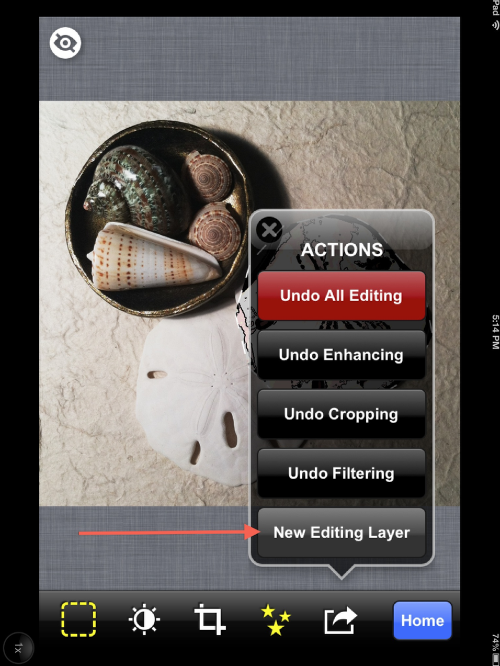
In this pop-up screen, click on “New Editing Layer” to begin Stage 2.
Step 7
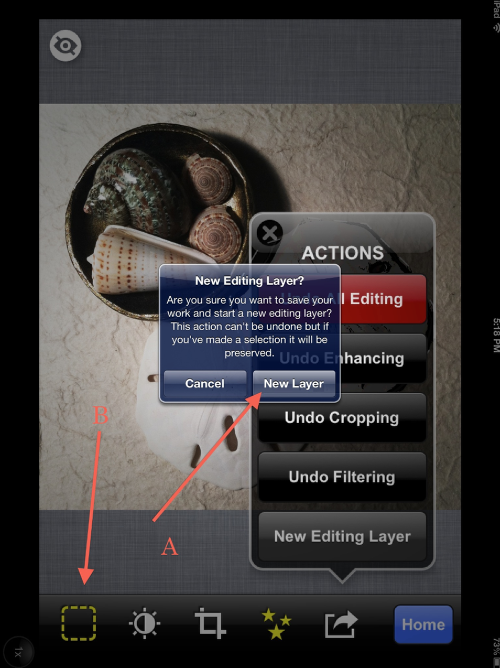
And in this pop-up screen, click “New Layer” (A). This will cause both pop-up screens to drop away. Once these are gone, click on the “Selection Box” (B) to start a new selection!
Step 8
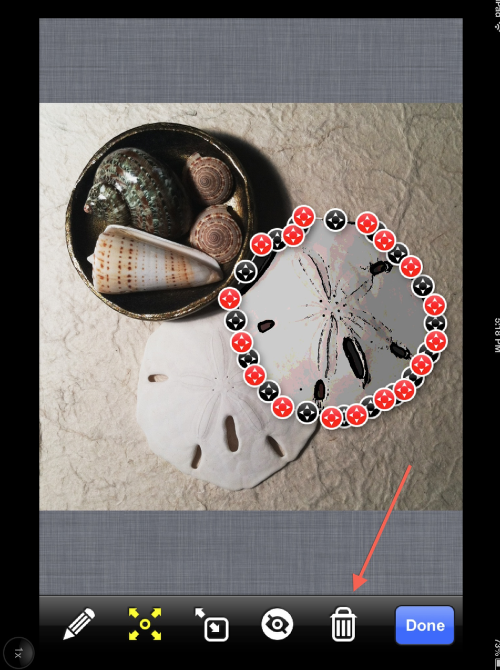
This screen will come up next…and this step is an important one in the work flow. It took me several attempts to figure this out, so I’m going to save you a bunch of time!! You need to click on the “Garbage Can” icon to remove the selection points on the first sand dollar.
Step 9
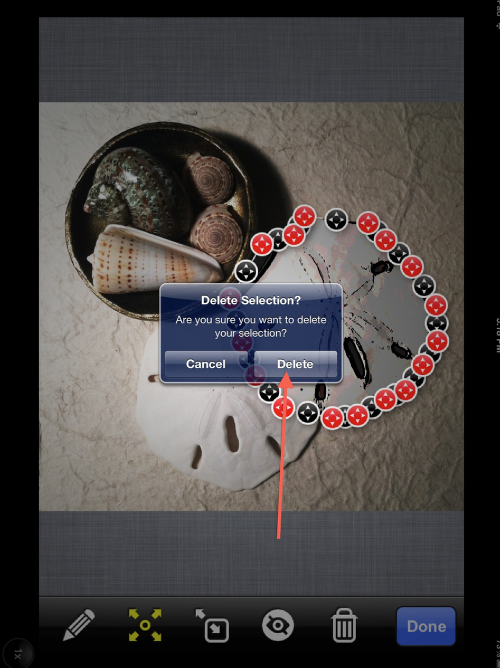
Click on “Delete” to remove the selection points. Have no fear; your FX effect will remain! So click and proceed courageously!!
Step 10
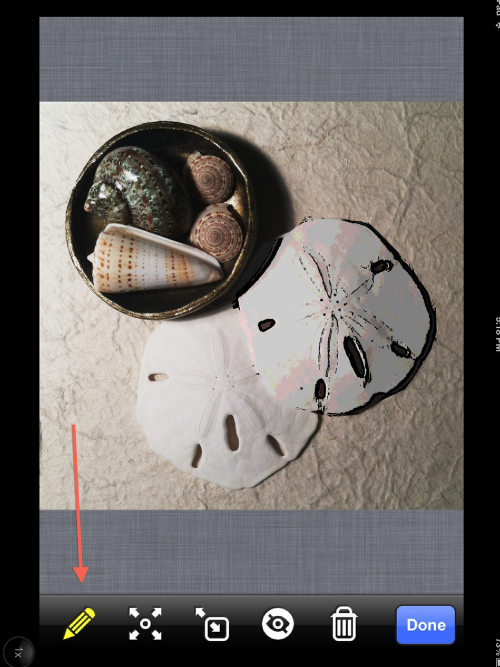
We begin again! Click on the “pencil icon” to activate the selection point process…
Step 11
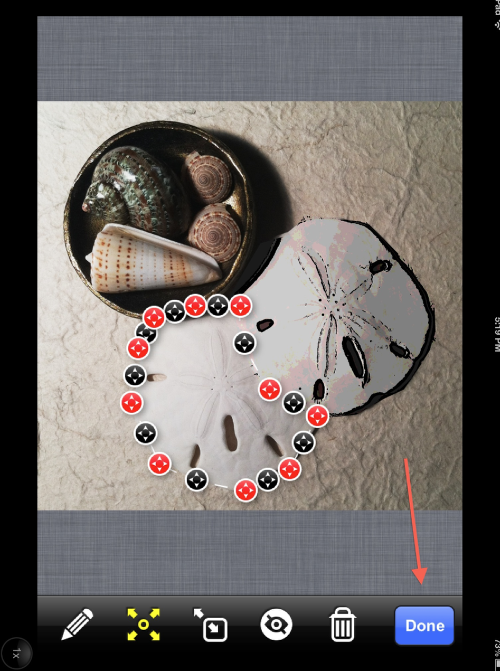
Make your selection points around the second element…and once done…click “Done”.
Step 12
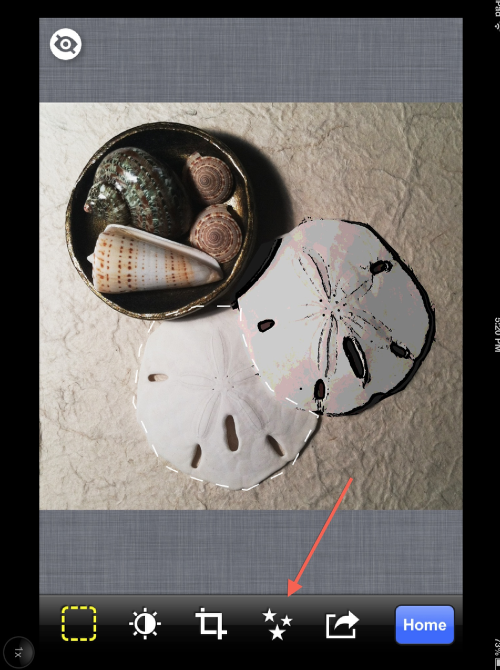
The “three stars” icon will take you to the FX effect screens…
Step 13
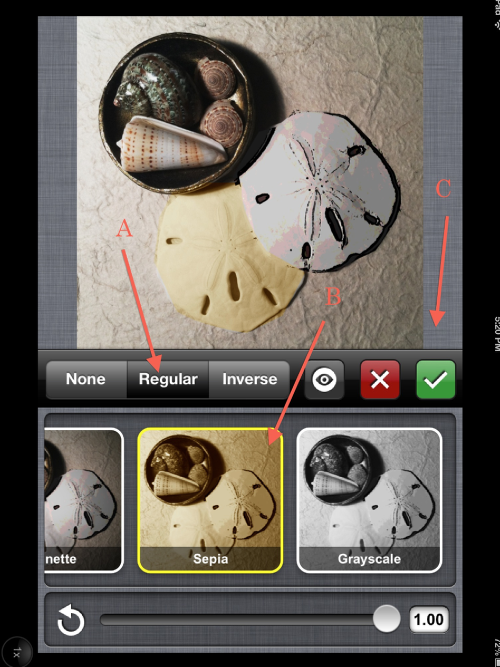
This time, after making sure that “Regular” (A) was active, I chose “Sepia” (B) for the second sand dollar. To close, click on the “Check Mark” (C).
Step 14

Now…all of this is going to sound familiar but it did take me a couple of times to get the sequence right….click on the “Boxed Arrow” icon….
Step 15
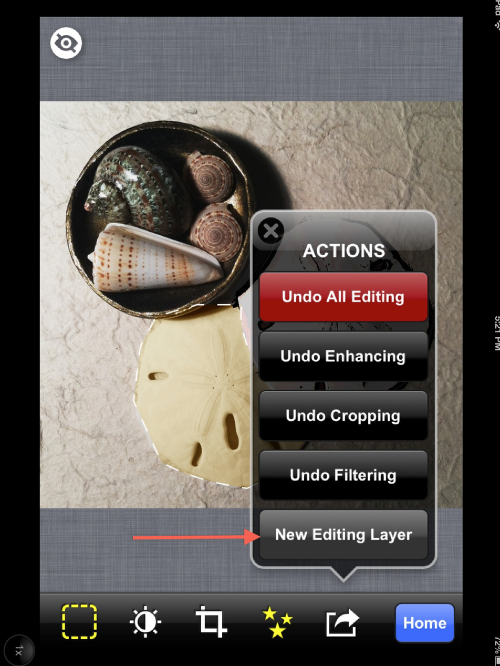
Click on “New Editing Layer”….
Step 16
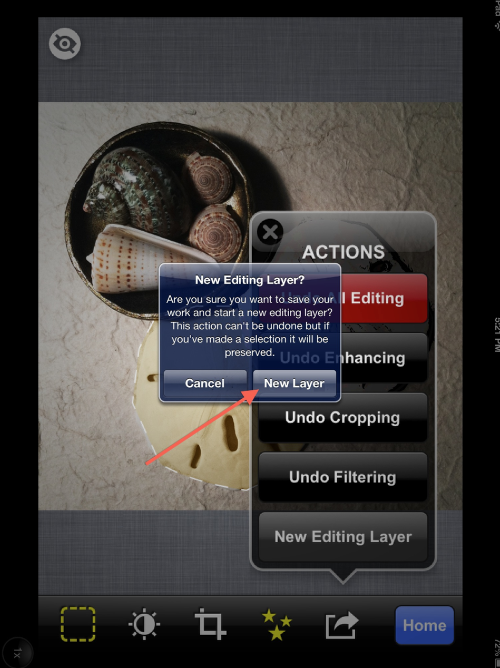
Click on “New Layer”….
Step 17
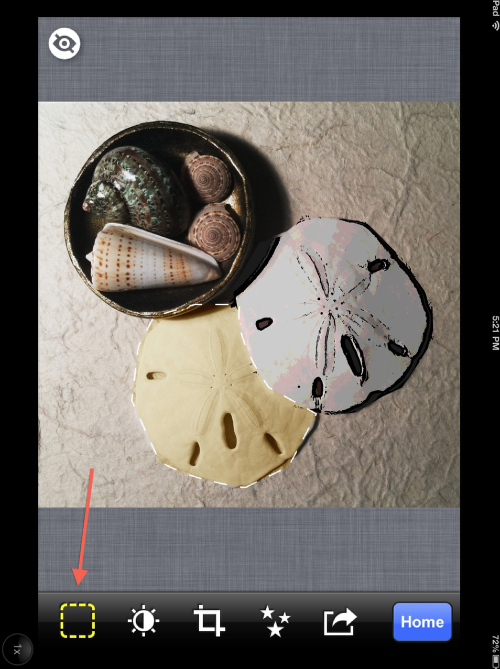
Click on the “Selection” icon….
Step 18
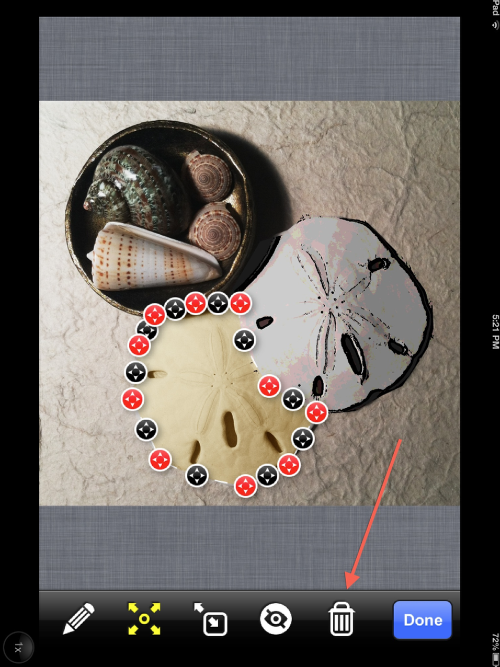
Click on the “Garbage Can” icon…
Step 19
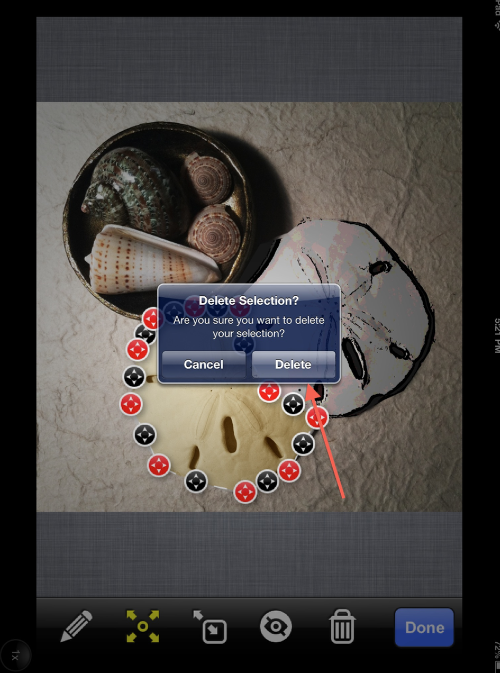
And…click on “Delete”.
Step 20
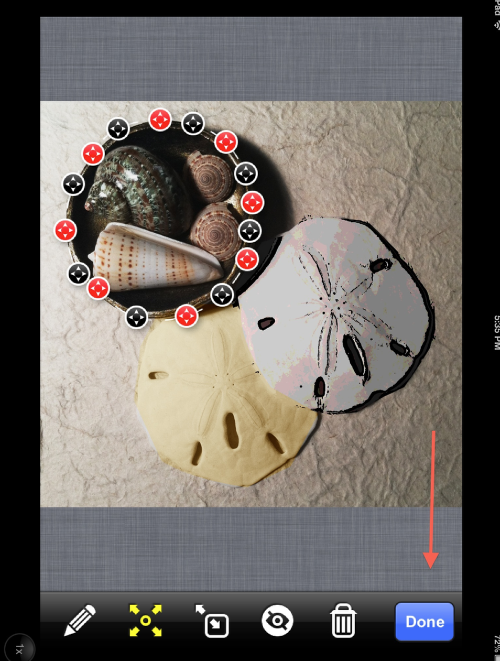
Create the selection points around the third “element” and click “Done”.
Step 21
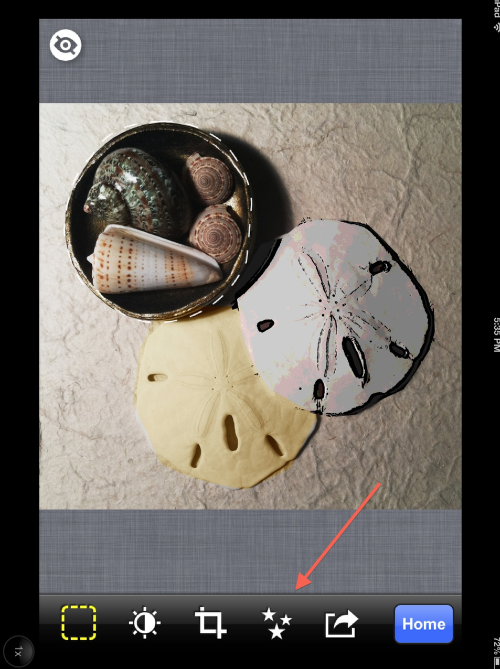
Yep…click on the “three stars” icon…
Step 22
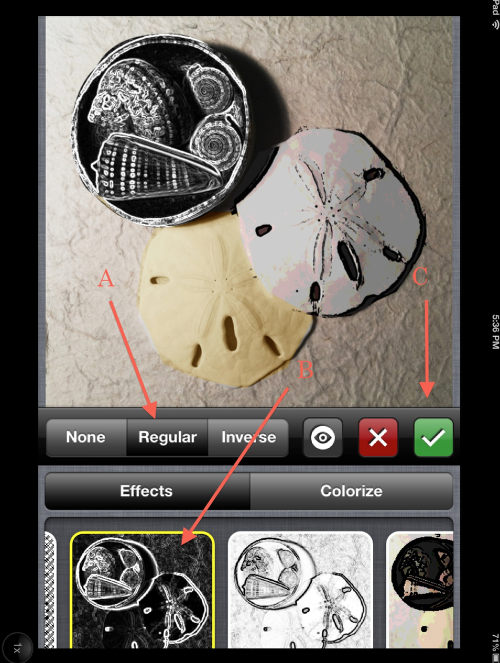
Make sure that “Regular” (A) is active, chose your effect (B), and then click the “check mark” (C).
Step 23
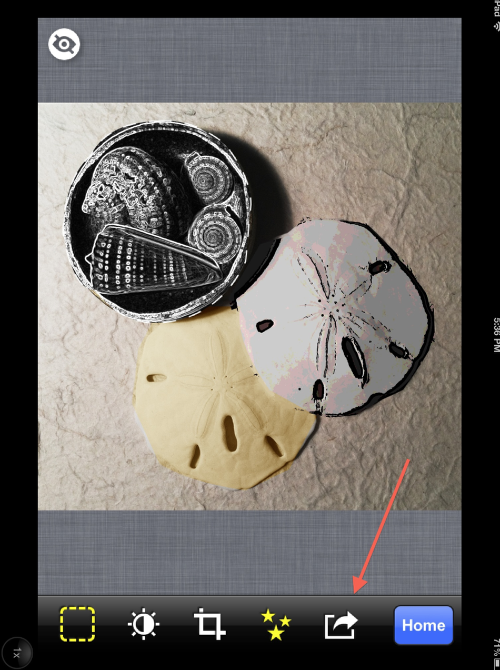
Wow! Wasn’t that exciting…going through all of that. Again! Sorry about that…but sometimes repetition is necessary…you know, practice makes perfect and all that. In any case…time for something a little different!!
As before, click on the “Boxed Arrow” but instead of repeating the same sequence exactly, I have a bit of a change-up coming…
Step 24
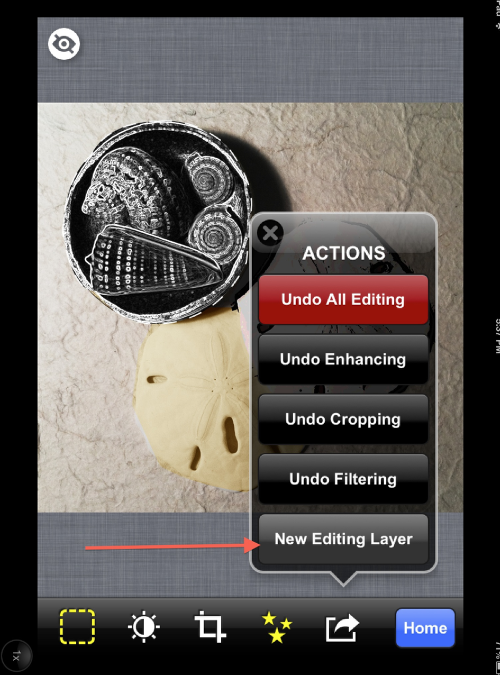
I know…you’ve seen this…but click on “New Editing Layer”… and when the next screen comes up…click on “New Layer”. Then…click on the “three stars” icon instead of the “Selection Box”. I left out all these screens because by now I figure you have it down pat. What we’re going to do is to add a FX effect on top of a current effect on the third “element”! Did all of this make sense? Hope so!
Step 25
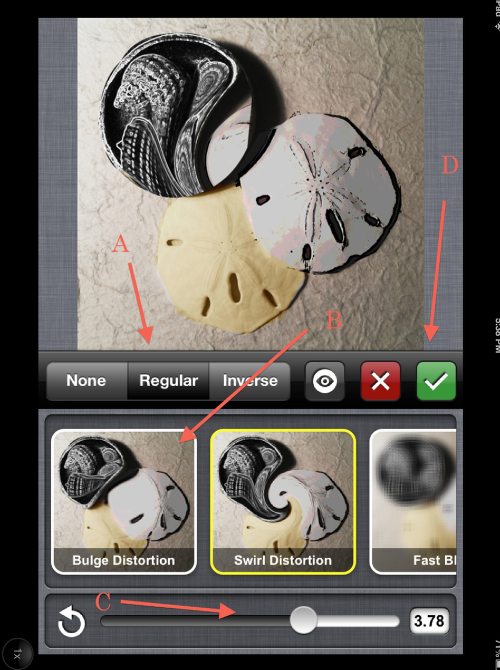
So…on top of the current effect, I’ve added the “Bulge Distortion” (B) effect. (After making sure that “Regular” (A) is active.) I used the slider bar (C) to adjust how much distortion. Then, as before, I clicked on the “check mark” (D) to finish.
Step 26
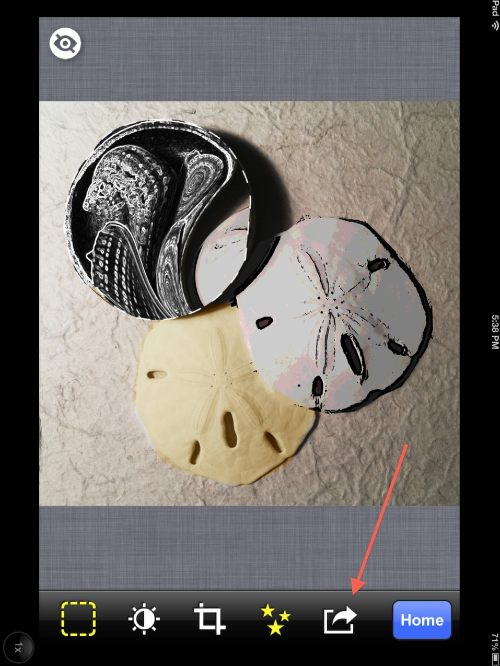
One last time…with feeling!!! Time to do the background and then it’s done!!!!! Click on the “Boxed Arrow” icon…
Step 27
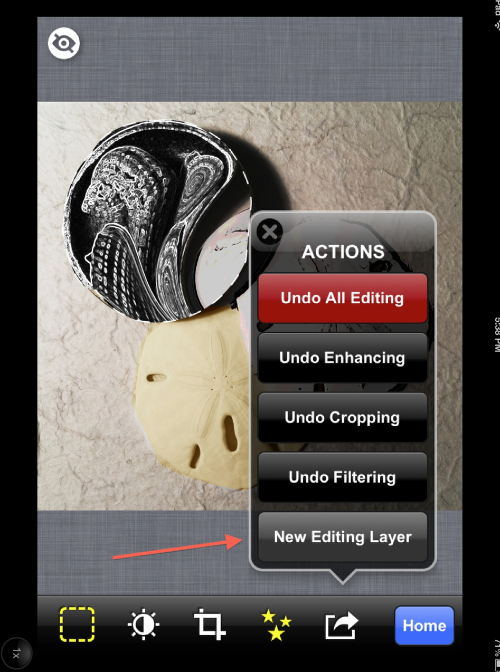
“New Editing Layer”….
Step 28
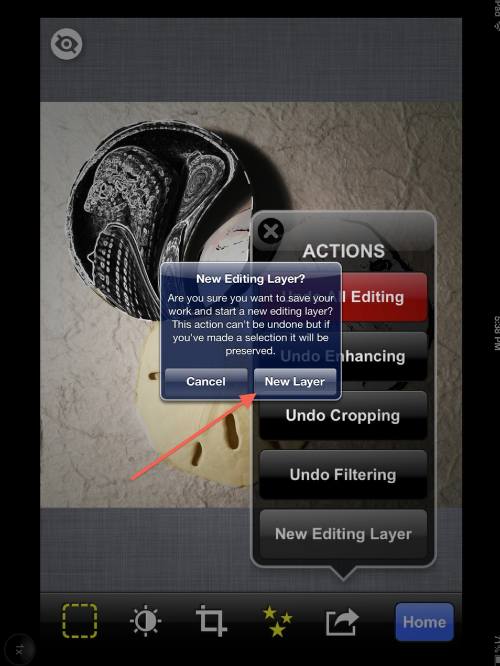
“New Layer”….
Step 29
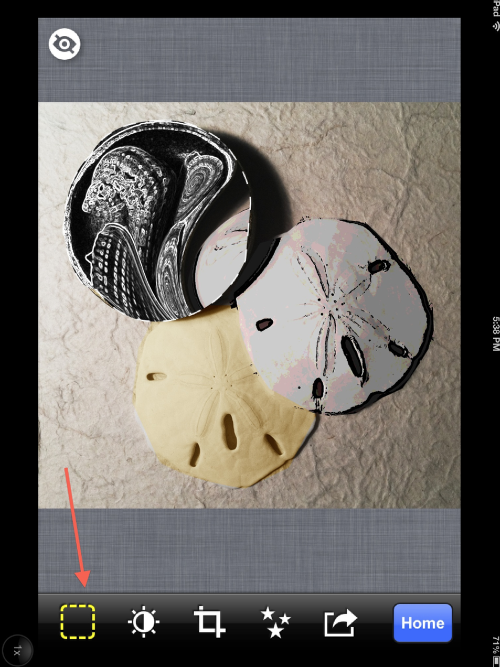
“Selection Box”….
Step 30
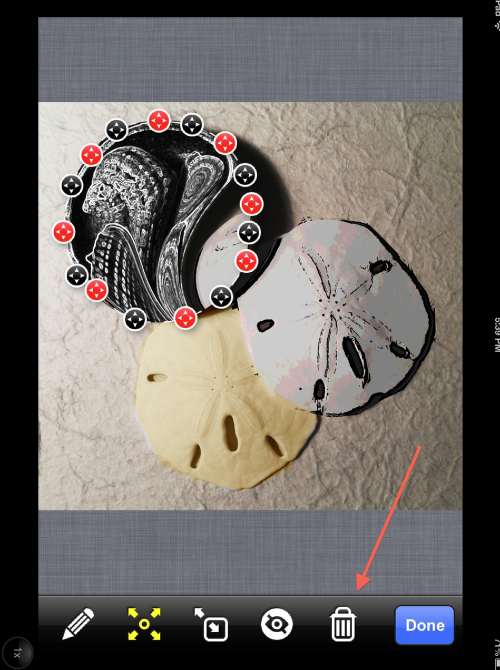
“Garbage Can” icon…
Step 31
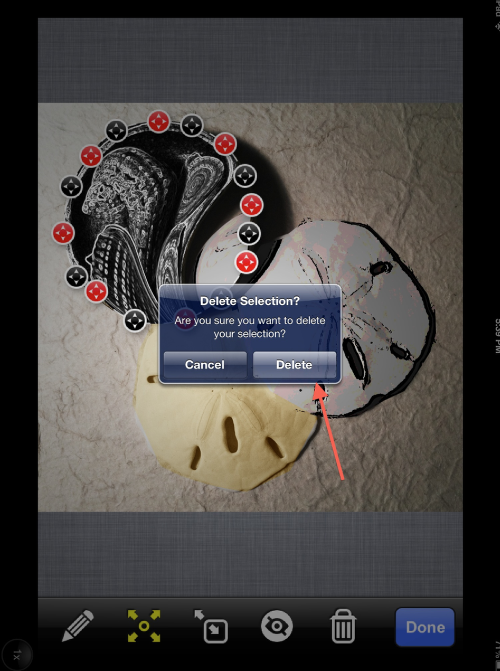
“Delete”…
Step 32
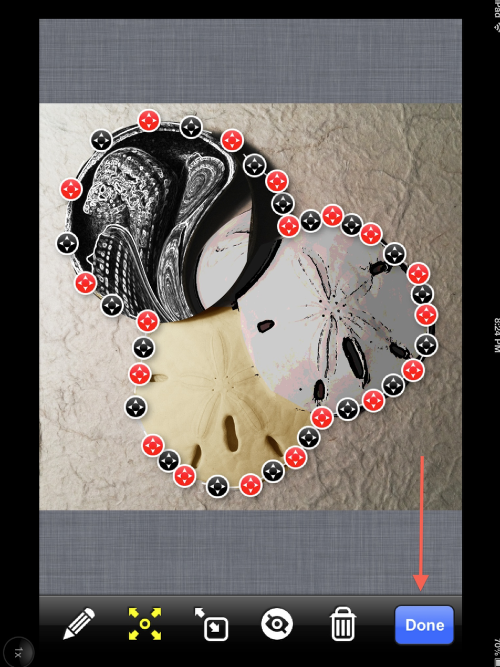
This time, make your selection points along the outside edges of your elements. Click “Done”.
Step 33
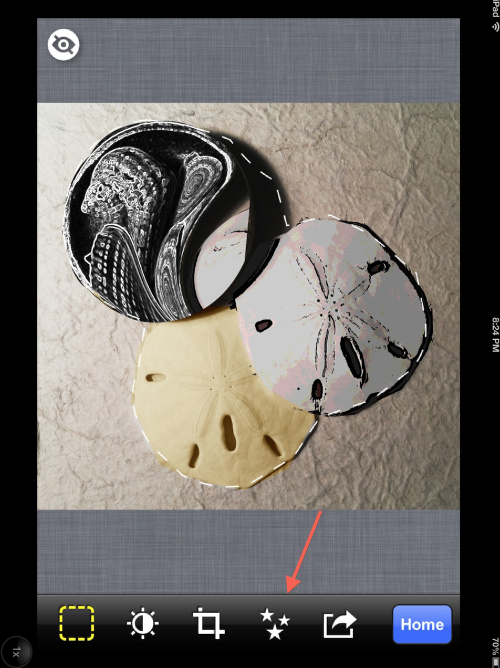
“Three Stars” icon…
Step 34
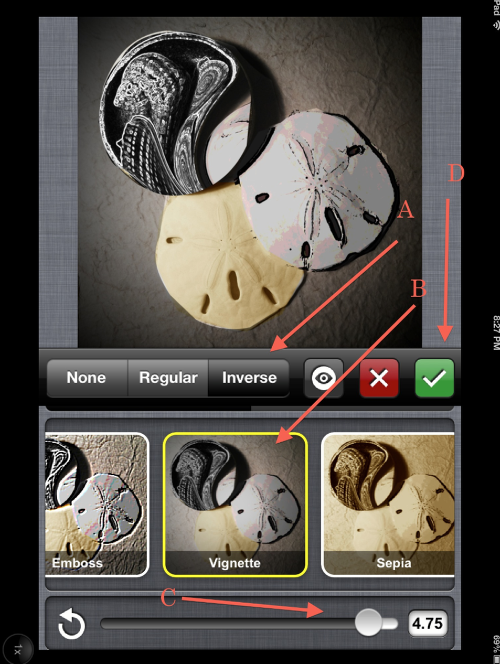
Now…here’s something different. Just a little. Instead of clicking on “Regular”, this time make sure that “Inverse” (A) is active. That way, the background is affected, not the image’s elements. I picked “Vignette” (B), adjusted with the slider bar (C), and clicked on the “check mark” (D).
Step 35
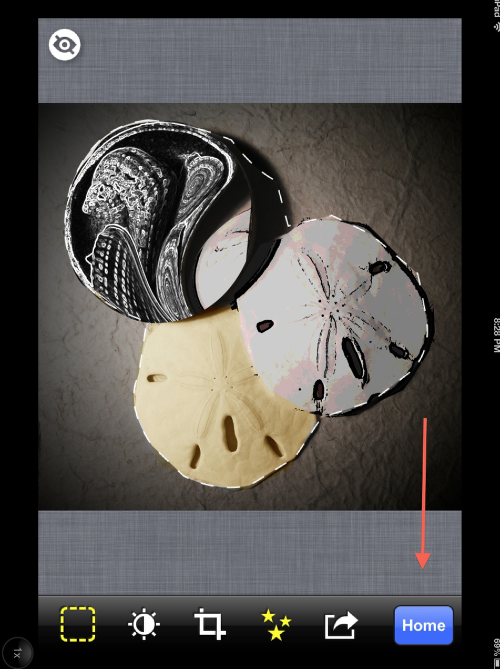
We’re done! Click on “Home” to start the save sequence!!!
Step 36
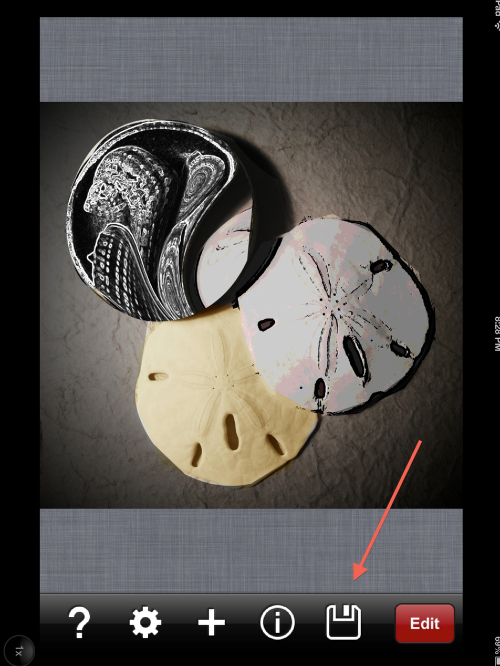
Click on the “floppy disc” icon….
Step 37
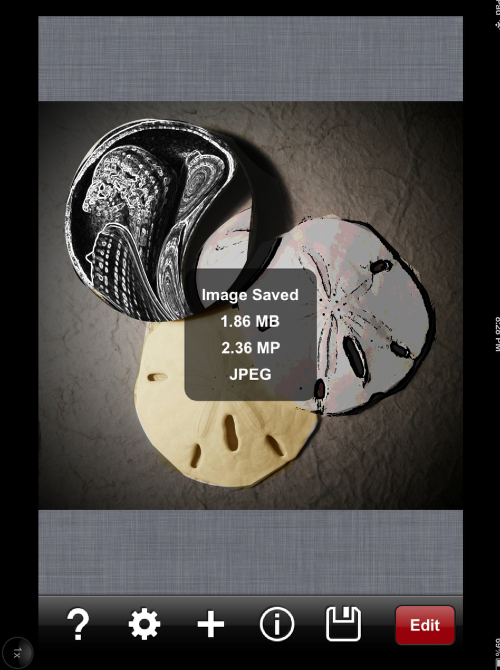
And…when the save is done…you’ll get this screen! All done!!!
Step 38
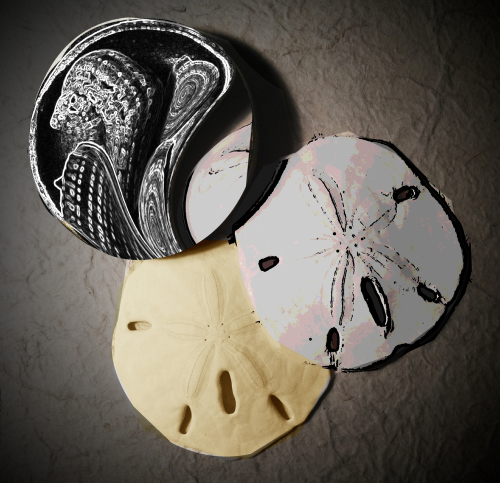
Here’s a look at the finished product. Not too bad…for what it is!!
I realize I repeated a lot in this tutorial, but sometimes that’s the best way…never assume that everyone understood the first time through…or the second…or third! For those of you who got it right off and were bored from there on…I did warn you!!
In any case, I hope you found this tutorial informative and enjoyable. Please don’t be shy with your comments and questions. I do love hearing from you!


10 Comments
Delta
Thank you, Thank you, Thank you ! This app has been a PIMA for a while. I’ve seen the uses, but the complexity has made me use work-arounds instead. I am now happy to use this app finally. Thanks again !
Robert Lancaster
Awesome! Thanks David.
I do have any idea for you though … how about a video tutorial on AnyShape?
Steve H
Thank you! This helps tremendously..
David
Delta ~ I’m glad this helped. You’ll also be happy to know that with their latest update, it is even easier to get the selection points/lines where you want them. I hope to have a new tutorial on this out in the very near future!
Robert ~ a video tute! Hmmm…maybe. It’s on my 2013 bucket list to become video-versatile so perhaps I’ll make this my first project. Thanks for the suggestion!
Steve H ~ I glad this helped you as well. I think you’ll like the updated version as well. I know I do!!
RegiB
Not boring at all! Thanks so so much for the tutorial. As you’ve shown, we may get the basics of the app, but the fine points take lots of trial and error and TIME! Thanks again for shortening the learning time!!
David
RegiB ~ and thank you!! I do appreciate your comments!
JQ Gaines
Excellent tutorial, David… very precise AND concise!!! I gotta admit, this is probably one app that I wouldn’t normally gravitate towards, but you definitely piqued my interest 🙂 I can see some wonderful possibilities here… thank you so much!!!
David
Thanks JQ! It took me a bit to come to turns with this app when I first started playing with it but the more I have used it, like you, I’m seeing more and more possibilities! Their latest update has made using it even easier so I’ll probably be going to it more often myself!
Doug Cadle
I just enjoyed the 3rd tutorial for any shape photo. The link you provided worked fine, but the link to see the first 2 gave a “not found” error. Please send me links to the first 2.
Thanks
Dave
Doug ~ I’m not sure what links you’re referring to in your comments…I don’t see any in this article. Can you give me some idea where these are? Thanks! Dave