Photo Education & Accessibility – ‘Getting the Picture with Panoramas on iPhone’ by Luis Perez
We are delighted to publish our third tutorial to our new section within theappwhisperer – Photo Education & Accessibility. There are many photographers and artists with special needs, whether this relates to visual issues even bordering on blindness (yes it’s true), to deafness to many other difficulties that people suffer with, these include mental health issues, physical issues and more. We want to ensure that whatever your difficulty you can still enjoy photography and art, it’s so therapeutic.
Our Photo Education & Accessibility Editor, Luis Perez is an Apple Distinguished Educator whose work focuses on accessibility and inclusive design. He received his doctorate in special education from the University of South Florida in 2013 and is the author of Mobile Learning for All from Corwin Press. His work has appeared in THE Journal, The Loop Magazine, and the New York Times Bits Blog.
Luis is also partially sighted and ironically he turned to photography as a result of his vision loss. This is what we are embracing, we want to help you to enjoy photography and art and to ensure you are able to access it with all the knowledge we can provide.
This week Luis explains the steps needed to create a panoramic photo with the iPhone using VoiceOver. It’s really fabulous, over to you Luis (foreword by Joanne Carter).
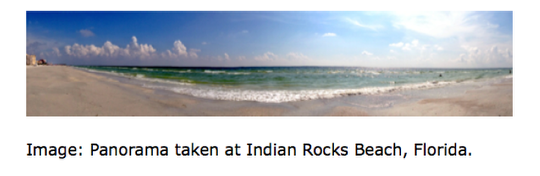
“The Grand Canyon, the Golden Gate bridge. These are magnificent views that are difficult to capture in a single photo. That’s when the Pano feature built into the iPhone’s Camera app can come in handy. This feature, which was introduced in iOS 6, allows you to capture more of the scene in front of you by taking a series of photos that are automatically stitched together by the Camera app. In iOS 7, this feature has been improved to correct for variations in exposure as you capture each segment of the panoramic photo.
There are a lot of tutorials on the Web that show you how to take a nice Pano photo using the iPhone. This one will be a little different in that we will focus on doing it while we can’t quite see the screen. Imagine that you have a visual impairment of any type and you want to share the beauty of the landscape in front of you with your friends and family back home while you’re traveling. How are you going to do that? Fortunately, this is where the accessibility features built into iOS devices come into play.
I have been using the Pano feature since it first debuted, even though I have a significant visual impairment that makes it difficult for me to capture this kind of photo. With VoiceOver, the built-in screen reader for iOS devices, I can get voice directions as I capture the scene in front of me with the Pano mode even if I can’t see the screen. VoiceOver will let me know if I am holding my phone in a straight line as I sweep around me to capture the scene, and it can also tell me if I am moving the phone too fast or too slowly for a proper capture.
Here are steps for using VoiceOver to capture a panoramic photo with the iPhone
1 Hold down your Home button to activate Siri and say “Turn VoiceOver on.” This will activate the VoiceOver screen reader without requiring you to go into the Settings.
2 Move your finger around the screen and VoiceOver will announce the name of each app. When you locate the Camera app, double-tap with one finger to launch it.
3 Move your finger over the screen to hear the names of the controls in the Camera app. Note for VoiceOver users: the option for switching the camera mode to Pano is found on the bottom of the screen in the portrait orientation and on the right side of the screen if you are holding it in landscape orientation with the Home button to the right.
4 The Mode option is an adjustable control. Once you have selected it by moving your finger over it, you can then flick left or right with one finger to choose among the different options. A few flicks to the left should get you to the Pano option we need.
5 With Pano as your mode, move your finger until you hear the Take Picture button announced.
6 By default, the Pano mode is set to capture a left to right panorama. To change the direction, move your finger toward the center of the screen until you hear “Capture left to right panorama button” and double-tap with one finger.
7 With your direction selected, move your finger to the bottom of the screen and select the Take Picture button, then double-tap to start capturing the Pano.
8 Move your phone from left to right (or right to left if you have changed the direction). As you move your phone, VoiceOver will guide you by saying “Move up” and “Move down” to help you keep the phone in a straight line. It will also say “Slow down” if you try to move the phone too fast.
9 When you are finished with your capture, there is no need to select the Take Picture button again. A quick tip is to just move your phone back in the direction you started. This will let the Camera app know that you are done with your Pano and your photo will be saved to the Camera Roll.
Panoramas help me as a person with little peripheral vision because I can capture a bit more of the scene in front of me than I need to make sure I have not cut off any important details. I can always crop the photo when I get home and view it on my computer or when I transfer it to the larger screen of the iPad. Panoramas also work great with a number of add-on wide angle lenses. I use the Olloclip 4-in-one lens system, which includes one of those lenses.
To see this in action, I am linking to a video I uploaded on YouTube that shows how to capture a panoramic photo with VoiceOVer on the iPhone, see above.
Luis Perez
Luis is our Photo Education Editor he is also an Apple Distinguished Educator whose work focuses on accessibility and inclusive design. He received his doctorate in special education from the University of South Florida in 2013 and is the author of Mobile Learning for All from Corwin Press. His work has appeared in THE Journal, The Loop Magazine, and the New York Times Bits Blog. You can learn more about Luis’s work in educational technology by visiting his website at www.luisperezonline.com. To see more of Luis’s photography, visit his Instagram page at www.instagram.com/lfp1211.