
ProCreate Tutorial By MaryJane Sarvis – ‘My Collage With Painting Method’
We are delighted to publish this excellent tutorial by MaryJane Sarvis using ProCreate to create an absolutely stunning final image.
Follow these steps closely and you will be totally captivated with MaryJane’s workflow. Don’t miss this…over to you MaryJane. (Foreword by Joanne Carter).
If you haven’t picked up ProCreate yet, you can do so here. It retails for $4.99/£2.99.
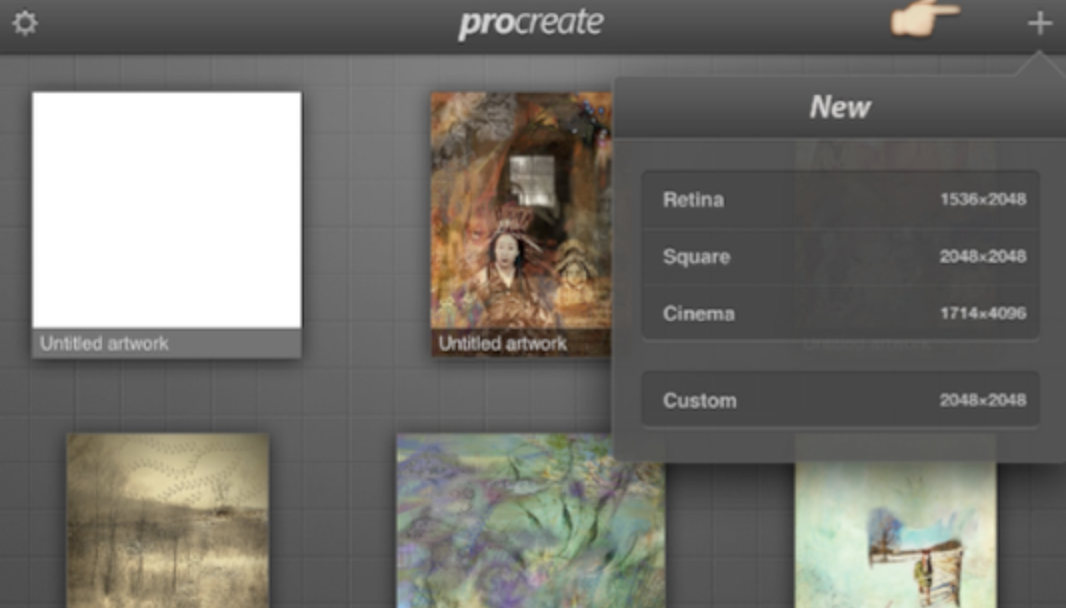
Step 1
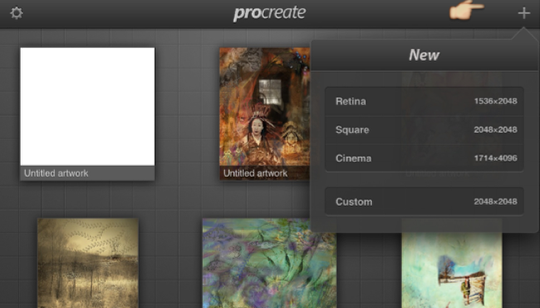
“When you open Procreate you’re in your gallery. To open a new work you hit the +. Choose your canvas.
Step 2
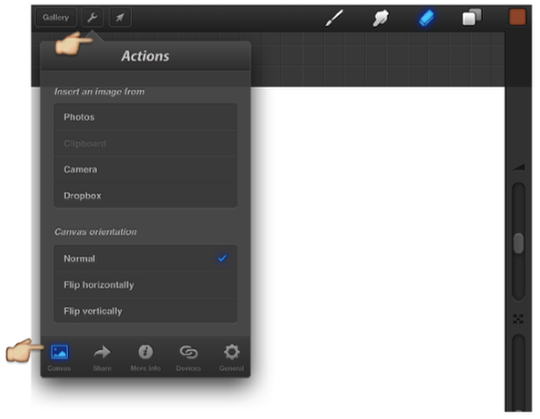
Your first toolbar is on top. Hit the wrench. The drop menu then displays the bottom bar of tools and choices. To insert a photo hit photos. Note that the canvas tab must be blue.
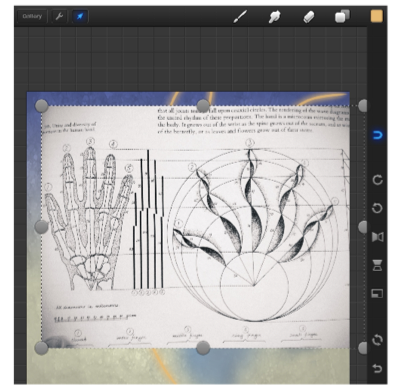
Step 3
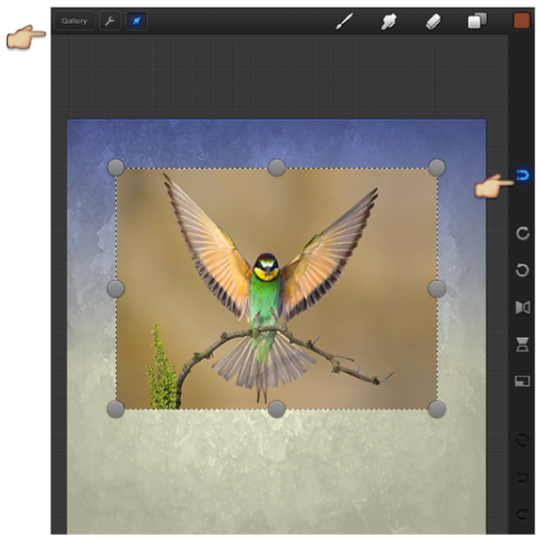
Note the arrow must be tapped/lit to move and adjust image.
I started with a background texture. Added the bird. Note the blue magnet on the tool bar on right side. I find the magnet helps me size and position the top image. Then I deselect it for fine tuning. You can find a lot of detailed directions in the Procreate handbook. There is a huge range of shape control in the grey dots.
You’ll want to size and resize the top image as you erase or otherwise alter. Note that the arrow on the top left must be highlighted blue in order for the top image to be moved or sized.
Step 4

To erase around the bird or any adjustments go to the brush menus in the top tool bar. Each style tool brings down the full brush selection. Then choose brush style. From big and soft to fine point they’re all available through the style bar. I prefer the airbrush selection for basics erasing around an image. Then I change to finer points found in Sketching or Inking.
More on brush – smudge – eraser choices later.
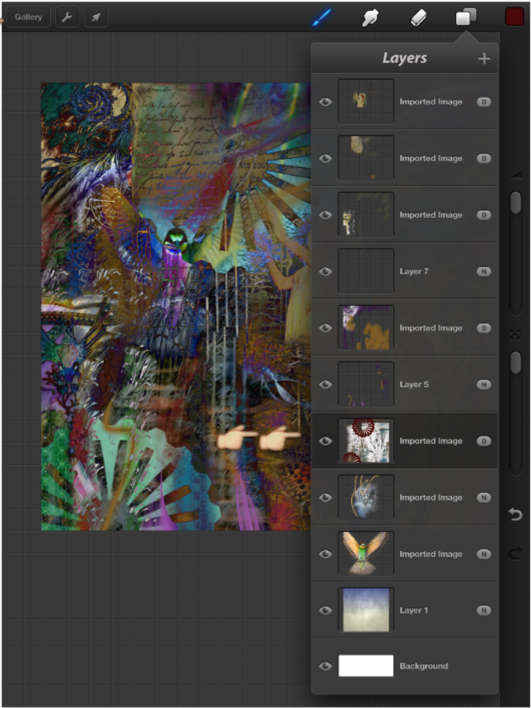
Step 5
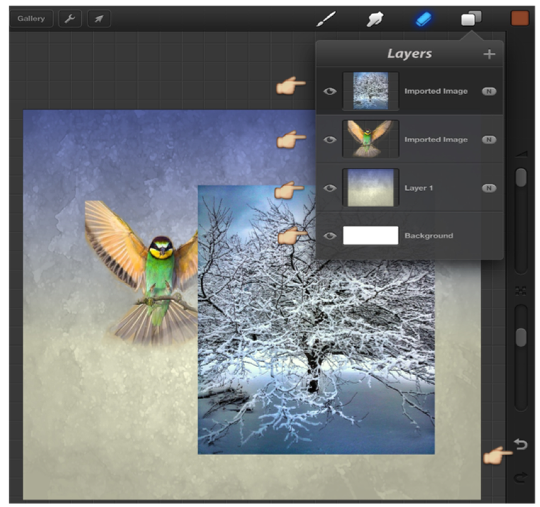
After my first two images are prepared I add another image via the wrench again. Here on the right is the layer menu. Every time you add an image you add a layer. Or add a layer by tapping the + on layer menu top right.
Swipe each individual layer to find each layer’s choices. Duplicate, Clipboard and Delete are shown.
Note that you can only erase or smudge or paint the layer you’re on. There’s no Unerase function. Only the undo arrow. There’s up to 250 undos per layer. It is best to use as many layers as you can. Much more control. There can be up to 20. You can merge 2 at a time or once you get too many.
Step 6
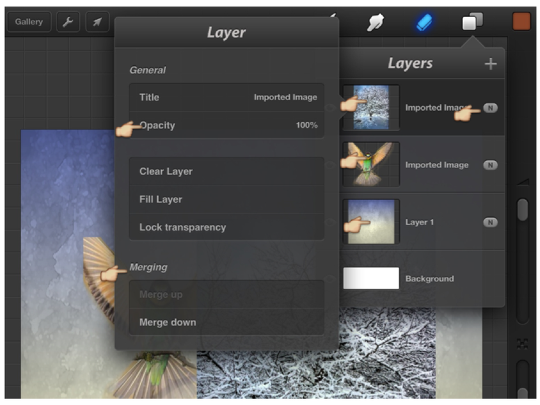
Tap the window inside each layer to bring up the other layer menu shown above. To adjust Opacity you tap that line then it disappears. You then swipe the canvas to adjust the percentage.
Note the Merge choices as well.
Tap the little oval on the right of each menu bar to reach the Blend menus.
Step 7
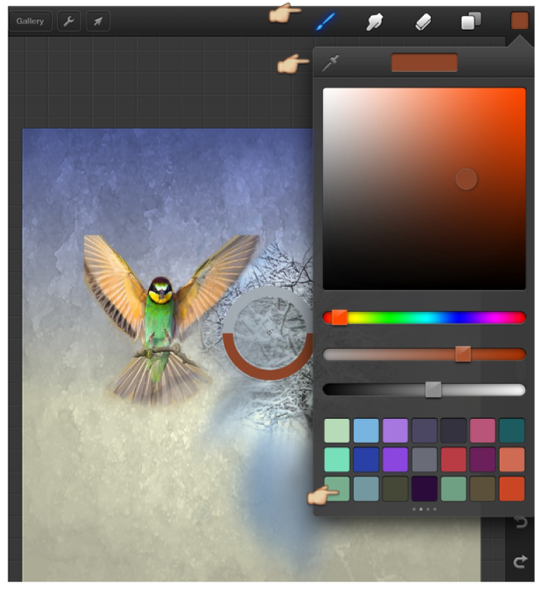
To paint you choose the brush. To choose a color go to the color square far right. Use any of the palette choice tools. The eye dropper on the menu top left functions to choose a color on your canvas to use. If you want to use it later then drag it from center top to a little square in the bottom palette.
Step 8
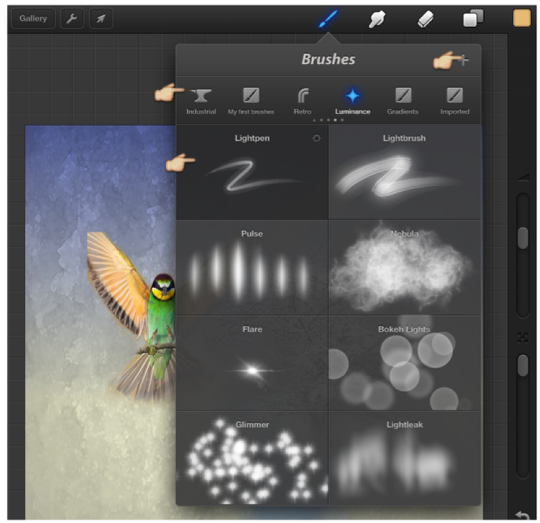
Your 3 tools, Brushes, Smudge and Eraser have a huge variety of sizes, shapes and patterns. All can be found and are interchangeable in the drop down menus. After you choose a tool, then a brush style, you can even adjust that brush to the size and shape. Each brush has settings on the flip side exposed by a double tap. I recommend duplicating it before changing it, though you can reset it too.
There are more brushes available from the Procreate Artery (store) and from the Forum sharing page. Access both under the wrench then info at center bottom menu. You can also make your own!
Step 9
I added another image, building up my layers.
Step 10
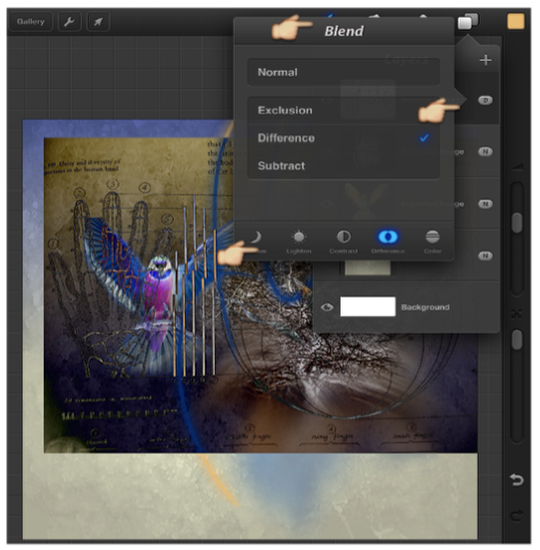
After trying several choices in the Blend menu I choose Difference.
Step 11
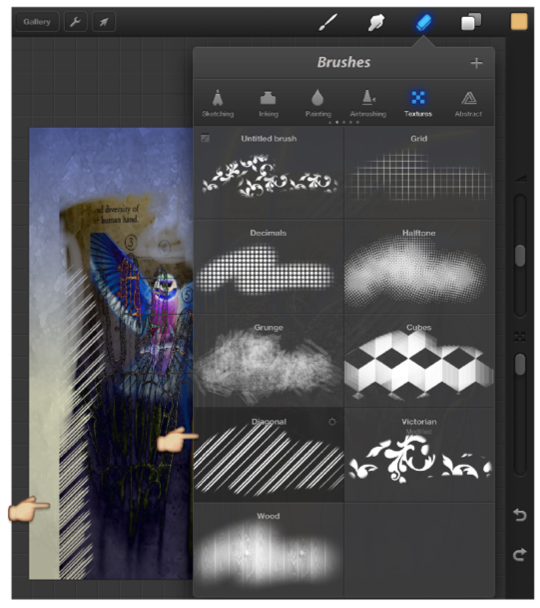
Using the eraser I delete in the diagonal pattern brush from the Textures brush menu.
Step 12
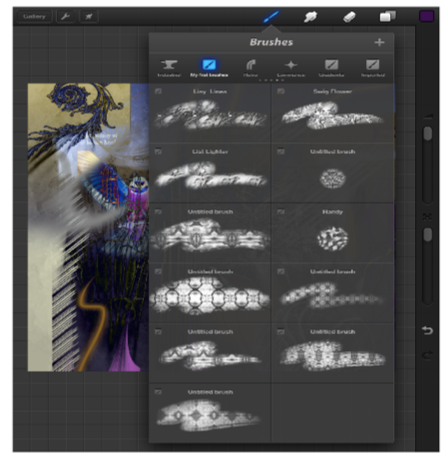
I continue to add images, paint, smudge and erase. These are some of my own brushes made from my photographs.
Step 13
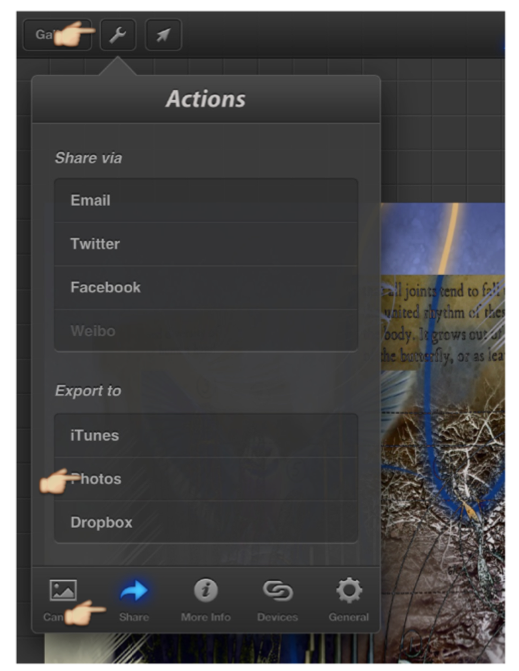
To save the image I go to wrench and hit the Share on bottom strip. You can save from here or after your back in your gallery.
Step 14
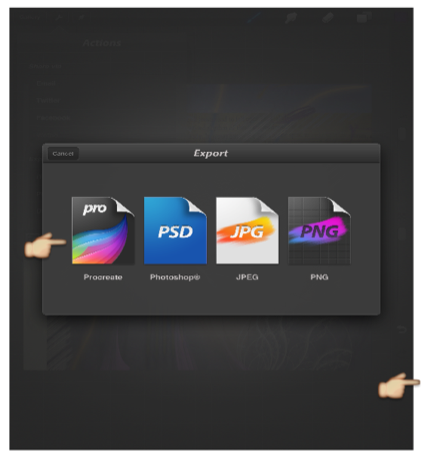
Choose which style you want to save in.
Step 15

Note the other choices available under the wrench. Smart hide can be useful. Experiment.
Step 16
My finishing touch was a stamp I found on the Brush exchange on the Procreate Forum. Website. I went down to the layer which is blended in the Difference selection. I preferred that layer to adding a new layer.
Return to the gallery by tapping it on the top left.
Step 17
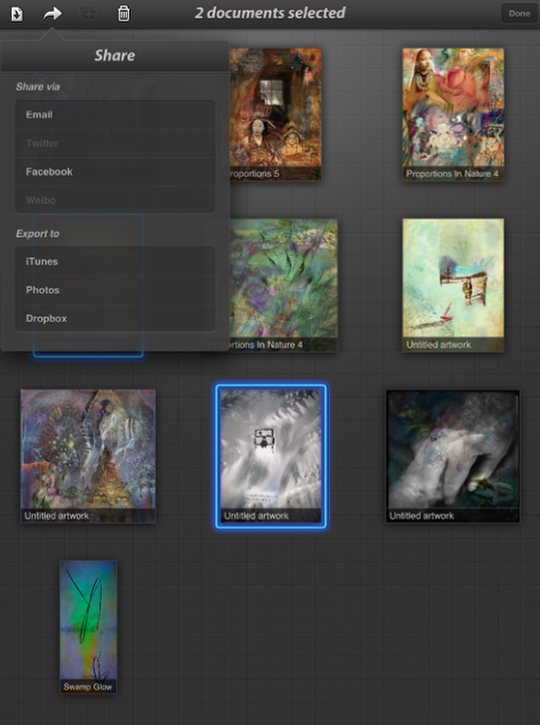
Finally, back at the gallery I chose to Share several finished works. Tap the wheel first. Then select the images. Then the actions. When you keep your work in the gallery all your layers are maintained. Very helpful!
Final Image
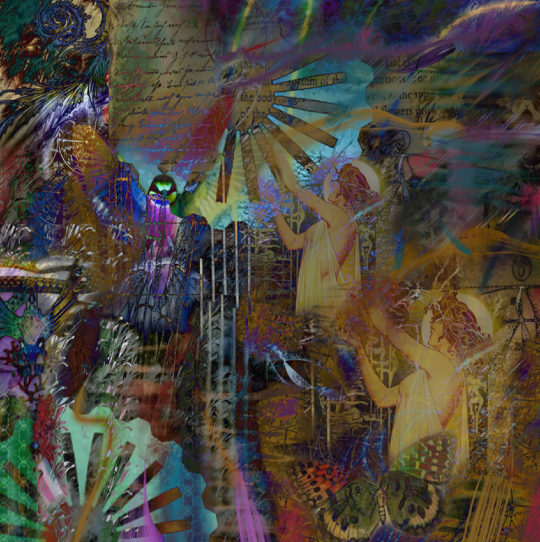
Finished work! I sometimes take the final piece into another App such as Camera Bag 2 or Alt Photo to name two. Just to add a vignette or unifying filter.
I leave them in the gallery for weeks until I’m certain I’m done”.
Please Support Us…
TheAppWhisperer has always had a dual mission: to promote the most talented mobile artists of the day and to support ambitious, inquisitive viewers the world over. As the years passTheAppWhisperer has gained readers and viewers and found new venues for that exchange. All this work thrives with the support of our community.
Please consider making a donation to TheAppWhisperer as this New Year commences because your support helps protect our independence and it means we can keep delivering the promotion of mobile artists that’s open for everyone around the world. Every contribution, however big or small, is so valuable for our future.
Joanne Carter
Joanne Carter is a British photography journalist, editor, curator, and the founder of *TheAppWhisperer.com*, one of the world’s leading platforms dedicated to mobile photography and art. Since its launch in 2009, TheAppWhisperer has become an international hub for artists of all levels to discover, learn, exhibit, and engage with contemporary photographic practice.Built on principles of inclusivity, accessibility, and artistic excellence, Joanne has spent almost two decades championing mobile photography as a serious artistic medium. Through interviews, critical essays, exhibitions, competitions, and education, she has helped shape and document the evolution of mobile art on a global scale.Her work has taken her internationally, lecturing on photography and mobile art at institutions and events including the Museum of Art in Seoul, South Korea, alongside appearances in the UK and Europe. She has served as a juror for international photography and mobile art awards across Portugal, Canada, the United States, South Korea, Italy, and the UK.Joanne is also the founder of *TheAppWhispererPrintSales.com*, one of the first online galleries dedicated exclusively to collectible mobile art, connecting artists with collectors across Europe, the United States, and Asia.Before founding TheAppWhisperer, Joanne worked extensively in print journalism and photographic publishing, including roles at a paparazzi photo agency and as deputy editor of a leading photography magazine. Her freelance journalism, criticism, and commentary have been published widely in both the UK and the US, with bylines in *The Times*, *The Sunday Times*, *The Guardian*, *Popular Photography*, *NikonPro*, *DPReview*, *Which?*, *Vogue Italia*, *LensCulture*, the *BBC*, and more recently, the *Financial Times*, where her published letters on photography continue to contribute to wider conversations around the medium.Alongside her editorial and curatorial work, Joanne’s own photographic practice has been exhibited internationally across the UK, Europe, South Korea, and the United States. Her work increasingly explores themes of grief, loss, death, memory, and the body.Her current research interests centre on grief, death, and poverty, with forthcoming postgraduate study leading towards doctoral research in these areas.Joanne is currently developing new long-form writing and photographic projects and is available for commissions, editorial projects, speaking engagements, and collaborations.Contact: joannetheappwhisperer@gmail.com)

24 Comments
Janine Graf
Well done MJ! I don’t use an iPad (I have a first generation that’s been stolen by my son to watch Netflix on . . . then he leaves it on his bedroom floor, piles toys on top of it, nearly steps on it every morning while getting out of bed – dang kids), but if I did use an iPad I’d download Procreate and read this tut over and over. I’m REALLY loving the work you’re creating with it!
Cara Gallardo Weil
So awesome MaryJane! I think what you do is so amazing! I think I’m going to have to spend months on this to learn the technique! Thank you so much for sharing your creative process! xoxo
Geri
Mary Jane – thanks for sharing your process – I’m definitely going to bookmark this for future reference. I have ProCreate and have done a lot of original painting with this app but have never tried any composite work.
Carlos
That helps! Thanks for sharing Mary Jane. Greeting from Texas.
Carlos
PS…are using your finger or a stylus? If it is stylus…which one?
Mansi Bhatia
There were at least 5 things I didn’t know could be done in Procreate. Thanks so much, especially, for the layers bit MJ. It’s been very confusing to me but I will try that with renewed vigor now thanks to you 🙂
Carolyn Hall Young
Thank you, MaryJane, I use Procreate often and fully, and this is a great introduction to the process. It is great for drawing, painting and collaging images with layers. Procreate and iColorama are my two core apps – a strong combination. They play well, together.
Gianluca Ricoveri
Wonderful tutorial MaryJane!! Well done!!
Andrea Bigiarini
Excellent tutorial MaryJane!
Catherine
Wonderful tutorial MaryJane! I’m anxious to try out the new things I learned… And your finished piece is just gorgeous!
Shane Martin
Thanks for sharing MJ, that was awesome!
karen divine
very cool…thank you very much…a few things I still don’t understand but I will email you….
Lavender
I’ve had Procreate for a few months now and have been slowly trying different things out on it. I wish I had this tutorial at the start…it would have saved me so much time! Thanks for sharing this! I’m eager to try a few of the things from your tutorial.
thanks!
Mark Schnidman
Thanks for sharing Mary Jane. The finished piece is totally awesome and your tutorial is clear and concise.
kachouro
Another example made with Procreate: http://bit.ly/13eoHNA
JQ Gaines
Ooooh, I can’t believe this article missed my radar!! Oh well… absolutely fantastic work, MaryJane!!! ProCreate is, by far, one of the most versatile and powerful tools available… and creating a tutorial on some of these features will continue to be a great resource for us. Nicely done!!! 🙂
Tracy Mitchell Griggs
I also don’t have an iPad and find that collage and layering work to be too challenging on the iPhone’s small real estate. Hopefully I’ll be getting an iPad sometime in the near future and have bookmarked this feature to review again once I am in iPad land. Thanks for the tutorial and hope you are added as a columnist here to focus on Procreate.
Cheers~
Colleen Gutschenritter
I adore Procreate and am still learning its huge amount of potential. This was a fantastic tutorial on some things I never thought about. Love the idea of erasing with those pattern brushes. Thank you so much for this!
Wayman
Awesome I’ve had procreate since getting my iPad but haven’t had any luck with it yet. Gonna play with it more now
Cat Morris
Great tutorial MJ!! I love Procreate too!
Natali
It’s a really great tutorial! I am delighted
It was very informative and interesting. Thanks for sharing!
Unfortunately I can not try this app until I have no iPad =)
Elaina Wilcox
Thanks Mary Jane! Finally I find some good advice on this deep app. It’s going to take me a while but with practice ( and you’re great tut I’m going to master this!
E
Peter
Very clearly put, thanks. One question: I am stuck on a page called ” Untitled stack” and can’t find how to get back. Any suggestions?
Federica
Amazing tutorial MJ, I have just purchased Procreate and I’m trying to do something. thank you!