Wood Camera – iPhone Photography Tutorial – How To Create A Dynamic Image – Part 2
As I mentioned in my earlier Wood Camera tutorial, I didn’t warm up to this app right away. When I first looked at it, my thoughts were those of “not impressed… I already have apps that do the same thing…” These thoughts quickly changed as I started working with Wood Camera. This tutorial is the second of two were I will show you how to quickly create a dynamic image…without having to leave the app!
If you haven’t picked up Wood Camera yet, you can do so here. It retails for $1.99/£1.49/download.
Final Image
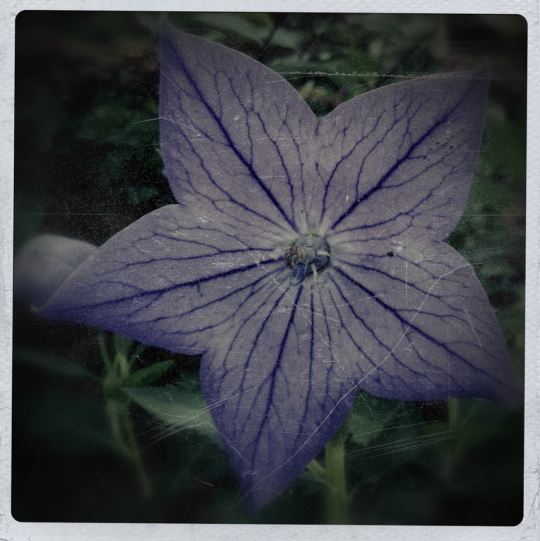
This is the final image, the one we are going to show you how to create.
Step 1
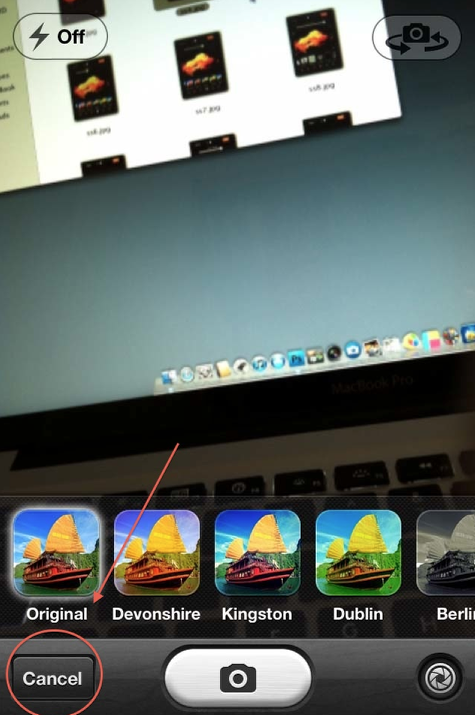
When you first open Wood Camera, it takes you to its camera function. It is here that you can capture an image using the selection of lens filters displayed on the bottom of the screen. This isn’t what I wanted to do this time, as I wanted to work with an image in my camera roll. To do this, click on the “Cancel” button…and this will take you to the Light Box.
Step 2
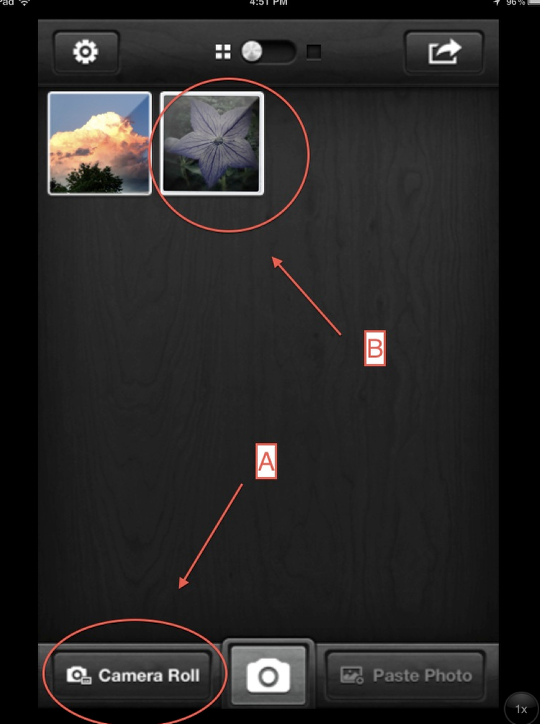
Here, click on the Camera Roll button on the bottom left (A) and you’ll be taken to your Camera Roll where you can select the image of choice. You’ll then be taken back to Light Box…click on the image (B)…and this will take you to the Edit screens…
Step 3
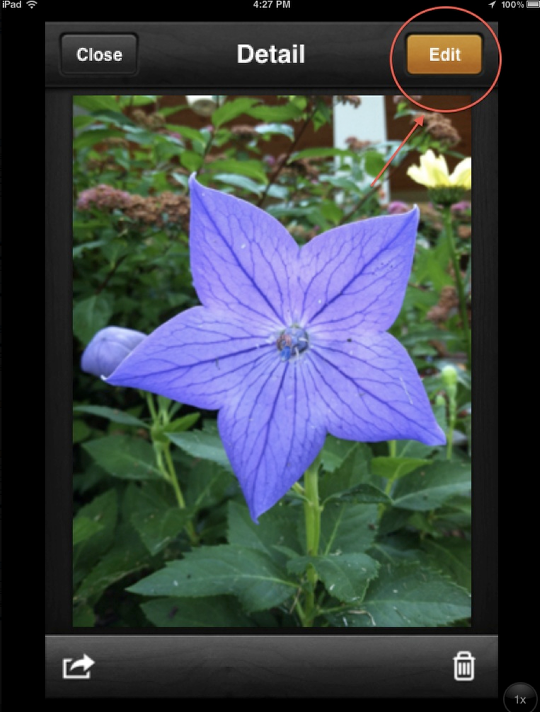
To begin your “transformations”, click on the Edit button in the top right corner…
Step 4
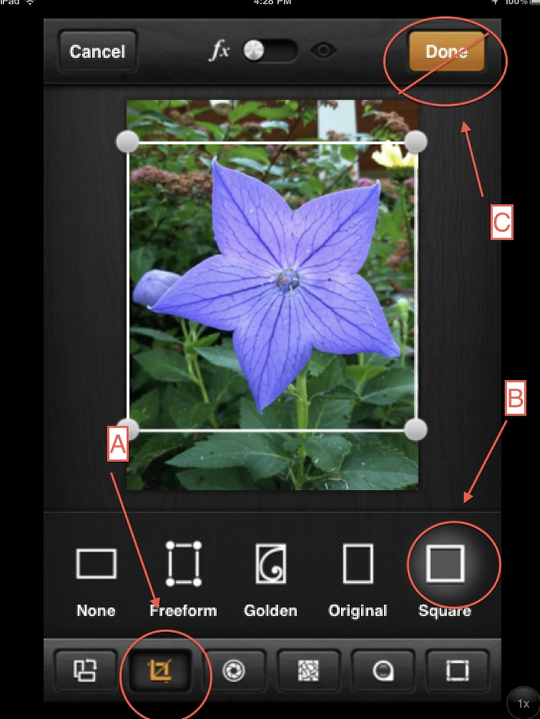
The first edit I did was to tighten up the cropping. I clicked on the Edit symbol (A) on the bottom tool panel, chose “Square” (B) and then used the shown selector points to set my crop. Now…DO NOT click the Done button (C) in the top right corner thinking that this will activate the crop. It will, but it will also end your Edit and you’ll have to start all over again! (I learned this the hard way…twice!) Instead, just click the next tool symbol you want to work with….
Step 5
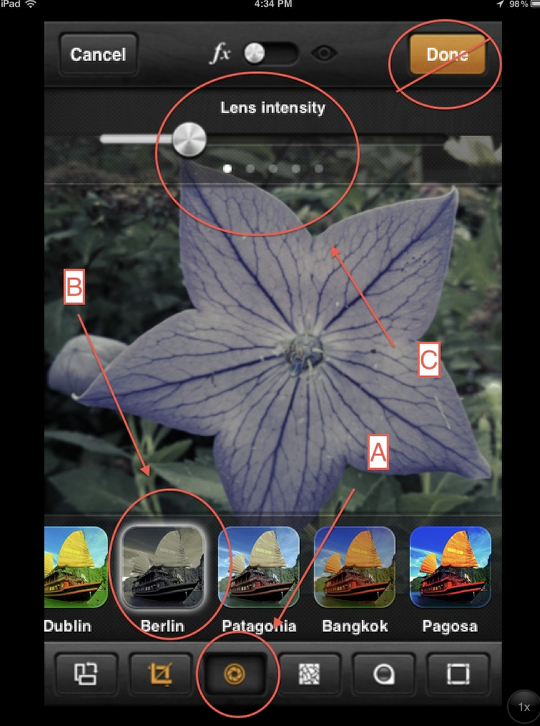
In this case, I wanted to work with the lens effect…so I clicked on (A) which brought up my choices. Playing around a bit, I finally decided on “Berlin” (B)…and then adjusted the lens intensity using the slider bar at the top (C). There are more settings that you can adjust in this effect…to get to those, slide the top tool bar to your left! (DO NOT click the Done button! I’ll tell you when!).
Step 6
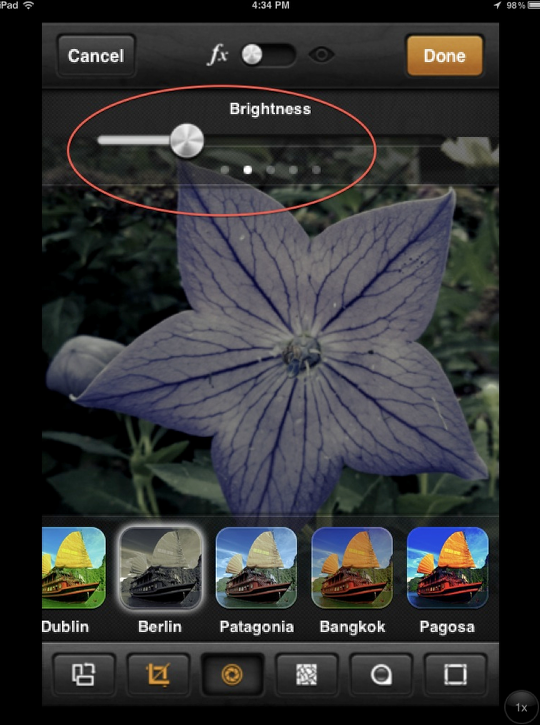
This brings you to the Brightness bar…and once again using the slider, adjust accordingly. Now it’s time to adjust the Contrast so slide to the left…
Step 7
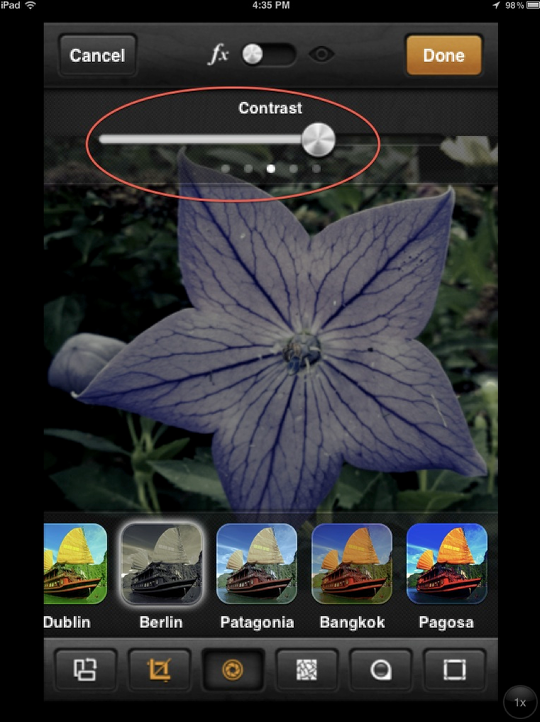
….and adjust the Contrast to taste. Next step…Texturize! (DO NOT click the Done button! It’s not when yet!).
Step 8
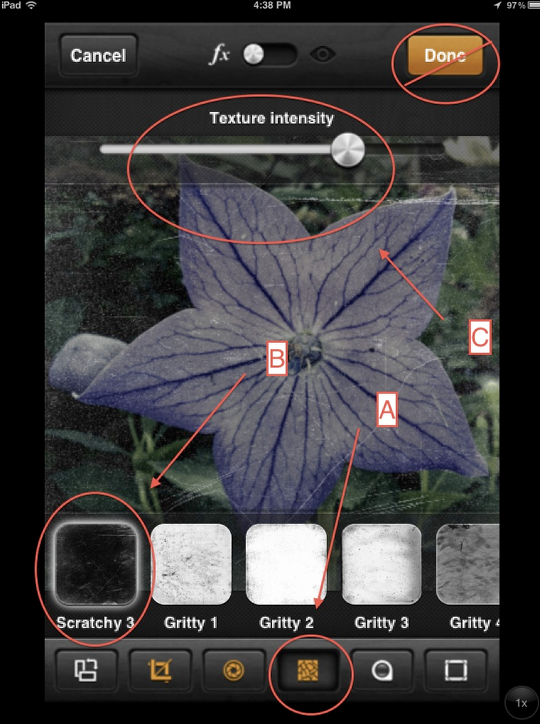
Click on the Texture button on the tool bar (A) which will bring up the selection of textures. Once again, I tried several out before settling on “Scratchy 3” (B). I then used the Texture Intensity slider bar (C) to adjust. (It’s not when yet!).
Step 9
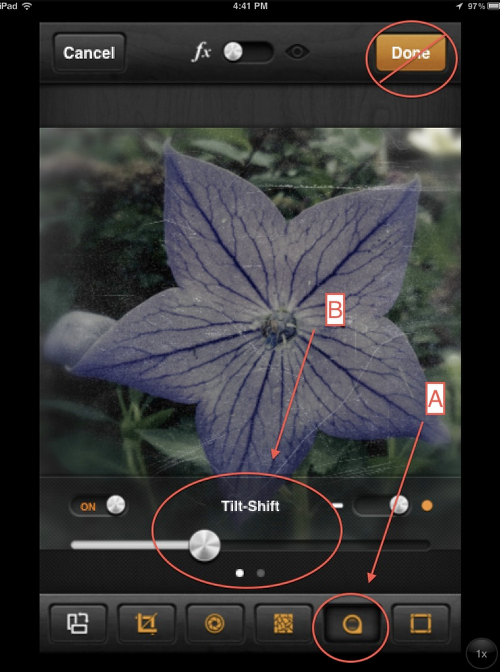
As you move down the Effects tool bar, the next one is the Vignette effects. (A). When you click on this, the Tilt-Shift function comes up first. I adjusted this as indicated. (B).
Step 10
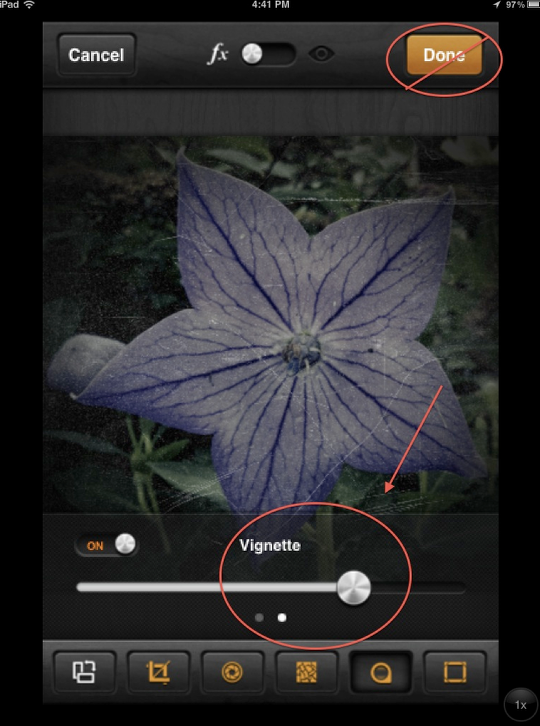
To get to the Vignette effect, slide the tool bar to the left…and I adjusted this as indicated. Again, it’s not done yet!
Step 11
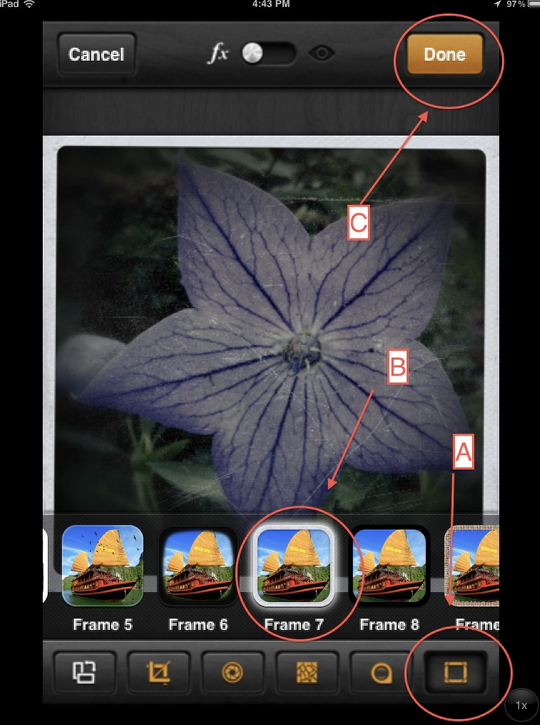
Moving to the Frames by clicking on (A), I chose Frame 7 (B) because I like the “snap shot” effect this gave this image. Guess what! Now it’s time to hit Done (C)! This will finish the image….and take you to the next screen….
Step 12
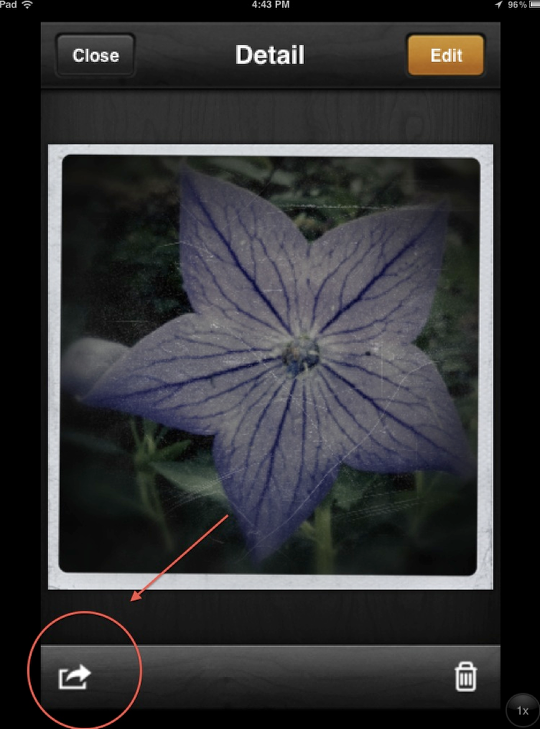
In this screen, you could hit the Edit button and add more effects to the image, hit the Delete button and start all over…or click on the button in the lower left, which will take you to the Share screen…
Final Image
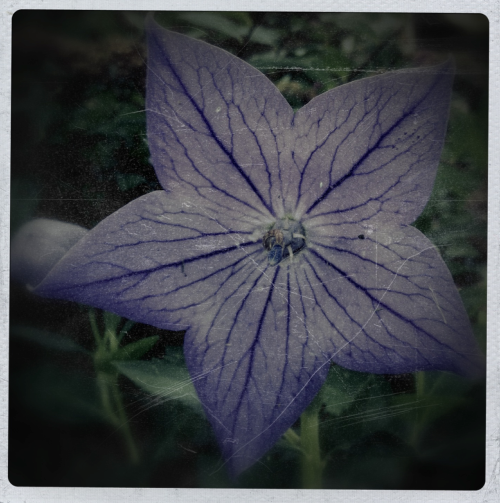
….and where you can save to your Camera Roll or share to wherever you want!!
This finishes up this tutorial…I hope you found it useful! Thanks ahead for any comments and/or feedback you leave below!! (Comments are much appreciated!).


6 Comments
Robert Lancaster
Thanks David for an awesome tutorial! I ahd Wood Camera just sitting on my iPhone and I was on the verge of deleting it when I read your first tutorial. I have now used it quite extensively and am learning more about it every day.
Thanks again to theappwhisperer for providing us with these tutorials … amongst all their other brilliant content.
Thumbs up all round.
David
And thank you, Robert!! I was the same way after I started using Wood Camera…I ended up creating a bunch of images with it that I’ll get posted on my blog sometime. Glad you found my tutorials useful!
kathy
hello my friend… loved this, your like a wandering nomad:))) like me:))!!!!!
David
And hello to you Kathy! Yeah…you’re “apt” to find me anywhere!! I’m so glad you like this tutorial!!
Carol
This is great, Dave, and making me really warm to WoodCamera. I’ll have to reinstall. You’ve turned a pretty photo into a very interesting one.
David
Thanks Carol! However…I’m not sure how to take “turning a pretty photo into a very interesting one”…I guess that’s good! (o: