Xtrafolio – Professional iPad Photo Portfolio Tutorial – Getting Started
I have had this app on my iPad ever since it came out feeling it would give me the presentation tool that I wanted to use with my iPad. And…I will have to admit that I was immediately intimated by its interface and kept putting off using it. So…when The AppWhisperer asked me to do a series of tutorials on this fine app, I agreed realizing that this was what I need to do to “get over it” and start using the power of Xtrafolio.
The plan is to give you a tutorial series showing you how to set it up and then dig into all the features that make Xtrafolio such a great presentation app. So let’s get started!!
Xtrafolio retails for $16.99/£11.99 and you can download it here,
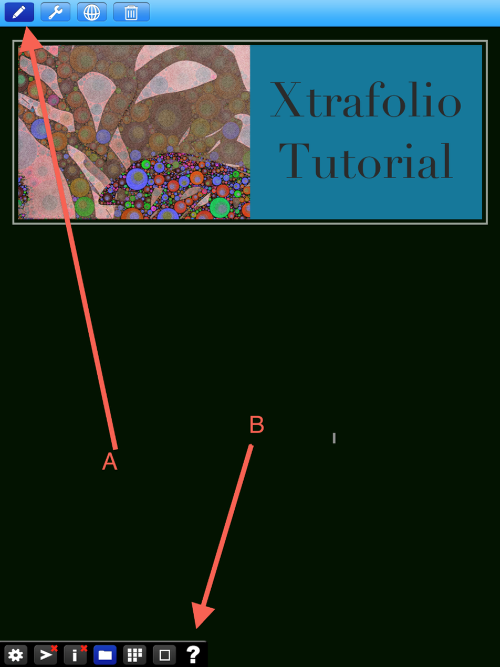
When you first start-up Xtrafolio, the first screen that will come up “empty” save the “Pen” icon in the top left hand corner. Since I’ve set up parts of this tutorial already, when I open the app I get this screen, normally when you open for the first time the help box opens and you start on the gear page. Click on this icon (A) and tool bar at the bottom will come up. Now…I would highly recommend that you click on the “Question Mark” icon (B) to open their guide…and read this first!
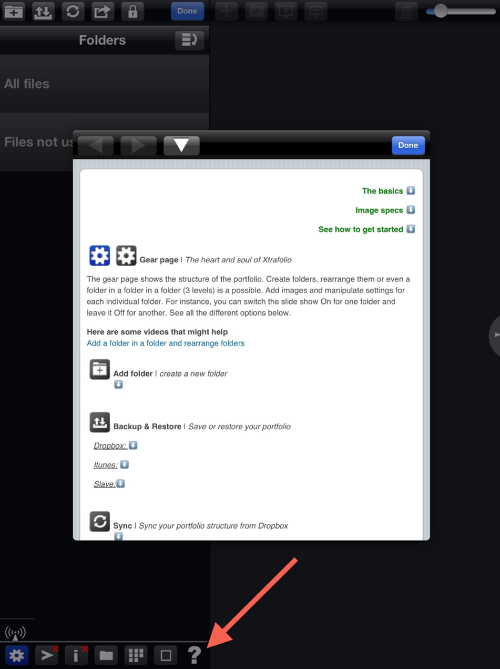
Their guide gives a good overview of each of the functions in Xtrafolio…but plan on taking some time to go through it to fully get a handle on using this app.
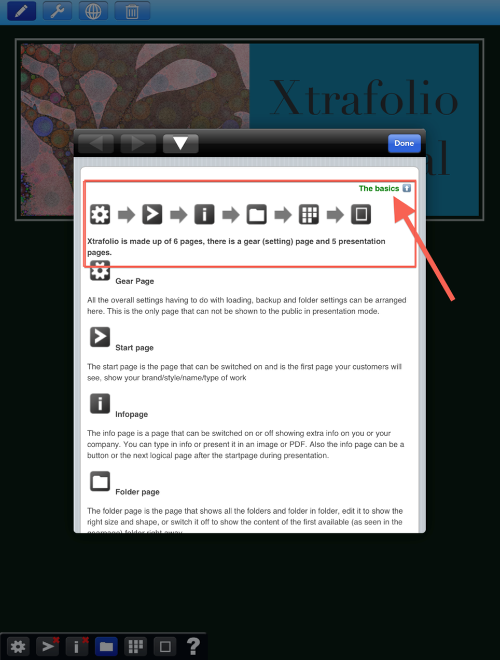
For example….clicking on the icon “The basics” will take you a through a tour of Xtrafolio’s structure…which I found came in handy! As you can see on the screen shot, it is made up of 6 pages, a gear (setting) page and 5 presentation pages. In this tutorial I’ll show you how to use the gear page to set up your first folder page. I’ll save the other pages for the future tutorials.
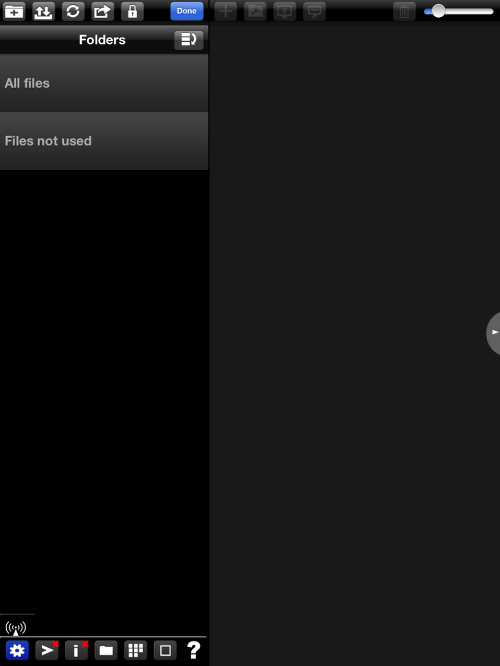
Okay! Back to start screen. Click on the “Done” icon at the top right corner of the Guide which should close it and leave you with this screen. Rather than go through what all the icons do, I’ll wait until it’s their turn…or you can read through the guide and find out! When clicking done on this page (folder page) you get left on the folder page. Perhaps you can start on the gear page and then tap help.
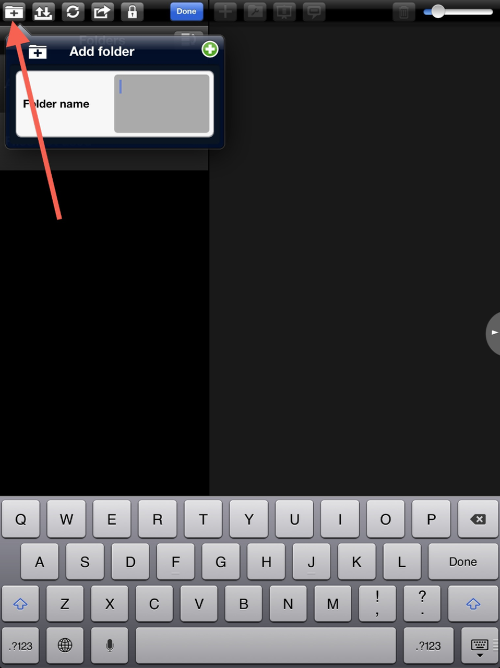
Let’s start with setting up a new folder, as this is where you will import your images into for your presentations. Click on the “Folder” icon in the top left corner…and the “Add folder” pop-up will present itself. As will your iPad keyboard so you can insert a folder name.
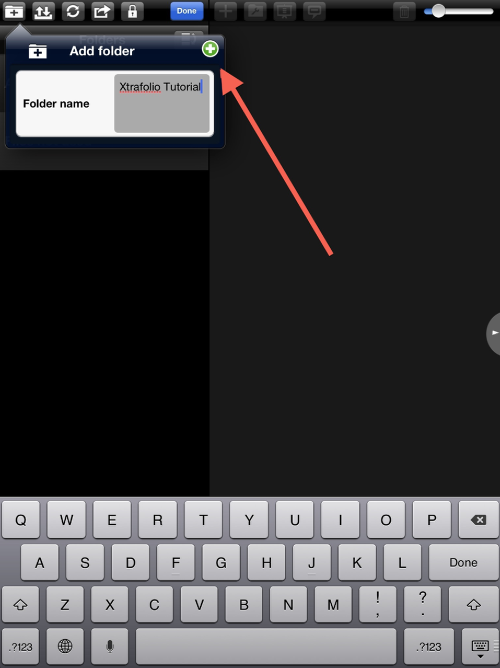
I’ve put in the title “Xtrafolio Tutorial”. Now, click on the green “+” icon or press done on the keyboard. This will close this window and create this folder.
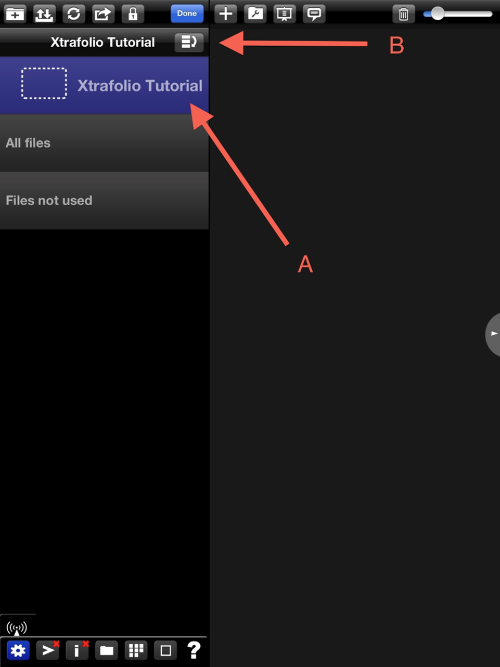
And here it is! Since this is the active folder, it will be highlighted in blue. To activate another folder, just click on it. Clicking on the icon at the top (B) allows you to rearrange the folders order. Made a mistake…just delete by swiping over the folder. More on that later…
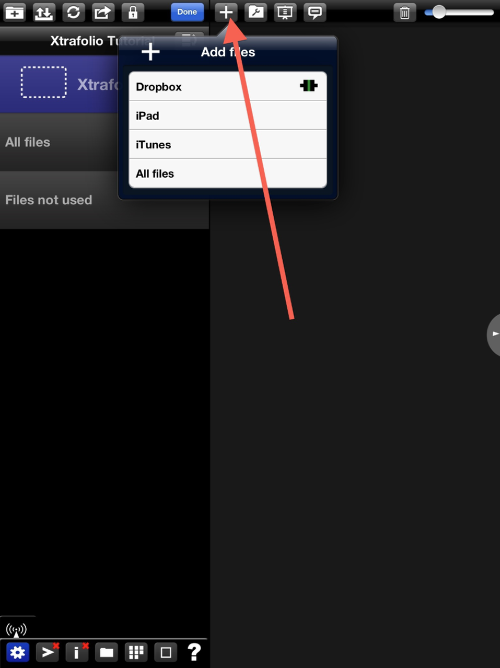
Now that you have a folder, it’s time to put something into it. Click on the “+” icon…and the Add files window opens. You have a choice of importing images from your Dropbox account, your iPad camera roll or from iTunes. (Hint: Do make sure you have your images organized in some fashion in any of these places. It will make life so much easier!) More advanced options also allow you to sync a whole folder structure (folders and images) from Dropbox. You can also use the green Dropbox icon to disconnect from one Dropbox account and then reconnect to another Dropbox account. We will have a look at this in another tutorial.
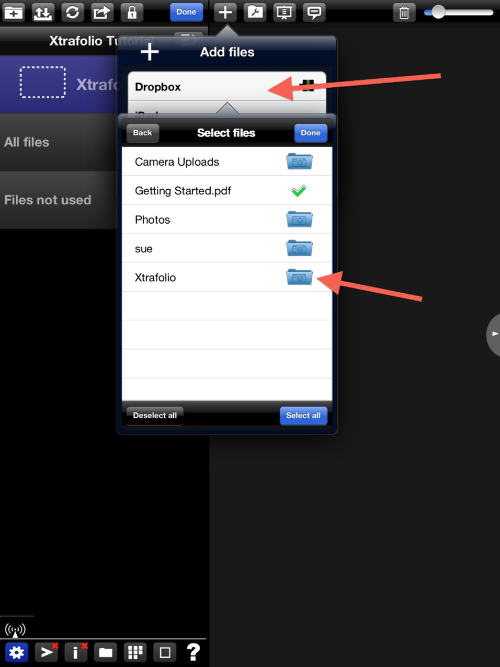
In my Dropbox account, I’ve created a folder called “Xtrafolio” where I’ve place three images that I want to import into my Xtrafolio Tutorial” folder.
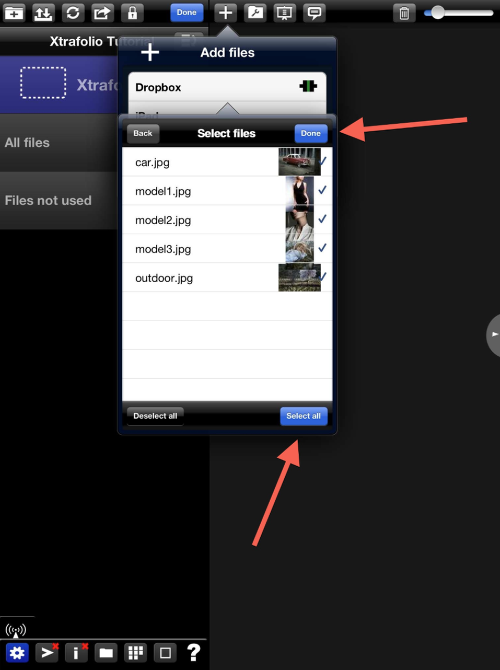
You can select each file individually…or click “Select all”. This done, click on Done to start the process!
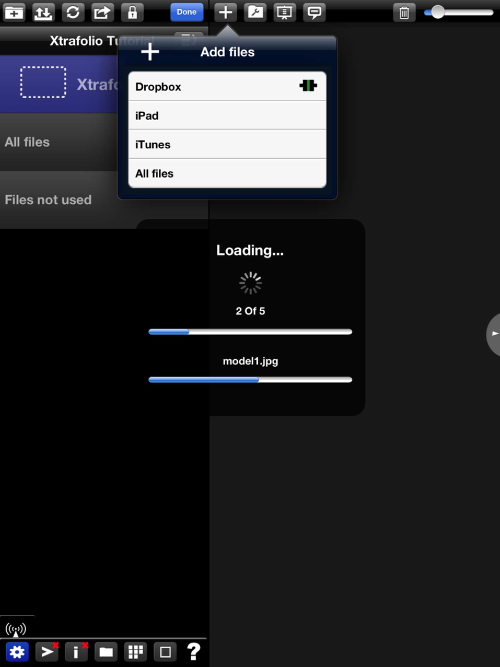
Xtrafolio gives you a progress screen that is nice little feature!
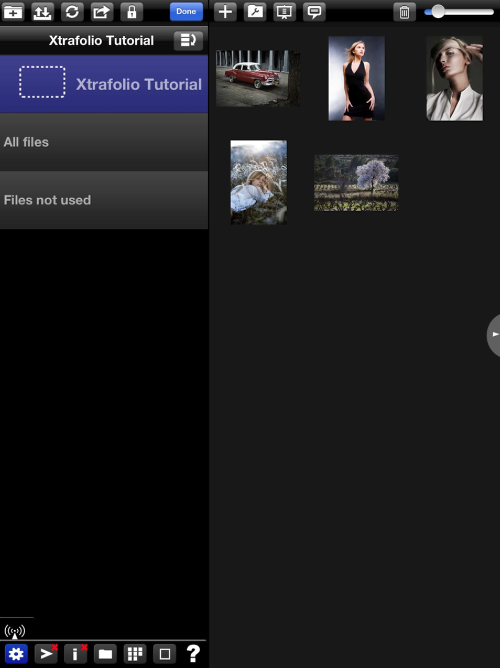
When done…thumbnails of your images appear in the viewing area. Change the size by sliding the top slider or show/hide file name from the side menu (little arrow).
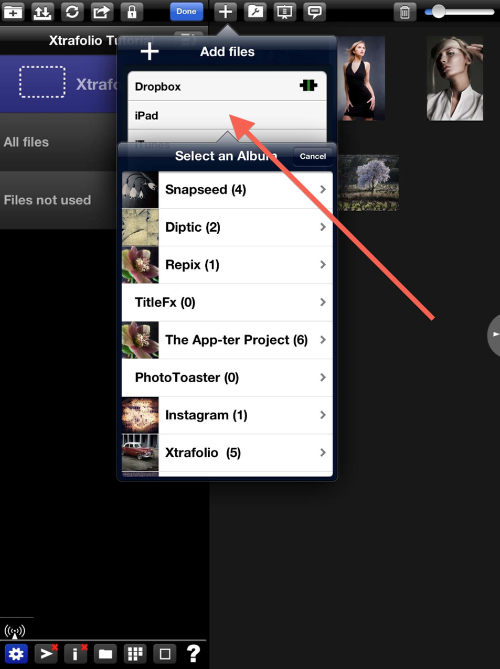
Repeating the process…this time going to my iPad image library…
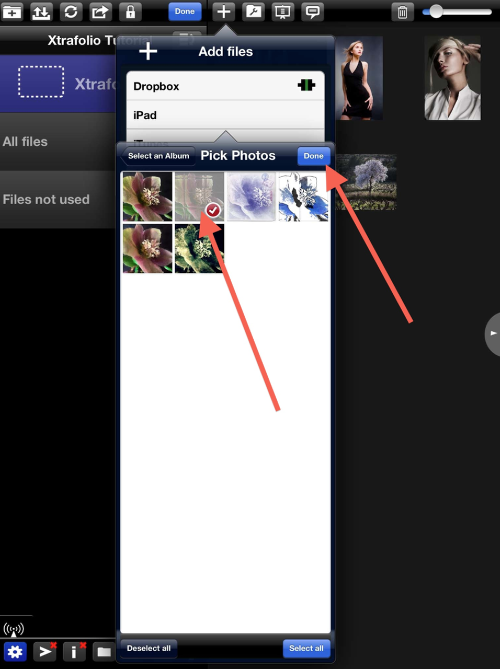
And as before, I clicked on an image…then clicked on “Done” to start the process…
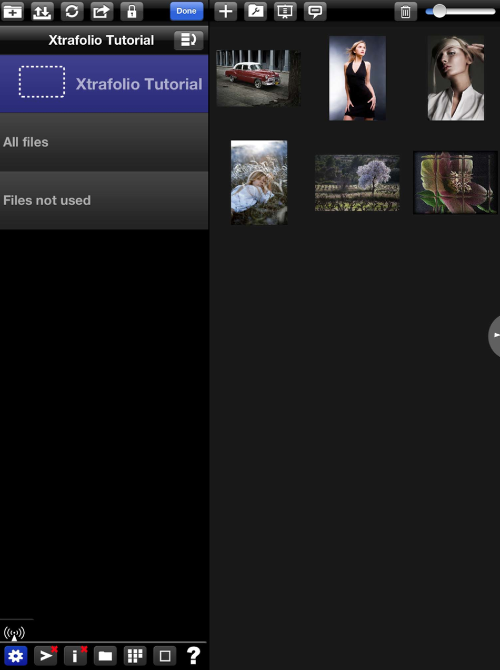
….with the thumbnail appearing with the others!! If you want to rearrange the order of the images, just “pick one up” and drop it at the correct spot.
Now that I’ve shown how to bring in images to your folders, let’s take a look at doing a little “customizing” of each folder. (I probably should have done this part first…oh well!)
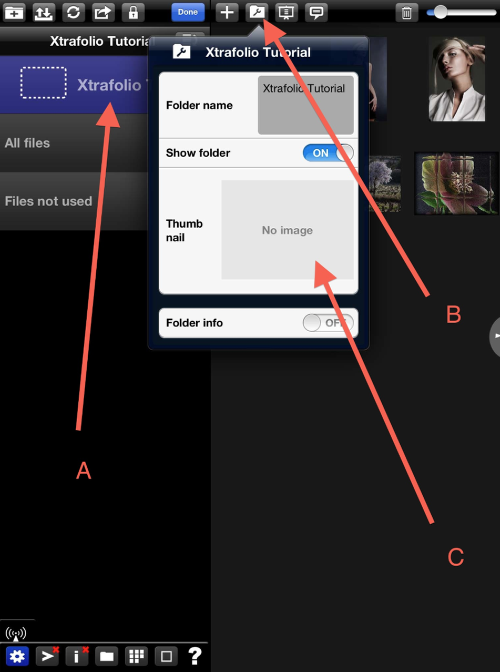
With the folder activated (A), click on the Folder settings “Wrench” in folder icon at the top (B). This will bring up this window. Since I already have the folder name in place…and I want the folder to be seen so I have the slider moved to “On”, let’s talk about adding a thumbnail image to the folder. Click on (C) where is shows “No Image” at the moment….
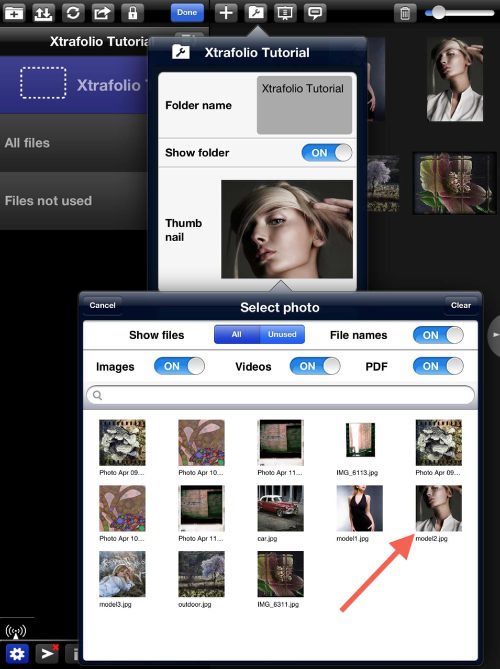
The “Select photo” screen will appear giving you sources to choose for your thumbnail image. Simply click on an image…and it will appear in the thumbnail window! If you want to show just a part of the image…it will appear in the the thumbnail window. Just like that!!
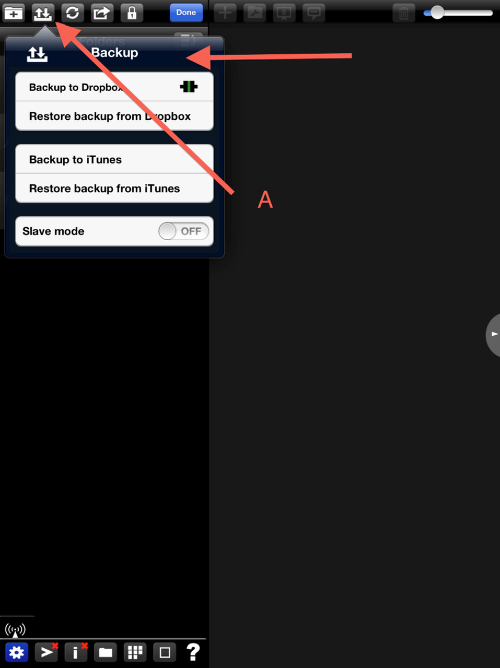
That brings me to the end of everything that I wanted to show you in this tutorial…except one all-important step! Setting Xtrafolio up to backup itself! You don’t want to lose all your work, do you! It’s a simple process! Just click on the “Double Arrow” icon (A)…this will bring up the Backup menu. From here, pick where you’d like your portfolio to backup. I chose “Dropbox” but iTunes is another option. When using Dropbox, the first time you do this, you will be given the set-up windows that are easy to follow. (I’d show you them, but since I’m already set-up…I can’t!) When backing up to iTunes, don’t forget to copy the .xtra file(s) that are created from iTunes file share to your computer.
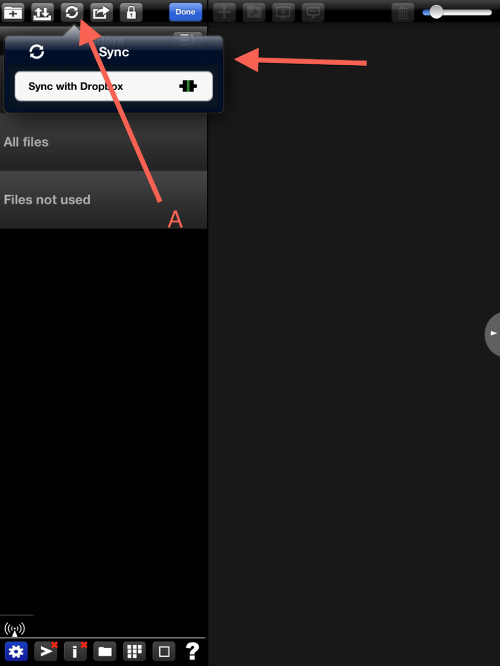
Another thing you can do, after you’ve set-up your Backup flow, is too also activate the Sync feature. This will allow Xtrafolio to automatically backup any changes you make. To do this, Sync (recycling icon), select a folder and go. The first time a copy from both sides (Dropbox and Xtrafolio) is made. After that, every time you press sync the changes will be “synced”. A nice touch as well!!
Okay! There you have it. Enough to get started. In the tutorials that will follow, I’ll show you more on formatting and styling your folders and portfolios, “hidden” control features to keep your portfolio “safe” from clients, and finally how to set-up for a slide show.
As always, please don’t be shy with your questions and comments! I’m still learning all the ins and outs of this powerful app…so your input would be most helpful!!
We have a brand new section for you to comment within our Forums about this – please follow this link – and click on Xtrafolio Tutorials.



2 Comments
Maryjane Sarvis
I’m so glad to see this! I have it but admit while I can tell its very useful I did get perplexed. Now I’ll be putting it into good use! Thank you! And thanks to Joanne too!
Dave
Maryjane ~ I felt the same way before I wrote this first tutorial on it. Made a lot more sense afterwards. I plan to have a follow up tutorial out very soon!