Software – Capture One Pro: Top 10 Features You Should Know About
Already popular with high-end imaging pros, Capture One is becoming increasingly popular with a much wider audience. Part of this could be the bundling with Sony mirrorless cameras or that, arguably, Capture One has better color and sharpness over Lightroom using the defaults. It may even be due to offering a choice between a subscription and traditional, perpetual licensing fee. Whatever the reasons for the growth in popularity, if you’re new to Capture One, there are several features you should know to help you improve your workflow.
If you’re thinking of switching to Capture One Pro, you can get a 10% discount on any of the Full Licenses and Styles, when you purchase directly from PhaseOne only. Simply enter the promo code AMBCARTER at checkout. Please note that the discount is not applicable to subscriptions.
Auto Adjustments
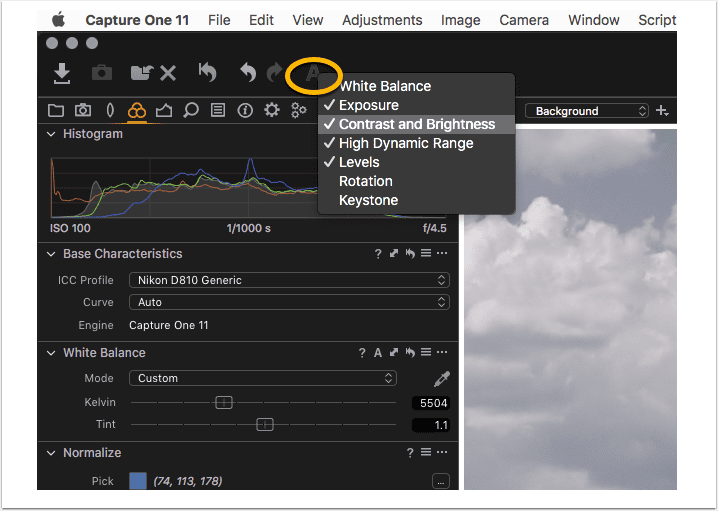
The Auto Adjustments feature in Capture One is a little different from the one in Lightroom. Simply clicking the A icon in the main tool bar automatically adjusts a number of parameters from various tools. Up to seven parameters can be selected but unless you’re using a Phase One digital back, you can ignore the Rotation and Keystone options. The default setting doesn’t enable White Balance either and in general it’s not good idea to include it, unless all the images were taken under the same (identical) lighting.
The all-inclusive Auto Adjustments option is available in the main toolbar of the default workspace, from the main menu (Adjustments > Auto Adjustments) and the importer dialog. You’ll want to head to the A icon in the main toolbar or menu first, to select which parameters you want it to alter. Then you can select it as an option when importing, saving you from doing it afterwards. Be warned though that it adds time to the importing process, so you’ll have to make allowances.
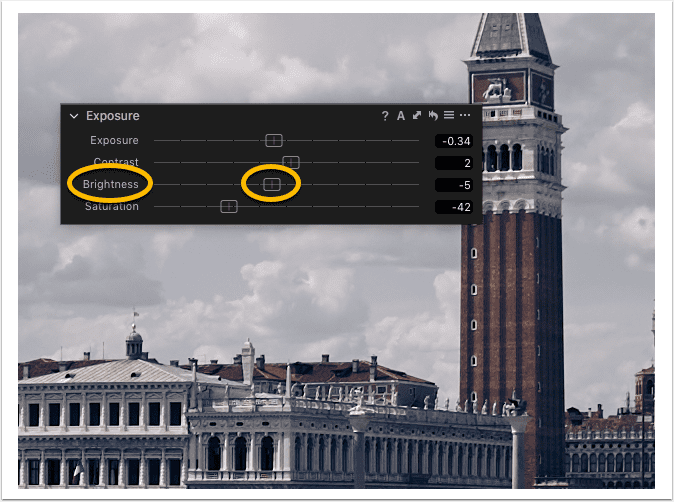
In general, you’ll want to enable Exposure, Contrast and Brightness and HDR. You may also want to include Levels. In each case, the optimal adjustment is applied and it’s great place to start.
Undo
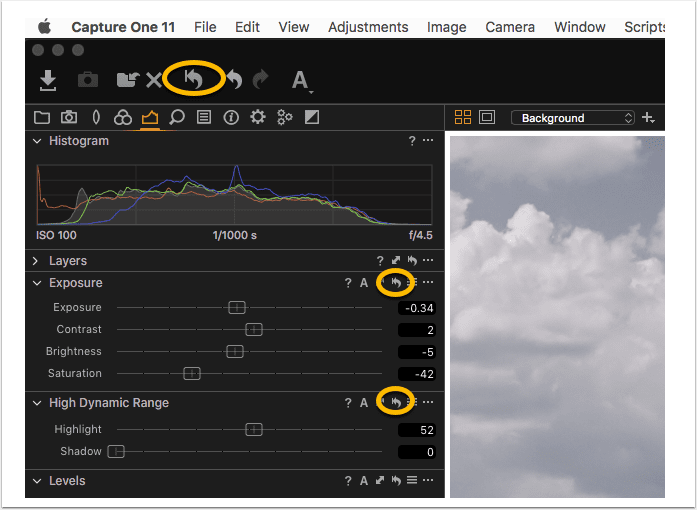
When making any complex series of adjustments you’ll invariably want to revisit some of those choices to start over. While Capture One has yet to inclued a listed history option, it does of course know the steps you’ve made and can keep track of them. If you use the Undo option you have a couple of choices. Editing steps can be undone in a linear fashion from either the main menu (Edit > Undo (cmd/ctrl Z)) or the curved arrow in the main tool bar, while more targeted editing can be undone, on a particular image (if you worked on more than one), from the same curved arrow icon tool’s title bar.
Resetting Parameter Adjustments
When you want to return a tools’ parameter setting to zero, so that you can start over, simply double-click on the parameter’s slider control button. This will reset any adjustment made. If you want to temporarily check the image without that adjustment, click on the parameter’s name in the tool and it will reset to zero while held. If you let go, the slider will return to its selected position and the adjustment will be reapplied.
Sessions
If you’ve only ever used Aperture or Lightroom, Catalogs are your only choice. There are plenty of advantages to them of course, especially if you’re maintaining a large body of work in one Catalog, and are constantly searching for images with keywords and other metadata. However, Capture One Pro is unique in offering an alternative management system called a Session.
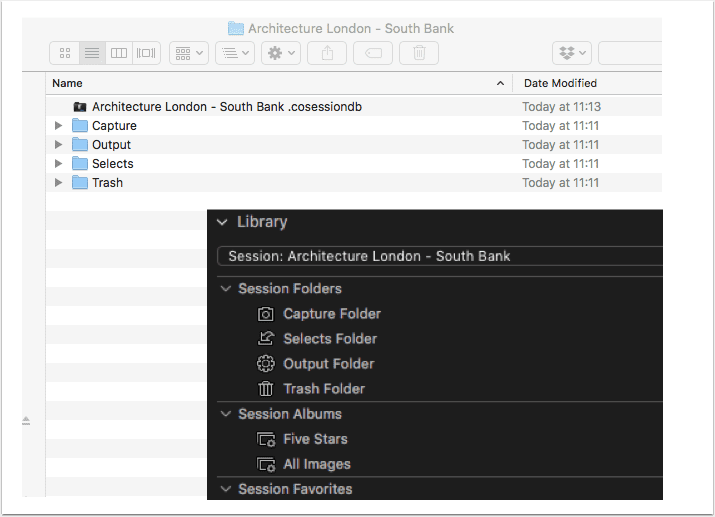
Sessions are mostly used by professionals for commissioned work, particularly on a job-by-job basis, and they’re excellent for that. If you’ve eight assignments in a day, for example, you can create eight seperate Sessions, one for each and keep everything separate. However, they’re often over-looked because of that association but many of those same benefits apply to enthusiasts. Sessions are well-liked in professional circles for their simple, and reliable, self-contained nature. These are real system folders not virtual folders like albums, so they’re easy to find, easy to move and easy to share. Every time you create a Session, Capture One creates one parent system-level folder – the Session folder and four system-level sub-folders (Capture, Selects, Output and Trash), like a template.
When you import images using the importer’s default setting, for example, Capture One will import (copy) files from your card to the Capture folder inside the Session parent folder. Keepers can be selected (and simultanoesly moved) to the Selects folder, deleted images are saved and moved to the Sessions’s Trash folder and when it comes to sharing, your converted RAW files are saved to the Output folder (as Jpegs of Tiffs), so you can keep track of what was used. When you want to share them, simply use the Library tool to locate the folder. To do this select the Output folder, ctrl/right click > Show in Finder/Explorer and then from the system dialog click and drag the Output folder to wherever you want to share it to, such as Dropbox, or a flash-disk.
Besides keeping all your images together by job or project, Sessions are light on resources. Every time you access a folder using the Library tool in a Session, an image preview is generated like a regular browser and this cache and settings are stored locally, in the sub-folder – there’s no ever-growing centralized storage of cache and settings files like you have in a Catalog. That also means you can use a Session to browse and edit your files on your computer or external disk without importing them, as you have to when using a Catalog. Although you can use any Session to do this, it’s best to create new one solely for the purpose.
Level Horizons
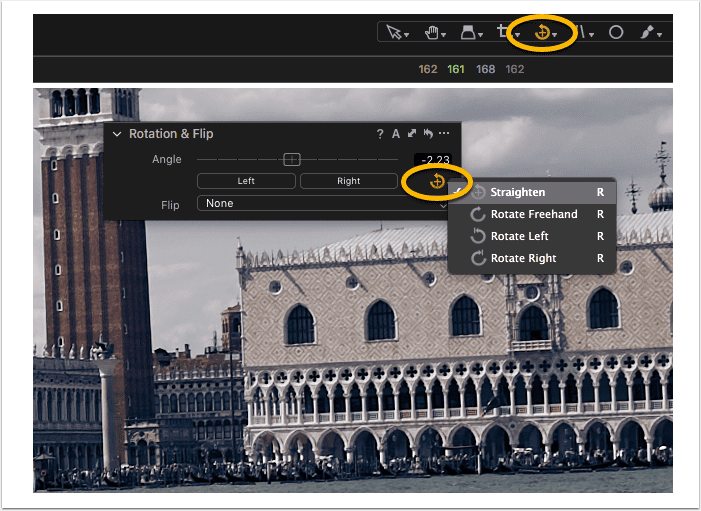
I’ll keep this simple. There are several choices in Capture One, some automated if you’re the lucky user of an IQ back, but the simplest and most accurate manually-applied option is the Straighten (R) cursor. It’s the first listed in the Rotate cursor group, and it’s also available from the Rotation & Flip tool. Simply select the icon (a curved arrrow with cross-hair) and click and drag over the horizon, or indeed any element in the image that you want aligned. It will even work with vertical elements, such as the edge of building to straighten it. Note the when selecting the shortcut R, make sure it’s the Straighten tool that’s selected from the cursor group, as R is used for each one – use shift R to cycle between cursors in the group.
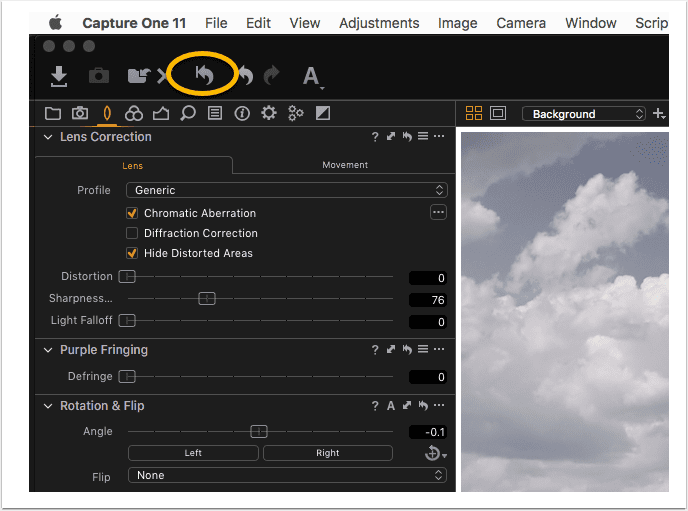
Before and After
Capture One doesn’t have a side-by-side before and after display view option, like Lightroom. You have to make a copy and then compare them. There are a couple of ways to do this, depending on where you are with your adjustments – if you haven’t started making any, selecting either New Variant or Clone Variant will actually lead to the same result – Capture One will make a copy without adjustments. If you’ve already made adjustments, selecting New Variant creates a new image from the source file without any adjustments. In practice it’s simple and works well even if it sounds a little complicated, however, there’s a far better, quicker and even easier way to compare. Simply option-click first (to avoid mistakes), then click on the Reset icon (curved arrow with a vertical bar) in the main tool bar for a quick, temporary view of the before (unedited) state. Then release to view the after (adjusted) state.
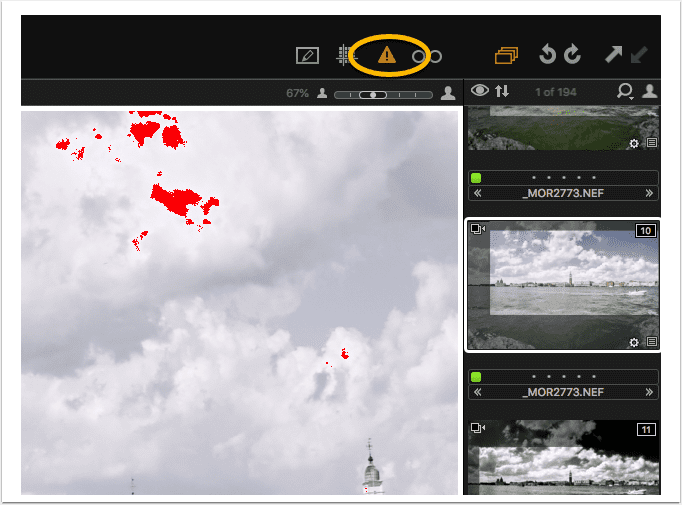
Clipping Warning
The default setting for Capture One includes a clipping option to show highlights that are devoid of detail. Click on the Show Exposure Warnings (warning triangle) icon in the main tool bar and a red-colored mask will display all those clipped areas. If you want to include a shadow warning (displayed as a blue mask) denoting clipped or crushed shadow detail, you’ll need to select that option from the preferences in the main menu. Once you can see what’s clipping you can make exposure or tonal adjustments to reduce or remove the warnings.
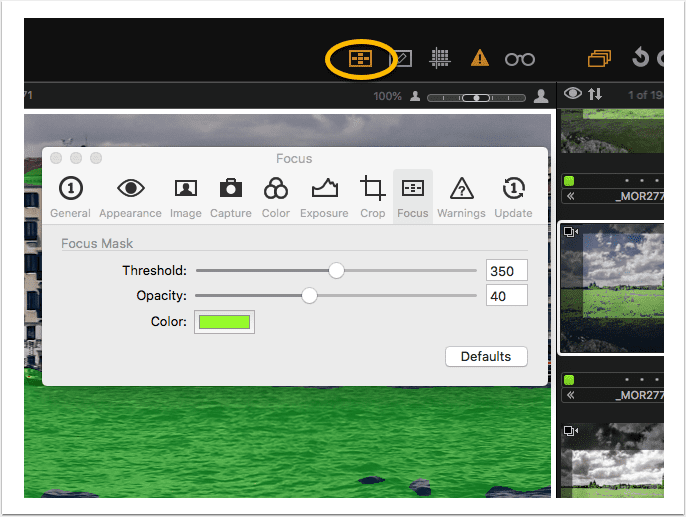
Focus Mask
One of the most under-used, perhaps little known, tools in Capture One is the Focus Mask. It works a little like Focus Peaking in a mirrorless camera, showing a mask over the area that’s in focus. This is an outstanding tool to quickly check if you’re images are in focus. The Opacity and Threshold at which the mask is triggered can be set from the Preferences (from the main menu, select Capture One > Preferences). If you have the Preferences dialog open with an image selected, you can fine-tune the threshold for the resolution of the camera-lens system. The Focus Mask is available from the main menu (View > Show Focus Mode) and as optional shortcut in the main toolbar (ctrl/right-click on the toolbar and select Customize Toolbar). From the dialog window that opens, click and drag the Focus Mask (AF target) icon to the main tool bar and drop it into position.
Grid Overlays
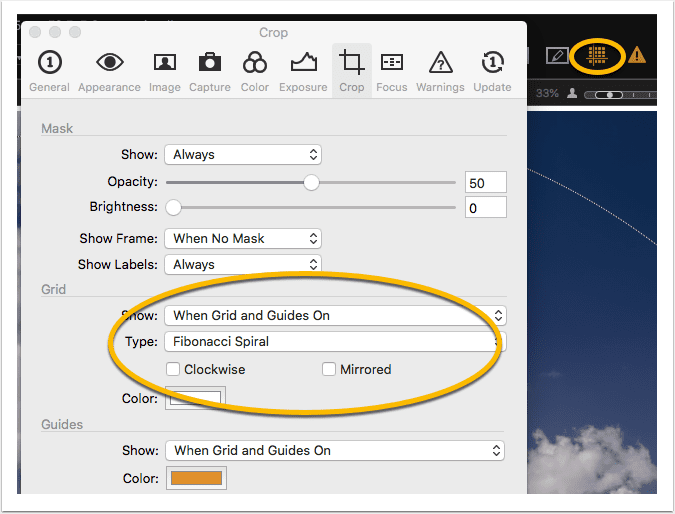
Capture One has several options for Grid overlays to help composition when cropping images. Capture One has a separate Guides feature as well, but that’s a customizable option intended for studio use, and different to what we’re talking about here. The default Grid setting is a simple 3 x 3 arrangement but there are plenty more options including a Fibonacici Spiral (similar to a Golden Spiral) and a grid based on the Golden Ratio as an aid to the placement of the motif.
The options are only available from the Preferences (Capture One > Preferences), you can’t select them via shortcut. Before putting in a support case to Phase One, the absence of a memorable shortcut is due mainly to there being several options there to display them, though it likely could be done. From the Preferences’ Crop dialog under Grid, select the When Grid and Guides On option from the menu. Next, turn the grid on in the viewer; from the main menu select View > Show Grides and Guides or hit the Show Grids and Guides icon the main tool bar. This will allow you to see the choices on-screen as you select them from the Grid Type menu in the aforementioned Crop dialog.
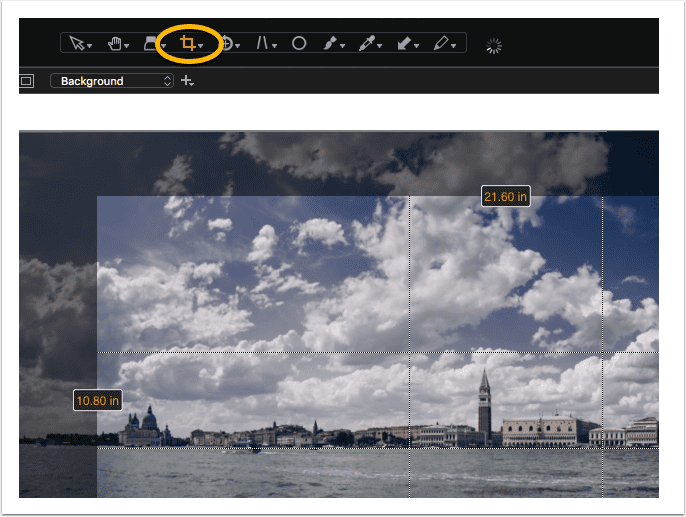
Applying a Crop
I wouldn’t call this a hidden feature exactly, but the application of a crop, available from the cursor bar or Crop tool in the Lens Inspector, catches out a lot of new users to Capture One, especially if you’ve come from Lightroom. That’s because there’s no Done option to apply the crop. In Capture One it’s a semi-automatic feature, where once you’ve made the crop to the image all you need do is select another cursor such as the Pan (H) or Select (V) cursor. If you don’t switch cursors the crop remains active and it’s this that initially causes confusion. Once you’re used to it, operation of the Crop tool becomes second nature, especially when using the shortcuts, and you’ll wonder why the others don’t follow suit. Any images that have been cropped are shown in the Browser with the area that’s been cropped as a mask, so you can identify them easily.
Kevin Carter
Kevin Carter is Head of Technical Hardware for theappwhisperer.com as well as ED of Digital Journal of Photography (DJP). Not one to sit still for long, Kevin is also a Professional Photographer and Technical Editor/Lens Guru for a number of technology and photography titles. These include the British Journal of Photography, Professional Photographer, Digital Photo Pro, DSLR User, Digital Photographer, CNET UK, PhotographyBLOG, MacUser and PC PRO, as well as PC Format and MacFormat, among others. Recently he became the Lead Technical Editor for DxOMark.