How to develop RAW files non-destructively with Affinity Photo 2
How to develop RAW files non-destructively with Affinity Photo 2
In Affinity Photo 2, you can now use the Develop Persona in a non-destructive RAW workflow as your ideas emerge. Read on to find out more about this new and highly anticipated feature.
Non-destructive RAW editing is finally here, and now in Affinity Photo 2 for both iPad and desktop, you are able to return to and redevelop your image at any time.
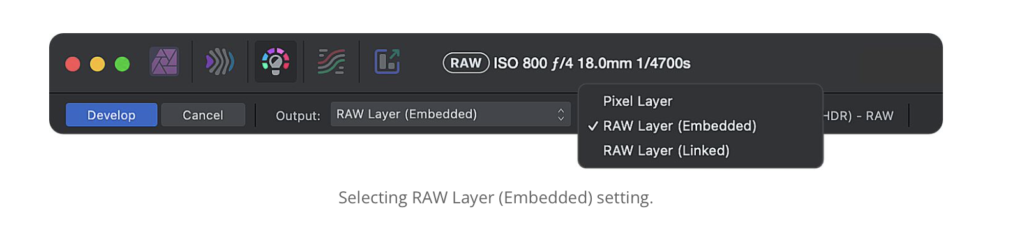
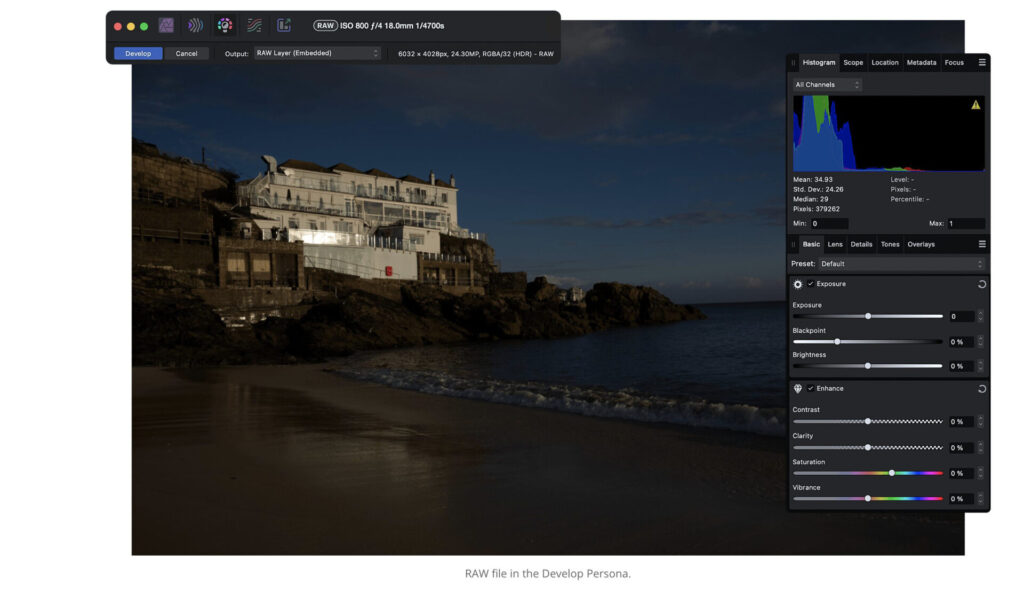
To get started and to be able to jump back into your RAW image development in the Develop Persona, we need to look into some settings available on the context toolbar. Upon opening your RAW file, you’ll notice that the process defaults to the Pixel Layer. Expand the list and you’ll notice two other options, which will allow you to return to the Develop Persona and re-edit your image. These are:
RAW Layer (Embedded)—This will embed the original RAW data with the document. This results in a larger file size depending on the number of adjustments and subsequent layers added.
RAW Layer (Linked) references the RAW data to the file in its location. This results in a smaller file size as file data is linked externally.
Sample workflow
Let’s have a look at how this new feature can come in handy.
First, when loading the file in the app, I am greeted by the Develop Persona. I’ll make my initial adjustments here. Before I do, however, I’ll select the RAW Layer (Embedded) option on the context toolbar, as this will allow me to redevelop the image should I wish to do so at a later time.
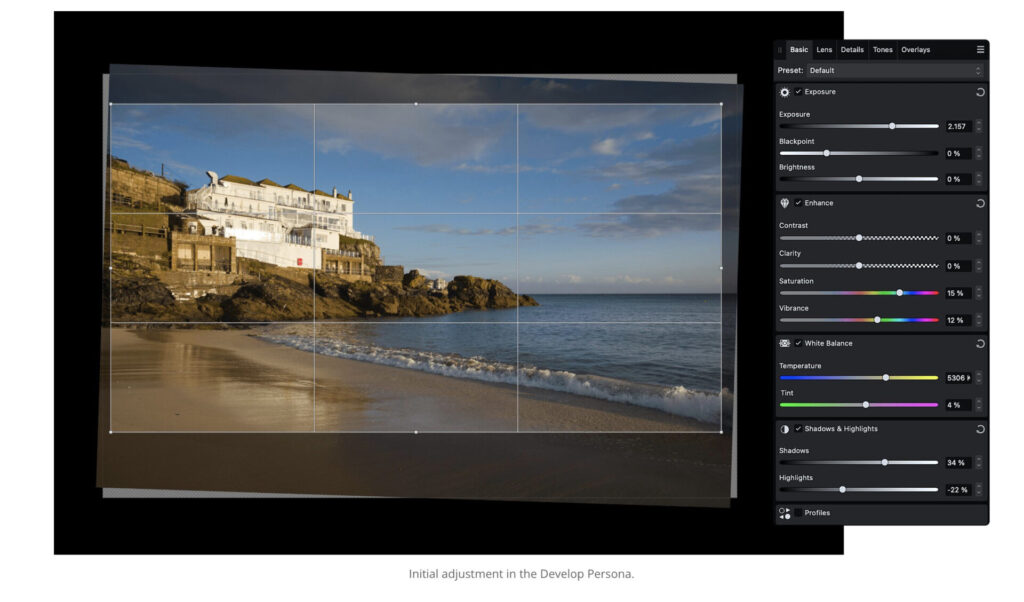
This is my starting image below. I’ll clean it up by applying the following adjustments:
- Crop and Straighten
- White Balance
- Exposure
- Shadows and Highlights

When ready, it’s time to take the image into the main Photo Persona, where additional adjustments will be performed. To do so, I click Develop in the top-left corner.
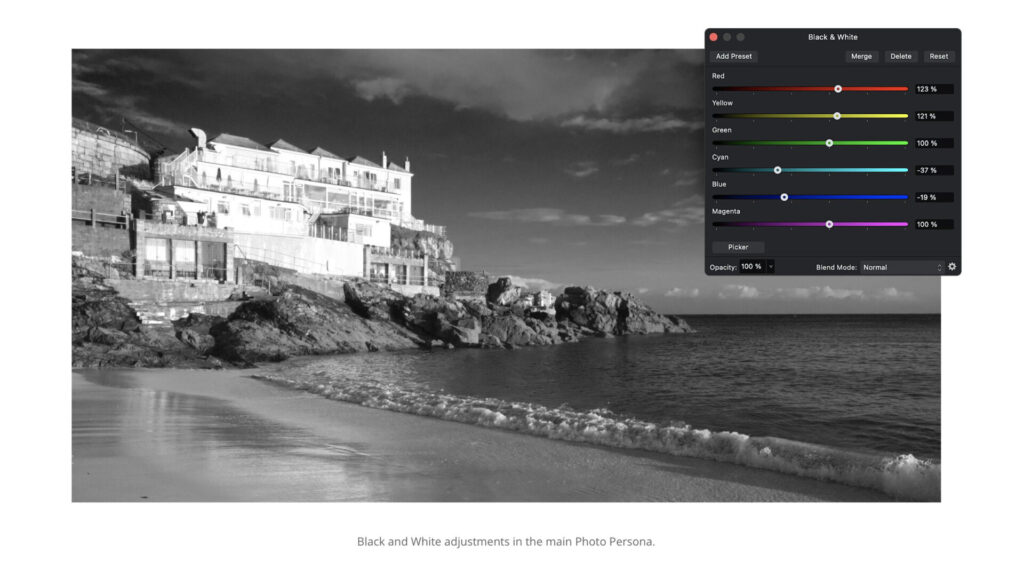
I may want to convert this image to black and white and work on the tones to decide on the final look of the scene. I’d like to render the photograph so that the building structure on the rocks stands out against the sky, which I need to darken. To do so, I’ll increase the Red and Yellow colour channel sliders while reducing the values for Cyan and Blue. This makes for a much more dramatic output.
I’m generally happy with the outcome at this stage, however to my eye, there are three issues:
- The fine detail in the building is now over-exposed.
- The temperature of the image could be further manipulated to add more drama to the sky.
- The vertical alignment of the building isn’t correct.
This is where I can return to the Develop Persona and further fine-tune my initial adjustments.

Whilst back in the Develop Persona (on the Basic panel) I adjust the Temperature and Highlights, which instantly creates the effect I was after. Next, to adjust the vertical alignment and allow for the building to be correctly positioned, I need to navigate to the Lens panel and modify the Verticalslider’s value. When ready, I click Develop once more and continue working.
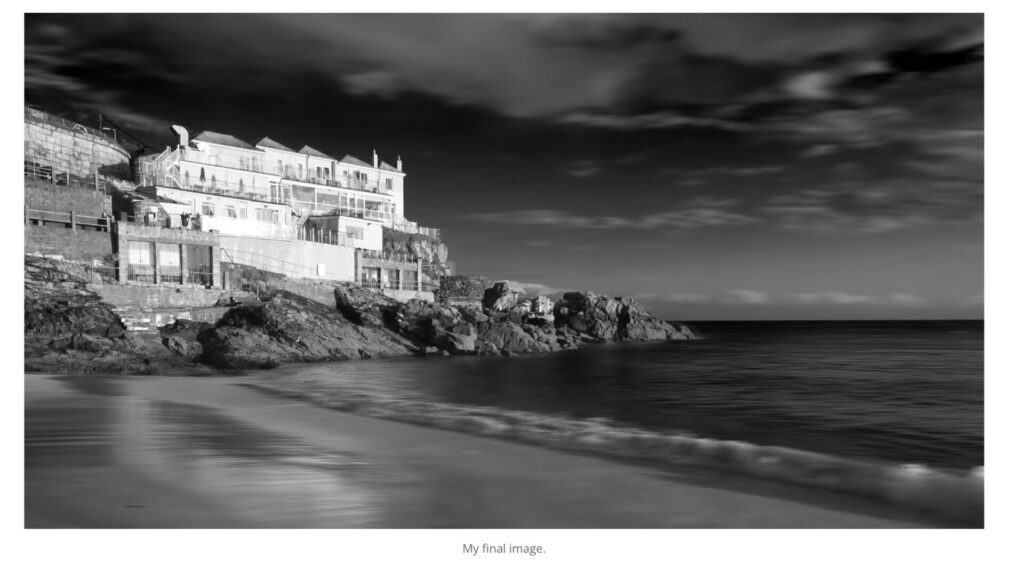
To finish this edit, I’d like to apply a Motion Blur filter to the sky and the sea, as well as sharpen just the building and the rock structures. And, of course, if at any point I’d like to re-edit the output of the tonal range of colours that create the atmosphere in the image, I can do so by navigating back to the Develop Persona from the Background layer.
And here’s my final image after the aforementioned final two steps.
To be able to jump back to the original RAW file is both liberating and extremely satisfying. As I manipulate the photograph further, I’m never worried that several of my previous changes might be fully committed and it isn’t possible to change my direction, should I want to. This allows me to create as I go along and adjust to the ideas that are constantly emerging.
Please support us
TheAppWhisperer has always had a dual mission: to promote the most talented mobile artists of the day and to support ambitious, inquisitive viewers the world over. As the years pass TheAppWhisperer has gained readers and viewers and found new venues for that exchange.
All this work thrives with the support of our community.
Please consider donating to TheAppWhisperer as this New Year commences because your support helps protect our independence and we can keep delivering the promotion of mobile artists that’s open for everyone around the world. Every contribution, however big or small, is so valuable for our future.