
Blind Mobile Photography with the Apple iPhone – Photo Education & Accessibility Tutorial
We are delighted to publish the first tutorial to our brand new section within theappwhisperer – Photo Education & Accessibility. There are many photographers and artists with special needs, whether this relates to visual issues even bordering on blindness (yes it’s true), to deafness (not many people know this, but I personally endure severe hearing loss) to many other difficulties that people suffer with, these include mental health issues, physical issues and more. We want to ensure that whatever your difficulty you can still enjoy photography and art, it’s so therapeutic.
We are therefore delighted to welcome Luis Perez to theappwhisperer family as our Photo Education Editor. We recently interview Luis in our Day in the Life series, if you missed that, please go here. Luis is an Apple Distinguished Educator whose work focuses on accessibility and inclusive design. He received his doctorate in special education from the University of South Florida in 2013 and is the author of Mobile Learning for All from Corwin Press. His work has appeared in THE Journal, The Loop Magazine, and the New York Times Bits Blog.
Luis is also partially sighted and ironically he turned to photography as a result of his vision loss, we hope you find this section as invaluable as we do. We have included written text with still screenshots as well as a video tutorial with subtitles/closed captions to help aid your accessibility. Over to you Luis (foreword by Joanne Carter).
“The iPhone is well known for its ability to capture excellent photos. Less well known by the general public is the way in which this device can empower individuals of all levels of ability with the built-in accessibility features included as part of iOS. These accessibility features make it possible for individuals who are blind or who have low vision to access the information in emails, ebooks. social media and more, giving them the opportunity to participate in society on a more level playing field.
The built-in accessibility features of iOS also open the door for individuals who are blind or who have low vision to use photography as a tool for creative expression (I addressed this topic in more detail in a recent “Day in the Life” interview on The App Whisperer). In this brief tutorial, you will learn how to make a photo using the VoiceOver screen reader on an iPhone. A screen reader uses speech synthesis technology to communicate what is on the screen of a mobile device like the iPhone to someone who can’t see.
This tutorial assumes that you are making your photos with an iPhone running iOS 7, the latest version of Apple’s software for its mobile devices.

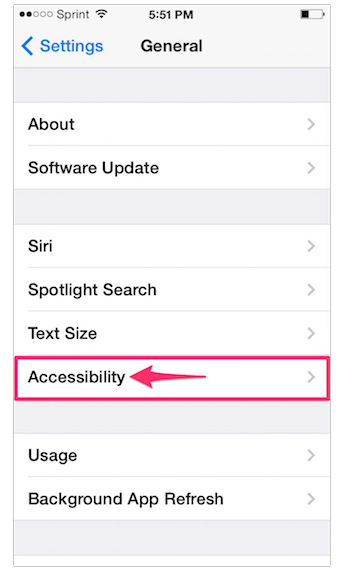
To get started, go into your device’s Settings and navigate to General > Accessibility.
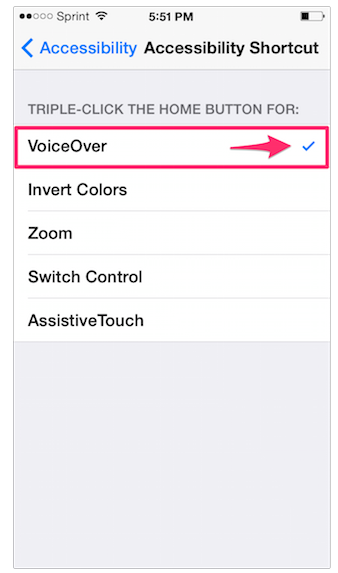
Next, select Accessibility Shortcut and make sure VoiceOver is the only option selected.
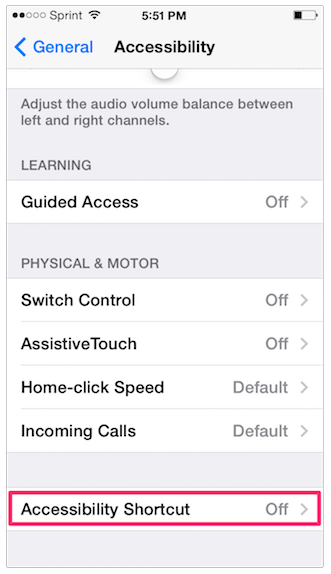
If Guided Access is already enabled, you may need to go back to the Accessibility pane and turn that feature off. What we are doing here is making sure that you have a simple way to turn VoiceOver on and off as you experiment with using it to make photos. With the Accessibility Shortcut, you can turn VoiceOver on and off at any time by triple-clicking the Home button on your device.
To make your first photo with VoiceOver:
- Press the Home button once to make sure you are on the Home screen (I am assuming that as a photographer you have the built-in Camera app on your Home screen or in the Dock for easy access).
- Triple-click the Home button to enable VoiceOver. You will hear the built-in voice announce “VoiceOver on.” You should also see a black rectangle over the currently selected item. This black rectangle is known as the VoiceOver cursor. By moving the cursor around on the screen you change what VoiceOver reads aloud.
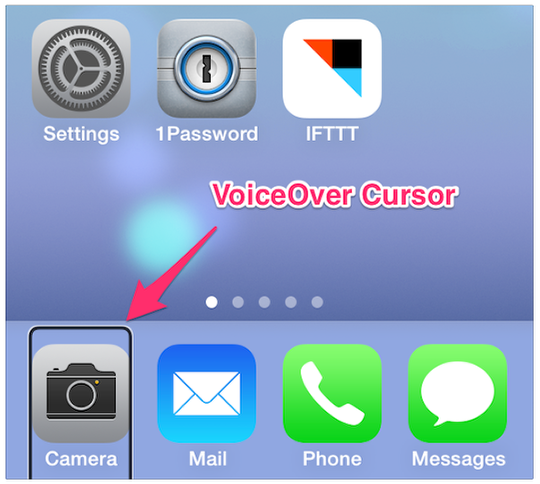
- Move your finger over the screen to hear the various apps and folders described to you. You can even hear information about your Wi-fi signal strength, the time, and your battery status by moving your finger close to the top edge of the screen.
- With three fingers, triple-tap the screen to turn the screen curtain on. Don’t worry: you did not just break your iPhone. The screen curtain just dims the screen so you can experience VoiceOver without relying on your vision.
- Continue moving your finger over the screen until you hear VoiceOver announce “Camera,” then double-tap anywhere on the screen with one finger. This will launch the Camera app.
- Now move your finger over the screen to hear the various options in the Camera app. To interact with a button or other control, make sure it has focus first (move your finger over it until VoiceOver announces its name) then double-tap anywhere on the screen to make a selection. Another way to navigate with VoiceOver is to use a flick gesture with one finger to go to the next or previous item, then double-tap anywhere on the screen when the desired item has focus to select it.
- Get a good friend to stand in front of you and aim the camera at him or her. VoiceOver will use face detection to let you know how many people are in the frame and their relative location (you should hear something like “One face, small face, face centered.”).
- Take the photo by triggering the shutter with one of the following actions:
- Double tap the screen with two fingers (also known as a Magic Tap)
- Press one of the volume buttons on the side of your device
- Press one of the volume buttons on your iPhone EarPods with Remote and Mic.
- Congratulations, you have just made your first photo with VoiceOver. Now let’s go into the Photo and Video Viewer (remember, move your finger until VoiceOver announces the desired item and double-tap with one finger).
- Once in the Photo and Video Viewer, move your finger over the screen until VoiceOver provides additional information about the photo you just made, such as the orientation of the device, the time when the photo was made, the number of faces, how sharp the photo is, and how well-lit (you should hear something like “Photo, Portrait, 5:03 PM, One face, Crisp, Well-lit Image”).
Alright, now let’s return your device to its typical mode of operation. This will be as simple as triple-clicking the Home button on your iPhone to invoke the Accessibility Shortcut we set up earlier. VoiceOver will be disabled and the screen curtain will be turned off so that you can once again see all your apps and folders and use your iPhone the way you typically do.
There is more you can do with VoiceOver in the Camera app, but for your first lesson I will keep it simple. Even if you are not blind or have low vision, consider how you might be able to use VoiceOver for photography in conditions where it might not be possible to easily see what you are capturing (such as in a brightly lit scene). With practice, you could use VoiceOver to help you capture photos in any situation, regardless of lighting conditions.
I leave you with one of my favorite sayings that I use whenever I do a presentation: you don’t need to see to have vision. My vision is a future where photography is accessible to everyone who has a passion for it.
Luis Perez
Luis is our Photo Education Editor he is also an Apple Distinguished Educator whose work focuses on accessibility and inclusive design. He received his doctorate in special education from the University of South Florida in 2013 and is the author of Mobile Learning for All from Corwin Press. His work has appeared in THE Journal, The Loop Magazine, and the New York Times Bits Blog. You can learn more about Luis’s work in educational technology by visiting his website at www.luisperezonline.com. To see more of Luis’s photography, visit his Instagram page at www.instagram.com/lfp1211.


3 Comments
Vanessa
A very important thematic, for so much people… thank you Joanne and Luis ♡
Sara mccracken
Thank you both for doing this. Also thanks to those at Apple who have worked on this.
I hope this will make many with disabilities feel more included.
Joanne Carter
Thank you Sara, yes that’s what I’m hoping too.