Samsung Galaxy S9+ Review: Best Samsung Camera To Date
Introduction
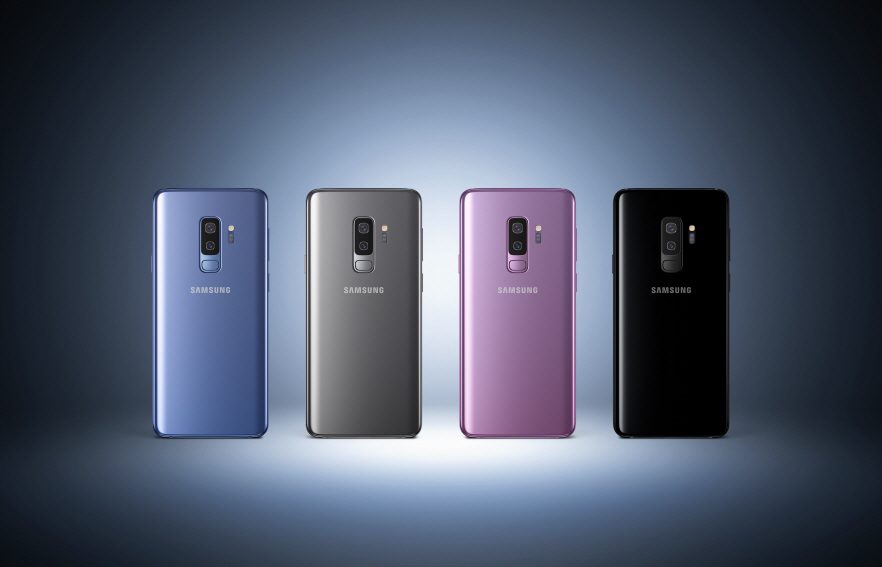
The Samsung Galaxy S9+ or plus reviewed here is the larger of the two Galaxy S series smartphone models but it also distinguishes itself by being the more-photo-oriented of the two by inclusion of dual rear camera modules.
The smaller, more pocket-friendly of the two, the S9 with its 5.8-in screen only has one rear wide-angle camera and so misses out on the telephoto camera and the background blurring options.
In that regard, the S9+ sits alongside the company’s slightly larger still Note 9 with its 6.4-inch screen which features an almost identical rear dual camera set-up.
As a result of the high-end dual camera feature, both the S9+ and Note 9 are regarded as the company’s flagship models and goes to show just how much weighting, the camera features are thought to influence buying decisions.
Where once the cameras were rudimentary at best, we’ve seen in recent models just how these camera features, and to a lesser extent the screens and built-in camera-apps are being used to differentiate between rivals.
Having said that, the S9+ camera-app’s interface is very similar to the Huawei P20 Pro, which, with it’s more advanced rear triple camera, is the model to beat.
In fairness, the S9+ camera specs look good on paper, though Samsung isn’t the only device manufacturer to concentrate their efforts on the wide-camera. Next to the P20 Pro, for example, with the S9+ Samsung have traded size for speed.
While the S9+ has a two-step aperture with a F1.5 maximum, the S9+ wide-camera’s 1/2.5-in type sensor is smaller and around half the size of the main camera in the P20 Pro. The P20 Pro also has a third-sensor in the rear array that’s used for augmenting low-light shots and estimating depth for the defocus blurring.
Key photo and video specs
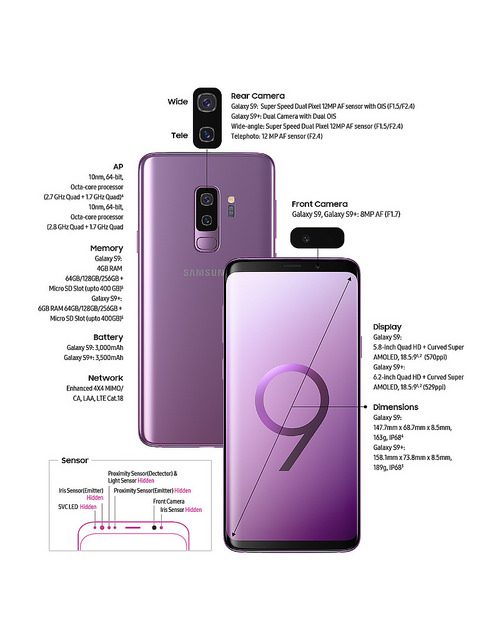
- Dual rear cameras, each with optical stabilization;
- Wide-angle camera module: 12MP F1.5-2.4, 26mm equiv. focal length, dual pixel autofocus
- Telephoto camera module: 12MP F2.4, 52mm equiv. focal length, contrast detect autofocus
- World’s first smartphone wide-angle camera with dual Aperture technology (variable F1.5/2.4 aperture)
- Live Focus mode offers background (and foreground) blurring for rear (and front) cameras
- Pro mode offers manual control, with RAW+JPEG option
- UHD 4K/60p video recording, slow-motion 1080/240p and super-slow 720/960p recording (when output at 30 frames per second)
Screen
The Samsung S9+ is without doubt a premium device and has a lot going for it. For a start it features a stunning AMOLED screen that’s easily on a par with the Apple iPhone X and the Huawei P20 Pro. Naturally it’s a little larger than the iPhone X and around the same size as that found on the Huawei P20 Pro, but occupies practically the whole width as it appears to wrap around the edge thanks that wonderful curved screen.
It must be some kind of optical illusion as the display image seems as if it’s suspended just a few microns below the screen’s surface.
Samsung has also avoided a notch at the top (or left when held horizontally), so for the wide-screen (cropped) stills mode and with video capture the overall viewing experience is about as it good as it gets in a smartphone currently.
If you dive into the display settings there are various color space settings to choose from, though they’re not exactly obvious what they are from the description. The default ‘Adaptive Display’ literally adapts both brightness and contrast to your particular viewing conditions, which makes for impressively saturated images with great shadow detail. On the flip-side, it means that when those images are viewed elsewhere they can look very different indeed. If you intend to keep your images on your S9+ – using the wonderful screen to show to others – it’s best to keep it set to that. Otherwise, change it to either ‘AMOLED Cinema/Photo’,which appears to use the same, wide-gamut P3 color space for both or use Basic, which adopts the more common web-oriented sRGB space.
Handling
The S9+ is quite comfortable to hold, as the thin frame between the glass panels provides something to grip. However, most modern high-end smartphones today are slab-sided glass front and back which tends to make them slippery, and, unfortunately, the S9+ is no exception.
After a decade or more of handling smartphones, I tend to find myself holding them all in the same way, with my left hand grasping the right side between finger and thumb so I can use my right to change modes, zoom and press the shutter-button.
Nevertheless, in my opinion a decent case such as a leather one with flap to cover the screen usually provides a secure grip (especially when holding the device by the case’s flap) and offers fair protection from accidents, especially to the screen. (You’re welcome.)
Camera and app
The S9+ has a twin camera array, just like the Apple iPhone X. However, its placement is squarely in the centre of the rear albeit towards the top of the device and next to the fingerprint scanner, which means in all probability you’ll be wanting to clean fingerprints off the lower lens on a regular basis. If you’re right-handed and holding the device horizontally using the home button to the right where the shutter button and combined zoom control is located, the LED flash sits under the lens array. So be careful not to obstruct that when holding the device.
In standard 4:3 aspect ratio the top or left hand-side of the device displays the various modes, including a Pro mode with extensive manual control via icons, displayed on the right in two columns, one over the image. This mode also has a RAW+JPEG file option. RAW capture is only possible in the Pro mode.
Both the Pro and Auto modes offer intuitive zooming by nudging the on-screen shutter-button up or down. Zoom magnification is shown but an option to switch to the equivalent focal length would be useful for me.
Icons thoughtfully turn as the device is rotated 90 degrees but the mode descriptions don’t, which kind of defeats the point. It’s the same with P20 Pro, but in both cases it’s only relevant when using the camera horizontally.
While you can rotate the device through a further 90-degrees with the icons following suit, the shutter/zoom control button stays put. Fortunately, you can use the volume control now located under your right-index feature as the shutter-button or opt for a ‘floating shutter button’ which can you place anywhere on-screen, if you don’t want trip the shutter or zoom using your left hand that is. Sadly, video capture and playback remain alongside the original shutter button.
One other minor frustration occurs when swiping on-screen for any reason – a fairly typical gesture on a smartphone – the camera changes mode. Admittedly this is perplexing at first but you soon learn to curb this behaviour. Personally, I would have liked to see some additional customization options.
Shooting Modes
The S9+ has several shooting modes, including a Food mode which applies blurring around the subject and another to capture Panoramas. However for everyday shooting most users will adopt either the full Auto or Pro modes provide access to the zoom or what Samsung call a Live Focus mode which is used to apply lens blurring like you might see using a ILC.
Auto Mode
Both Pro and the Auto modes are useful in their own right of course but for quick, shooting from the hip style, photography which is the essence of mo-pho (mobile photography), the Auto mode is perhaps the most satisfying in terms of user experience, especially when used with the ‘Adaptive Display option.
Like most modern smartphones the true amount of image processing behind the scenes is not always apparent, including the HDR option. When left to Auto, it’s not clear if it’s being used, especially as the Adaptive Display option alters contrast to widen the dynamic range on the fly. You can select HDR to be on permanently, and it works really well to produce realistic and authentic images even under heavily backlit shots, particularly with highlights but then images tend to be a little soft and lacking detail.
On the plus side the interface simpler with less distraction from parameter settings and options, and the results are incredibly impressive when there’s bright light, though inevitably less so in low-light levels. Despite the Dual Aperture technology, in Auto the device will frequently use the F2.4 aperture in low-light, and the S9+ prefers to keep the ISO sensitivity setting low (and therefore noise levels down). It rarely selects more than ISO320, and simply lowers the shutter speed to leverage the stabilizer. Bizarrely, you’ll sometimes see ISO400 or ISO500 when there are some brighter areas in the image. In either case if your subject is moving at all, this will lead to blurred images if you’re not more observant.
Pro Mode
As there’s no indication of the exposure settings (shutter speeds, aperture or ISO) in the Auto mode, the Pro mode is the more useful option. At least you can switch to F1.5 without it being overridden. Although the wide camera will similarly adopt the same low ISOs, slightly higher shutter speeds are selected instead but even then they could be higher.
It doesn’t really matter if you forget to adjust it, there’s not much difference in depth of field between F1.5 and F2.4 on a wide-angle lens like this, and image quality isn’t a lot different.
Although the Dual Aperture option is good to have it is available only on the wide-camera module. The second camera array is mostly used for the zooming option at x2 magnification and above, as well as the device’s Live Focus mode. When light levels drop though the wide-angle camera is used instead and cropped digitally.
Besides the additional control the Pro mode allows simultaneous Raw and JPEG capture. Raws look as if they’re partially processed while on the S9+ but if you want the ultimate in control, especially when it comes to exploiting the dynamic range, then Raw is the way to go.
In Capture One Pro, Raw files are handled impressively well, and I while I couldn’t quite match out-of-camera JPEGs exactly – out of camera JPEGs have fewer artifacts, better sharpness and distortion correction applied – the alternatives was near equal and perhaps better in some respects. Still, the amount of in-camera processing is impressive. If all you want to do is get them to look like they do on the S9+ screen, then shooting JPEGs maybe the way to go.
Live Focus Mode
Using the telephoto camera, the S9+ has a Live Focus mode that allows you to preview the defocus (bokeh) effect before capture. It is of course all produced by software, and the S9+ will blur the foreground as much as the background which is a bit of give away. Such is the pace of innovation in smartphones there are even newer models that can blur just the background. Interestingly, the S9+ captures both a wide and a tele shot simultaneously and combines the data from both in one image. As the telephoto camera uses a smaller sensor and has F2.4 aperture only, it’s best used in bright light – though to be fair it does warn you of that. You can adjust the blur before and after capture. But images have very low sharpness and the blurring is not all that realistic, so perhaps it’s best to use it sparingly.
Video
Video options are plentiful, too many to talk about here in any great detail, other than to say that the S9+ produces impressive, highly detailed video in 4K (UHD). Colours are somewhat saturated especially reds when left to the default settings but both 60 and 30 fps modes are great. A slo-mo 1280 x 720 (960 fps) mode which is triggered by motion detection was rather tardy to detect the motion in our test scene (water fountain) and clips are cropped, yet it is a fun if somewhat gimmicky addition.
Conclusion
What we like:
- Image quality using the Wide Camera
- Low light capabilities (with stationary subjects)
- Screen quality and color (space) options
- Pro mode has control of and displays full exposure settings (and can control Dual Aperture tech), and RAW+JPEGs
What we don’t like:
- Live Focus mode produces less detailed images with unrealistic blurring (unless used sparingly)
- Tele-camera limited to bright light only (small sensor, no Dual Aperture option)
In the hands the S9+ is certainly an impressive device. With its rounded edges and superb image, the screen is one of main highlights. It has perhaps the best screen currently available; JPEGs look great and yet Raws don’t look that much different on-screen, suggesting there’s some additional processing taking place as once off the device Raws aren’t quite so impressive. Given the time taken to make them look like out-of-the camera, you have to argue why not use them instead? Nevertheless, you can quite easily edit Raws successfully, so kudos to Samsung for the simultaneous JPEG+RAW capture option.
I enjoyed using the S9+ immensely and while the Live Focus (bokeh mode) option has limited appeal to me the tele camera (using the zoom option) is useful in bright light but, it is the wide-camera that appeals the most. The option of good quality 4K video is another attraction. It is without doubt one of the best and most capable of the current crop of smartphones, and it makes me wonder just how good Samsung could have made it using a larger sensor and a tweak of the exposure algorithm to adopt faster shutter speeds.
Check prices and availability of unlocked, sim-free devices:
Hello again, please donate…
We have a small favour to ask. More people than ever are reading TheAppWhisperer.com and we could not be more excited about that. We bring you ad-free journalism every day, so you don’t have to close windows and be distracted with advertisements. We specialise in mobile photography and mobile art and we value all of our readers, writers, contributors and viewers but we do have costs and we do need to ask for your help. We at TheAppWhisperer spend many hours each day, each week and each month to bring you this high quality level of journalism. We do it because we are passionate about it and because we want others to be as passionate too.
If everyone who reads our website, who likes it, helps to support it, our future would be so much more secure. Please help us by offering a contribution or supporting us with a monthly donation of your choosing.
[seamless-donations]
Kevin Carter
Kevin Carter is Head of Technical Hardware for theappwhisperer.com as well as ED of Digital Journal of Photography (DJP). Not one to sit still for long, Kevin is also a Professional Photographer and Technical Editor/Lens Guru for a number of technology and photography titles. These include the British Journal of Photography, Professional Photographer, Digital Photo Pro, DSLR User, Digital Photographer, CNET UK, PhotographyBLOG, MacUser and PC PRO, as well as PC Format and MacFormat, among others. Recently he became the Lead Technical Editor for DxOMark.